PEM Community Manager User Manual
1. Introduction
Pragma Edge Community Manager (PCM) is an enterprise solution built on IBM Sterling B2B Integrator, designed to simplify and accelerate the onboarding of trading partners using secure protocols such as FTP, SFTP, FTPS, AS2, HTTP/S, SMTP, and IMAP. PCM enables seamless data translation across multiple formats, including but not limited to EDI, EDIFACT, XML, SWIFT, HIPAA, HL7, and flat files, ensuring compatibility with diverse business requirements.
The Community Manager combines the ability to handle Managed File Transfer (MFT) and B2B functionalities into a unified setup, allowing for effortless management of both processes. This approach provides a user-friendly and adaptable platform that accommodates partner-specific variations without the need for complex coding.
By leveraging the power of IBM Sterling B2B Integrator, Pragma Edge Community Manager delivers next-generation B2B and file transfer capabilities. This comprehensive solution is designed to meet the evolving demands of businesses, providing a scalable and efficient way to manage B2B interactions and secure data transfers.
Experience a seamless, integrated approach to MFT and B2B operations that empowers your organization to thrive in a dynamic market.
Efficient Partner Onboarding
PCM significantly reduces the time and complexity involved in trading partner onboarding. It supports a broad range of protocols such as SFTP, FTPS, AS2, HTTP, HTTPS, REST, and web services. Key features include:
- Scheduled File Transfers: Automate file transfer processes to ensure timely data exchanges. This minimizes the need for manual intervention, reducing human error and streamlining workflows.
- Dynamic Partner Management: This capability allows organizations to easily activate or deactivate partners as needed.
- Self-Service Capabilities: Trading partners can manage their files and perform uploads/downloads.
Workflow Automation
PCM Application provides the flexible partner setups at various levels—B2B, MFT, transaction, and file—without the need for coding. The user interface is designed to deliver a consistent experience, with standardized workflows that can be reused across the organization. Workflow applications coordinate tasks between human actions and automated processes, significantly improving daily business operations.
End to End Monitoring
PCM provides comprehensive, end-to-end file monitoring solution that enables organizations to capture, enrich, and contextualize file activity as it flows across the Sterling application.
It provides full traceability of file movements, offering actionable insights that highlight how file processes impact core business operations. This situational awareness enables teams to detect and respond proactively to exceptions, delays, or potential SLA breaches—before they impact the business.
1.1 Login Page
The Pragma Edge PCM Portal is a unified interface designed to support multiple user roles through secure, role-based access. Whether you’re an administrator, business user, data processor, or partner, the portal provides a streamlined experience to setup, manage and monitor operations efficiently.
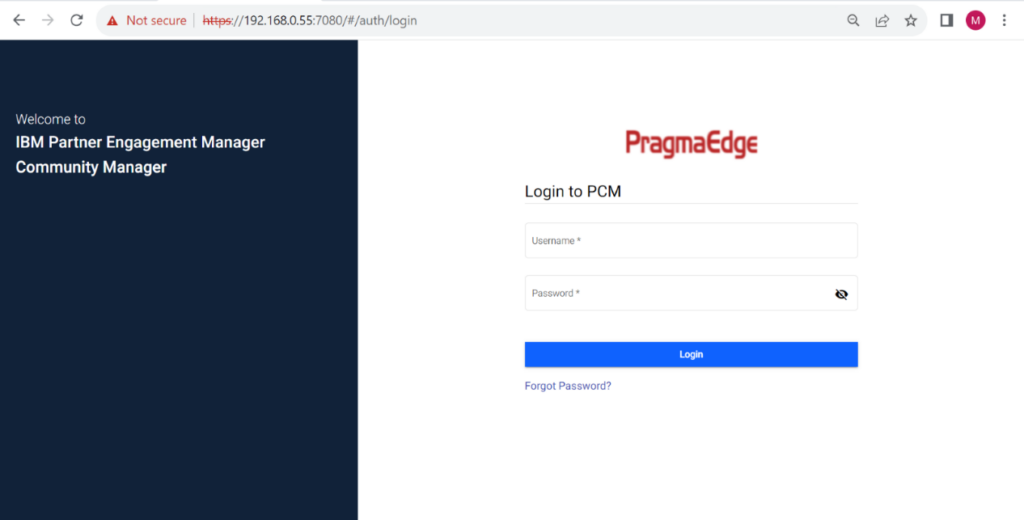
This is the login page of PCM. You can use your login username, password, and click on the login button. You will be logged in. In case you are not able to login or forget your password, please contact the PCM Support Team.
1.2 Portal Navigation
The Homepage would be visible once you have successfully logged in. It will be File Transfers -> Search, where you can search for your files which are processed.
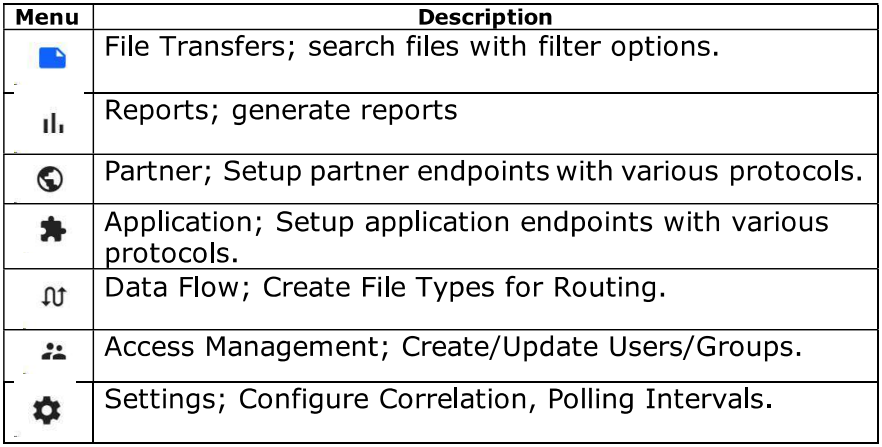
Each menu has its own set up of sub menus, which are available at the top of the horizontal pane. The menu, which is selected appears as blue icon, whereas the rest appears in black. By default, the first sub menu page is displayed, and users can select any other sub menu asper their option.

The Application Title can be configured as per the customer
needs in the configuration. (Refer to https://www.ibm.com/docs/en/spems/6.2.3?topic=manager-configuring-pcm-installation for more details on the configuration)
The default title is Client, which would be visible if the title is
not configured.
2. Access Management
2. Access Management
File Processor:
File Processor has the same permissions as business user and restrict user from viewing the file option and with reprocess, repick up and redrop privileges.
The user with this role has permission to perform the following tasks.
File Transfer Search:
- User has access to File Transfer Search where partner section can be restricted based on if the user is assigned a set of partners or groups, in which case would restrict the dropdown to the assigned partners.
- Perform File transfer search and Advanced search and can view all options under Action (View Details, View Activity, Pickup Now, Reprocess, Drop Again), but won’t have access to see the content of the files.
- Export the File transfer details based on items per page.
- Configure required columns on File transfer search.
Reports:
- Users can draw reports based on requirement.
- Generate reports for Dataflow, 997 overdue (If configured as part of development)
- Generate reports for transaction volume report, Doc type reports, Volume by Partners
Partner/Frontend Gateway Management:
- The user has access to all the partner setups with only view permissions which restrict the user from making any changes.
- Manage Partner: Can view the Partner setups.
Application/Backend Gateway Management:
- The user has access to all the partner setups with only view permissions which restrict the user from making any changes.
- Manage Application: Can view the application setups.
Data Flow Management:
- Users can validate the dataflow setups but cannot make any changes which can also be restricted to a set of partners or groups.
- Manage dataflows based on the Partner and Application
- Manage all existing rules.
Access Management: NO ACCESS
Settings: NO ACCESS
Data Processor Restricted:
Data Processor Restricted has access to the report’s module and doesn’t have access to the reprocess button in File transfer’s search and cannot access any other modules.
The user with this role has permission to perform the following tasks.
File Transfer Search:
- PARTIAL ACCESS: Perform File transfer search and Advanced search and can view only few options under Action (View Details, View Activity) and cannot view Pickup Now, Reprocess, Drop Again options.
Reports:
- Generate reports for Dataflow, 997 overdue (If configured as part of development)
- Generate reports for transaction volume report, Doc type reports, Volume by Partners
Partner/Frontend Gateway Management: NO ACCESS
Application/Backend Gateway Management: NO ACCESS
Data Flow Management: NO ACCESS
Access Management: NO ACCESS
Settings: NO ACCESS
Data Processor:
Data Processor has access to File Transfer Search and Reports and has access to reprocess files.
The user with this role has permission to perform the following tasks.
File Transfer Search:
- User has access to File Transfer Search where partner section can be restricted based on if the user is assigned a set of partners or groups, in which case would restrict the dropdown to the assigned partners.
- Perform File transfer search and Advanced search and can view all options under Action (View Details, View Activity, Pickup Now, Reprocess, Drop Again).
- Export the File transfer details based on items per page.
- Configure required columns on File transfer search.
Reports:
- Users can draw reports based on requirement.
- Generate reports for Dataflow, 997 overdue (If configured as part of development)
- Generate reports for transaction volume report, Doc type reports, Volume by Partners
Partner/Frontend Gateway Management: NO ACCESS
Application/Backend Gateway Management: NO ACCESS
Data Flow Management: NO ACCESS
Access Management: NO ACCESS
Settings: NO ACCESS
Business User:
Business User have full access to the file transfers and reports modules and have only view access to the partner, application, and dataflows until assigned a set of partners or groups.
The user with this role has permission to perform the following tasks.
File Transfer Search:
- User has access to File Transfer Search where partner section can be restricted based on if the user is assigned a set of partners or groups, in which case would restrict the dropdown to the assigned partners.
- Perform File transfer search and Advanced search and can view all options under Action (View Details, View Activity, Pickup Now, Reprocess, Drop Again).
- Export File Transfer Details based on Items per page.
- Configure required columns on File Transfer Search
Reports:
- Users can draw reports based on requirement.
- Generate reports for Dataflow, 997 overdue (If configured as part of development)
- Generate reports for transaction volume report, Doc Type Reports, Volume by Partners
Partner/Frontend Gateway Management:
- The user has access to all the partner setups with only view permissions which restrict the user from making any changes.
- Manage Partner: Can only view the Partner setups.
Application/Backend Gateway Management:
- User has access to all the application setups with only view permissions which restrict the user from making any changes.
- Manage Application – Can view the Application setups.
Data Flow Management:
- Users can validate the dataflow setups but cannot make any changes which can also be restricted to a set of partners or groups.
- Manage dataflows based on the Partner and Application
- Manage all existing rules.
Access Management: NO ACCESS
Settings: NO ACCESS
Business Admin DPR (Data Processor Restricted):
Business Admin DRP has access to all the modules until a specific partner or a group is assigned to the user except for Access Management and Settings menu where they don’t have access and for File Transfers Search with limited access.
The user with this role has permission to perform the following tasks.
File Transfer Search:
- User has access to File Transfer Search where partner section can be restricted if the user is assigned a set of partners or groups, in which case we restrict the dropdown to the assigned partners.
- Perform File transfer search and Advanced search, but don’t have access to Reprocess, Pickup Now and Drop Again.
- Export the File Transfer Details based on items per page.
- Configure required columns on File Transfer Search
Reports:
- Users can draw reports based on requirement.
- Generate reports for Dataflow, 997 overdue (If configured as part of development)
- Generate reports for transaction volume report, Doc Type Reports, Volume by Partners
Partner/Frontend Gateway Management:
- Users can set up partners and manage until a set of partners or groups are assigned which would restrict the user to the assigned group of partners.
- Create Partner
- Manage Partner (Update/Delete/Activate)
Application/Backend Gateway Management:
- Users have access to all the applications and can create and manage them.
- Create Application
- Manage Application (Update/Delete/Activate)
Data Flow Management:
- Users can set up dataflows, update flows, create and manage rules.
- Build and Manage Dataflows based on the Partner and Application (Update/Delete)
- Create Rules
- Manage Rules (Update/Delete)
Access Management: NO ACCESS
Settings: NO ACCESS
Business Admin:
Business Admin has access to all the modules until a specific partner or a group is assigned to the user except for access management and settings.
The user with this role has permission to perform the following tasks.
File Transfer Search:
- User has access to File Transfer Search where partner section can be restricted if the user is assigned a set of partners or groups, in which case we restrict the dropdown to the assigned partners.
- Perform File transfer search and Advanced search and can view all options under Action (View Details, View Activity, Pickup Now, Reprocess, Drop Again).
- Export the File Transfer Details based on items per page.
- Configure required columns on File Transfer Search
Reports:
- Users can draw reports based on requirement.
- Generate reports for Dataflow, 997 overdue (If configured as part of development)
- Generate reports for transaction volume report, Doc Type Reports, Volume by Partners
Partner/Frontend Gateway Management:
- Users can set up partners and manage until a set of partners or groups are assigned which would restrict the user to the assigned group of partners.
- Create Partner
- Manage Partner (Update/Delete/Activate)
Application/Backend Gateway Management:
- Users have access to all the applications and can create and manage them.
- Create Application
- Manage Application (Update/Delete/Activate)
Data Flow Management:
- Users can set up dataflows, update flows, create and manage rules.
- Build and Manage Dataflows based on the Partner and Application (Update/Delete)
- Create Rules
- Manage Rules (Update/Delete)
Access Management: NO ACCESS
Settings: NO ACCESS
On boarder:
On-Boarder role has access to the modules below.
The user with this role has permission to perform the following tasks.
Partner/Frontend Gateway Management:
- User has full access to the Partner setups until a set of partners or groups are assigned.
- Create Partner
- Manage Partner (Update/Delete/Activate)
Application/Backend Gateway Management:
- The user has full access to the Application setups until a set of partners or groups are assigned.
- Create Application
- Manage Application (Update/Delete/Activate)
Data Flow Management:
- Complete control over data flow setups until assigned a set of partners or groups.
- Build and Manage Dataflows based on the Partner and Application (Update/Delete)
- Create Rules
- Manage Rules (Update/Delete)
File Transfer Search: NO ACCESS
Reports: NO ACCESS
Access Management: NO ACCESS
Settings Module: NO ACCESS
Admin Role:
Admin has access to the Settings and Access Management Modules.
The user with this role has permission to perform the following tasks.
Access Management:
- User has the access to create the users and update them but cannot delete users.
- Create and Update Users. (Update/Activate)
- Create and Manage Groups (Update/Delete)
Settings Module:
- Users can configure Correlation Names for File Transfer Search, set up Polling Intervals and Schedule File Jobs.
- Setup Correlation Details
- Configure Pooling Intervals
- File Job Scheduler
Partner/Frontend Gateway Management:
NO ACCESS
Application/Backend Gateway Management:
NO ACCESS
Data Flow Management: NO ACCESS
File Transfer Search: NO ACCESS
Reports: NO ACCESS
Super Admin Role:
Super admins are the administrators of the application. They are responsible for managing the specifications based on the business requirements and have access to the entire system.
The user with this role has permission to perform the following tasks.
File Transfer Search:
- Perform File Transfer Search and Advanced Search and can view all options under Action (View Details, View Activity, Pickup Now, Reprocess, Drop Again).
- Export File Transfer Details based on Items per page.
- Configure required columns on File Transfer Search
Reports:
- Generate Reports for Dataflow, 997 Overdue (If configured as part of development)
- Generate Reports for Transaction Volume Report, Doc Type Reports, Volume by Partners
Partner/Frontend Gateway Management:
- Create Partner
- Manage all the partners in the system (Update/Delete/Activate)
Application/Backend Gateway Management:
- Create Application
- Manage all the applications in the system (Update/Delete/Activate)
Data Flow Management:
- Build and Manage Dataflows based on the Partner and Application (Update/Delete)
- Create Rules
- Manage all Existing Rules (Update/Delete)
Access Management:
- Create and Manage Users created on Community Manager (Update/Delete/Activate)
- Create and Manage groups (Update/Delete)
Settings Module:
- Manage Correlation fields based on the Process/Map Integration
- Manage Polling Intervals
- File Job Scheduler
2.1 Tabular Access Representation
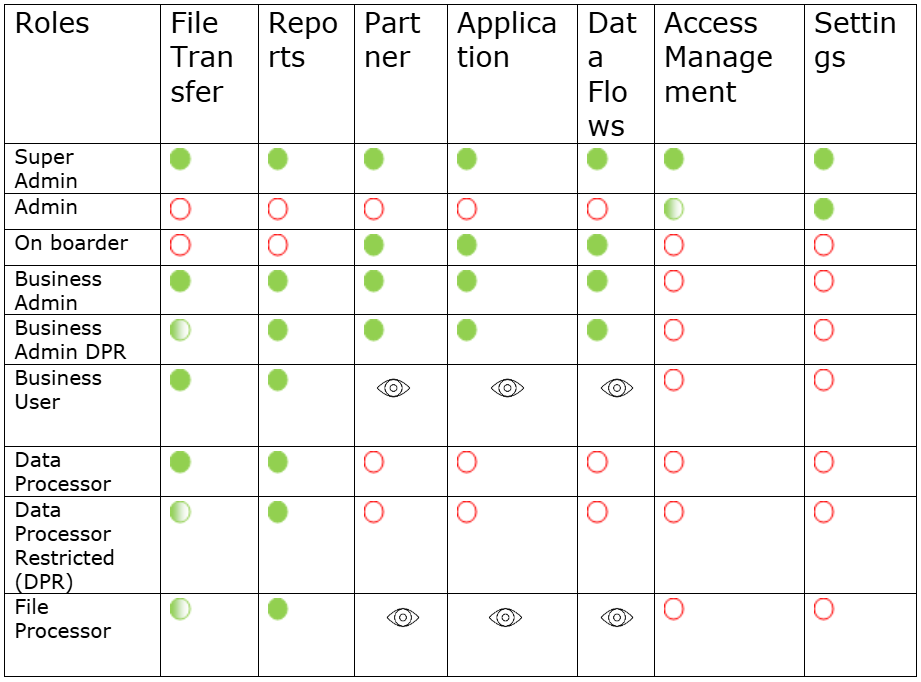
Admin: Admin can create users but cannot delete the users hence has partial access to the Access management module.
Data Processor Restricted: This user has partial access to File Transfers module, where Reprocess, Pickup Now and Drop Again button is not visible to this user.
File Processor: This User has restrictions from viewing the file option and with reprocess, repick up and redrop privileges.
NOTE: Partners or groups are to be added to restrict the user to a particular set of setups.
2.2 Manage User and Group
Manage User option helps to search for the created users, view and edit the information and to activate and deactivate the users and to view the activity logs through Audit Info.
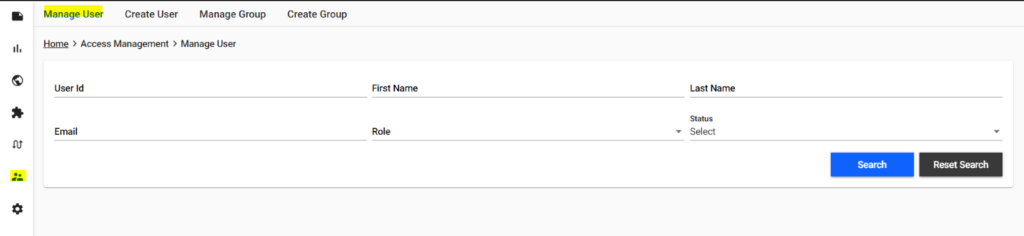
Navigate to Access Management -> Manage Users
We can search for the user based on User Id, Email, Role or Status (Active/ Inactive). Select any of the options and click Search.
We can Activate/Deactivate, Edit, Delete and View Aduit Info of the user by clicking on Actions for each user.
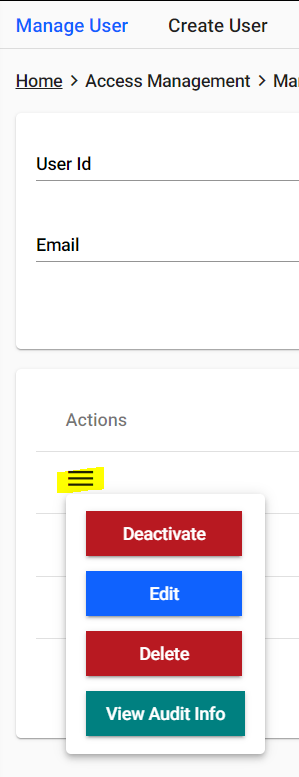
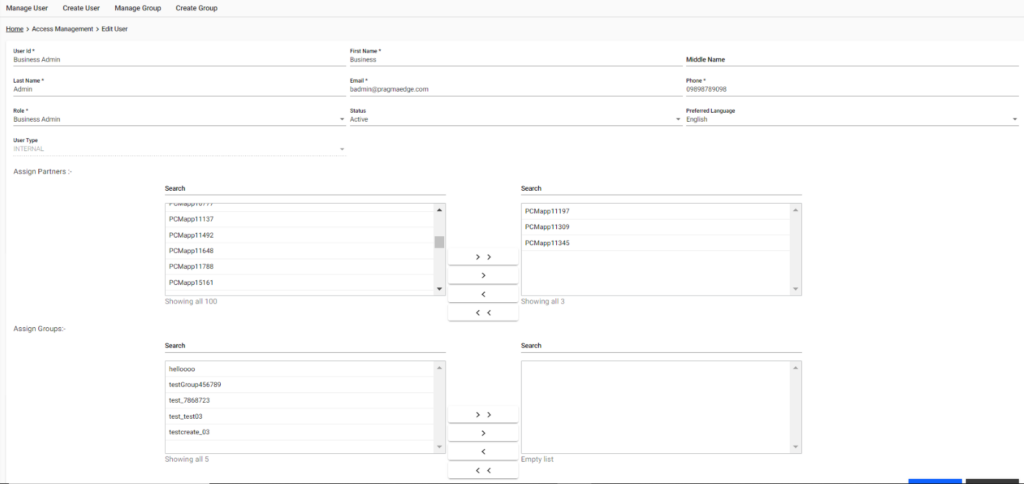
We can click on Actions-> EDIT to view the user information along with the Assigned Partners/Groups to the respective user and can update if required.
We can click on Actions-> View Audit Info to view the activity history of the user setup.
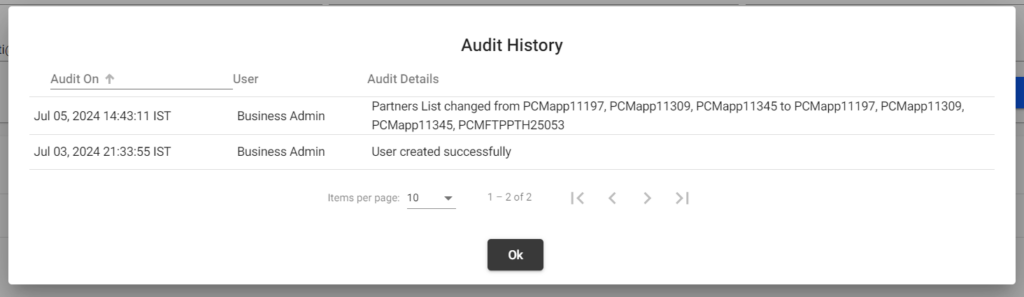
We can see the history of what has happened to the user, who created the user and when it was created, and all other changes made to the user.
Manage Group option helps to search for the created groups, view and edit the information and to view the activity logs through Audit Info.
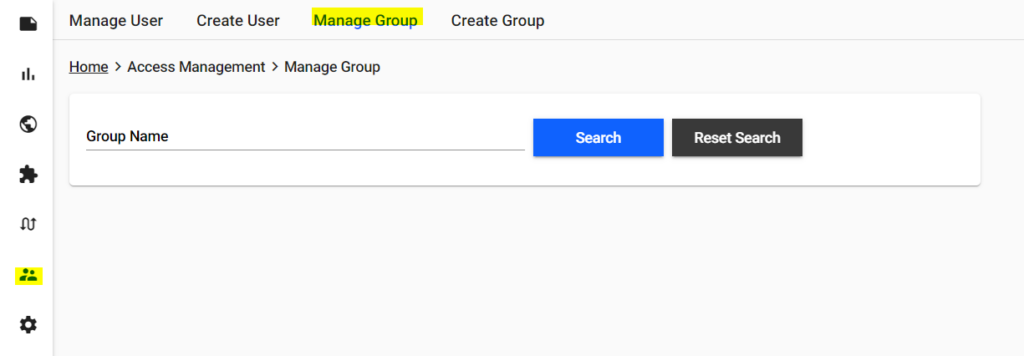
Navigate to Access Management -> Manage Group
We can search for the Group based on the group name and click Search.
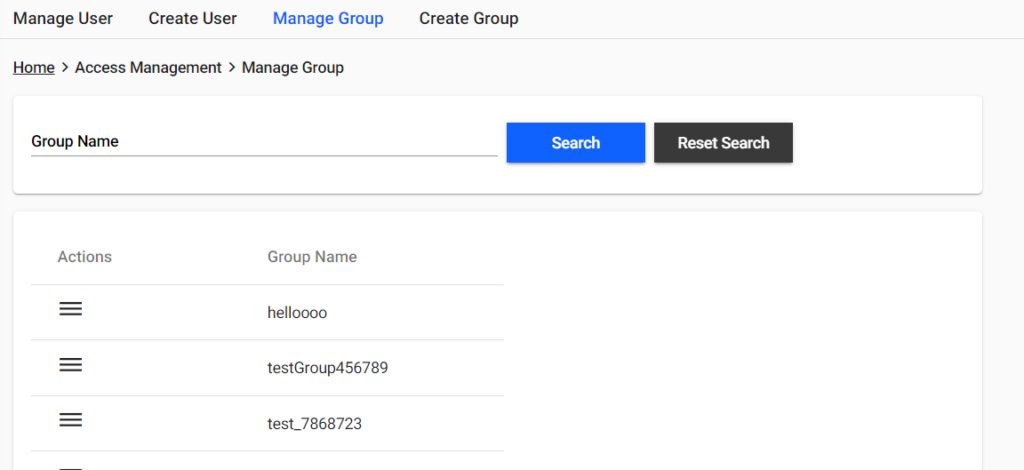
We can Edit, Delete and View Aduit Info of the Group by clicking on Actions for each group.
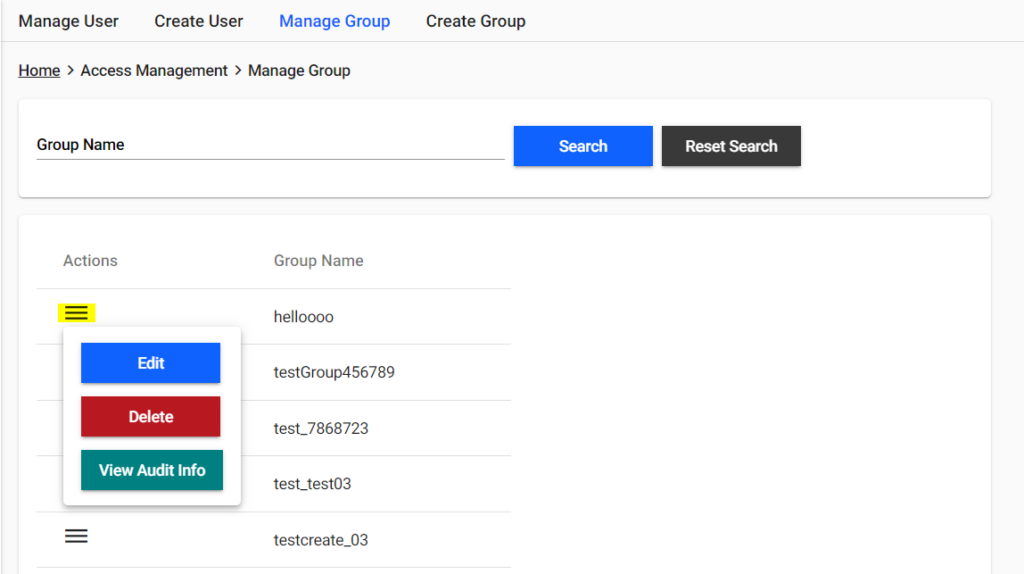
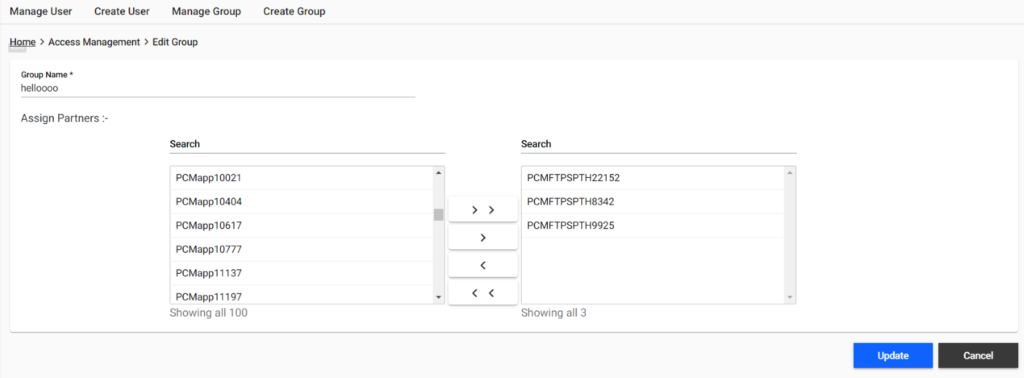
We can click on Actions-> EDIT to view the group information along with the Assigned Partners to the respective group and can update if required.
We can click on Actions-> View Audit Info to view the activity history of the user setup.
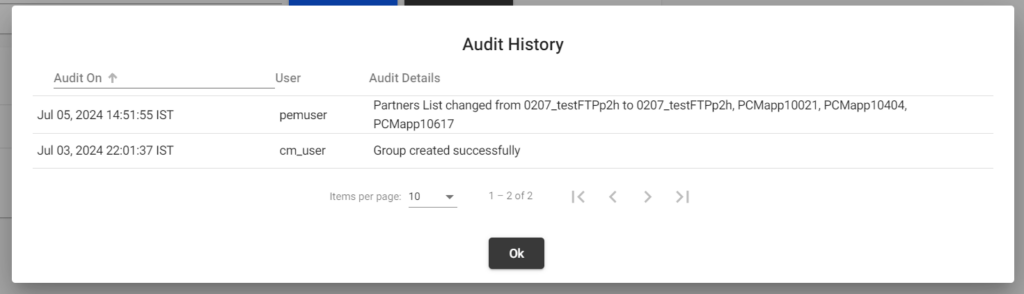
We can see the history of what has happened to the group, who created the group and when it was created, and all other changes made to the group.
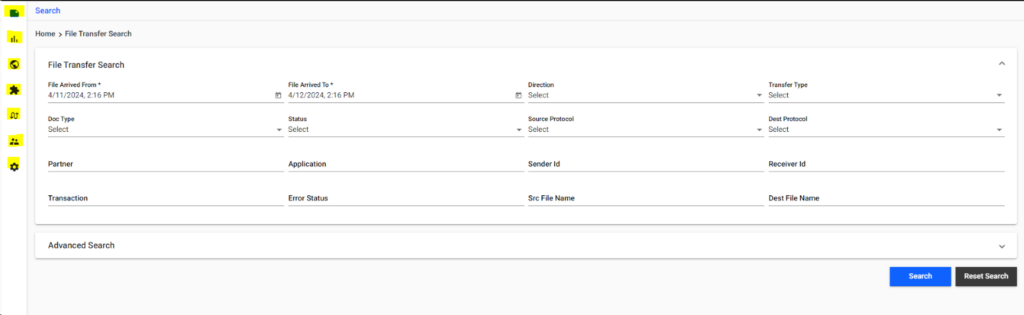
3. File Transfer Search
File Transfer Search:
File transfer search is used to retrieve the data of the files using multiple filter options.
The files are tracked within the B2Bi application. In case of AS2, the status is tracked only from/to the Mailbox Path mentioned in the AS2 Relationship.
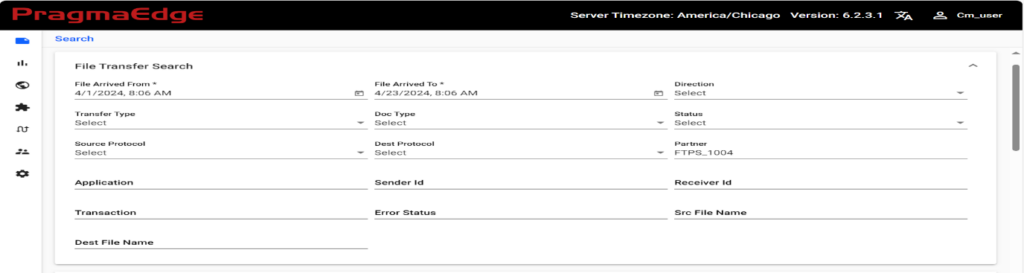
Go to File Transfers ->Search for Transaction Information. Once you click on File transfer search you will find the screenshot below.
The time zone must be the same as the time zone set in B2Bi, so that the files can be tracked correctly. Refer to https://www.ibm.com/docs/en/spems/6.2.3?topic=manager-configuring-pcm-installation for more details on setting up the time zone for PCM.
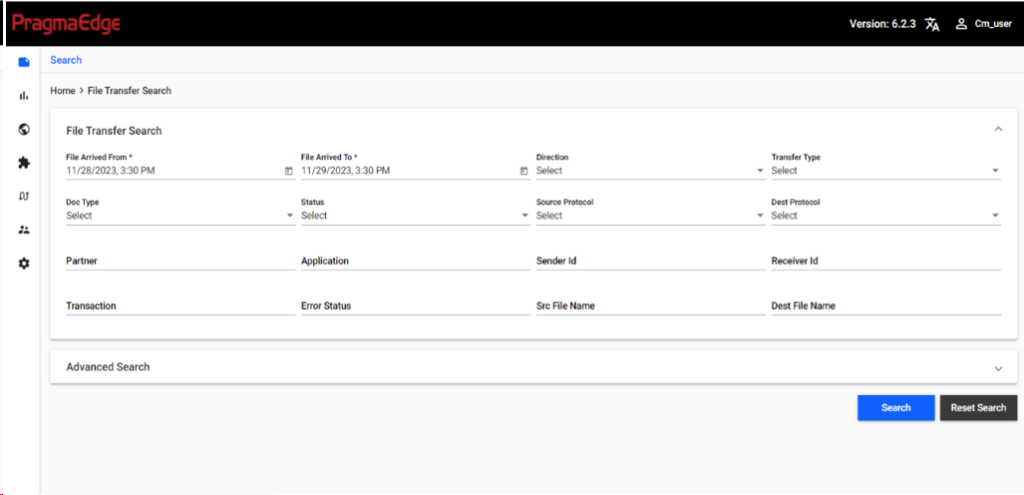
File Arrived: In file arrived columns (From, To) you can provide approximate date and time, to get the files processed during that time arrival.
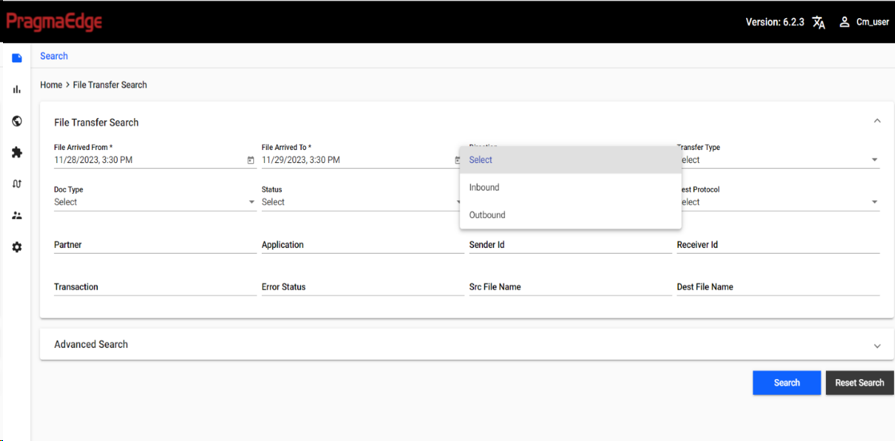
Direction: Choose the direction for the search operation, whether it is inbound or outbound. You can click on drop down list to select inbound or outbound.
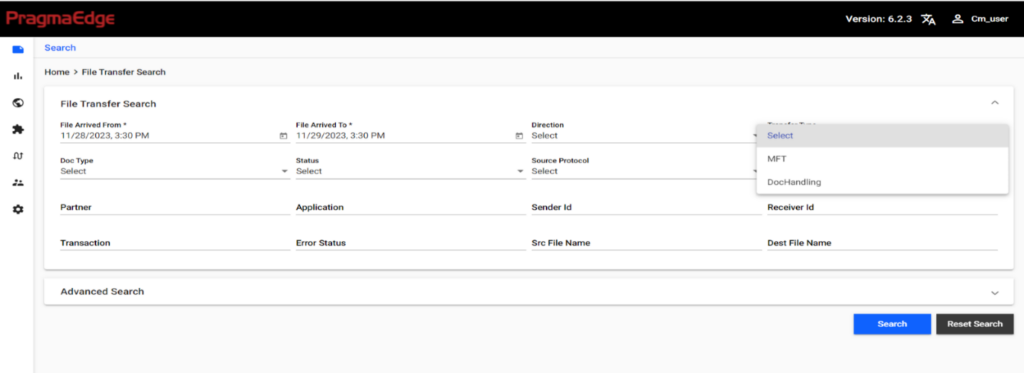
Transfer Type: Select the type of transfer for the search criteria, whether it is MFT or Doc handling. You can click on drop down list to select MFT or Doc handling.
MFT – Managed File Transfer, where files are routed based on the file name pattern.
Doc Handling – Document Handling, where files are routed based on the content of the file.
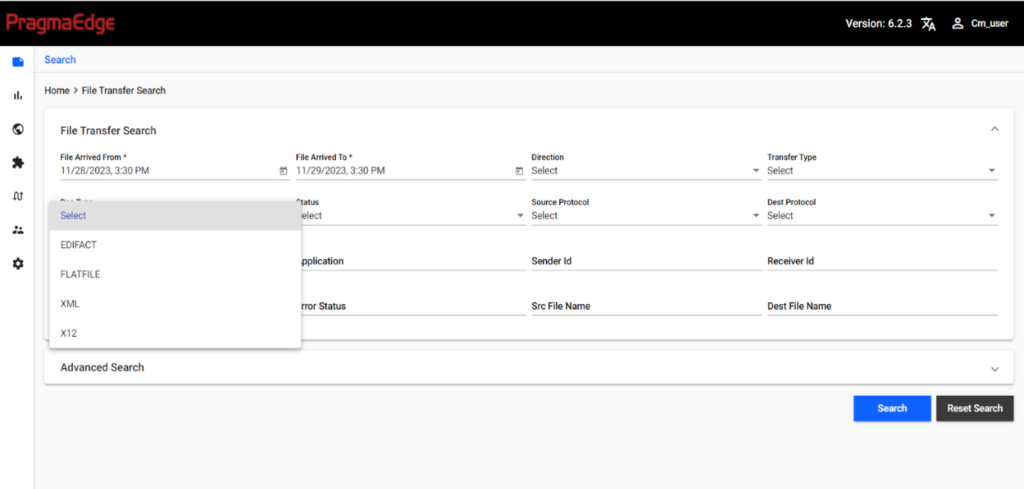
DOC TYPE: Select the type of document you need to search, whether it is EDI/X12, EDIFACT, FLAT FILE, XML.
Status: Select the status of the file whether it is Success, failed, Reprocessed or Manual Reprocess.
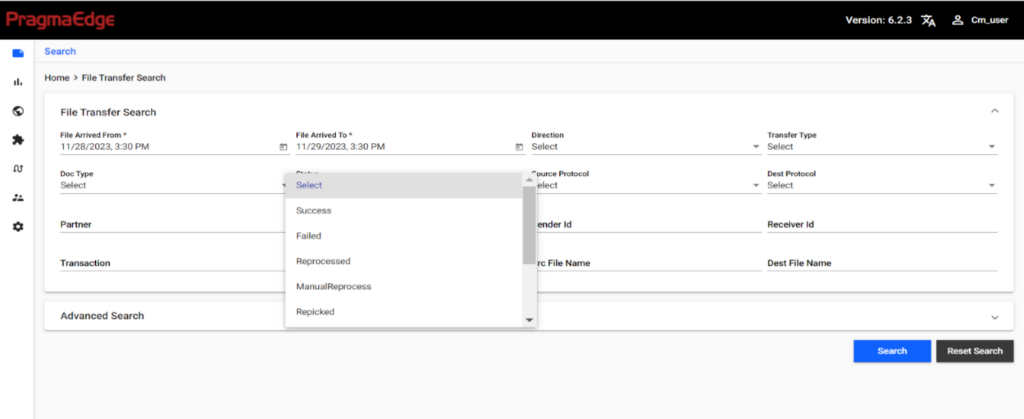
Success: When the transaction is successful.
Failed: When the transaction or process failed due to error.
Reprocessed: The status is changed to ‘Reprocessed’ when the transaction or process has been reprocessed through PCM.
Manually Reprocessed: The status can be updated by the PCM user manually when he/she fetches the Instance ID from PCM and reprocesses it in B2Bi.
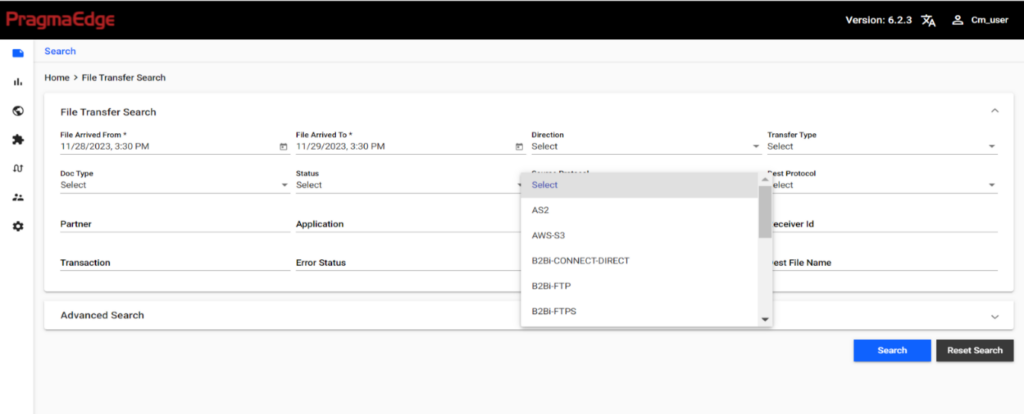
Source Protocol or Destination Protocol: You can choose different protocols according to search criteria as below screenshot from drop down list.
Partner: We need to enter the name of the partner in the search bar.
Application: We need to enter the name of the Application in the search bar.
Sender ID: We need to provide the Trading Partner ID if it is inbound file, Customer ID if it is outbound file.
Receiver ID: We need to provide the Customer ID if it is inbound file, Trading Partner ID if it is outbound file.
Transaction: We need to provide the transaction of the file to search for.
Error Status: You can provide Error Details to search for the files which failed due to that error.
Src file Name: If we know the source filename, we can search using that file name.
Dest File Name: If we know the destination processed filename, we can search using that file name.
File Name regexp: For MFT transactions only we can give regular expressions to search the files.
Reset search: When we enter incorrect details, we can use reset search to reset it and give correct details and search activity again.
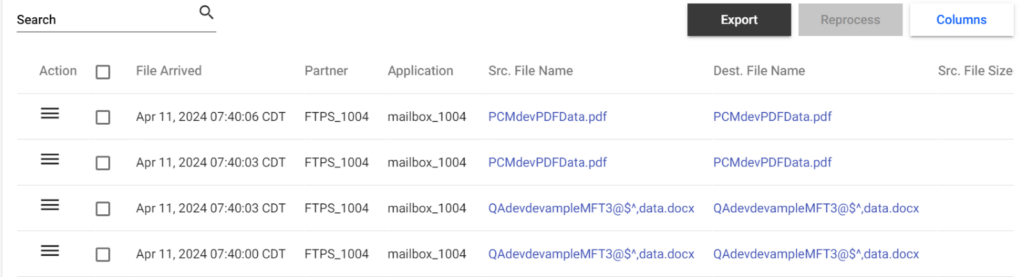
Output of file transfer search:
When we provide details in file transfer search using any filter options, we will get the response with the results as provided in below screenshots.
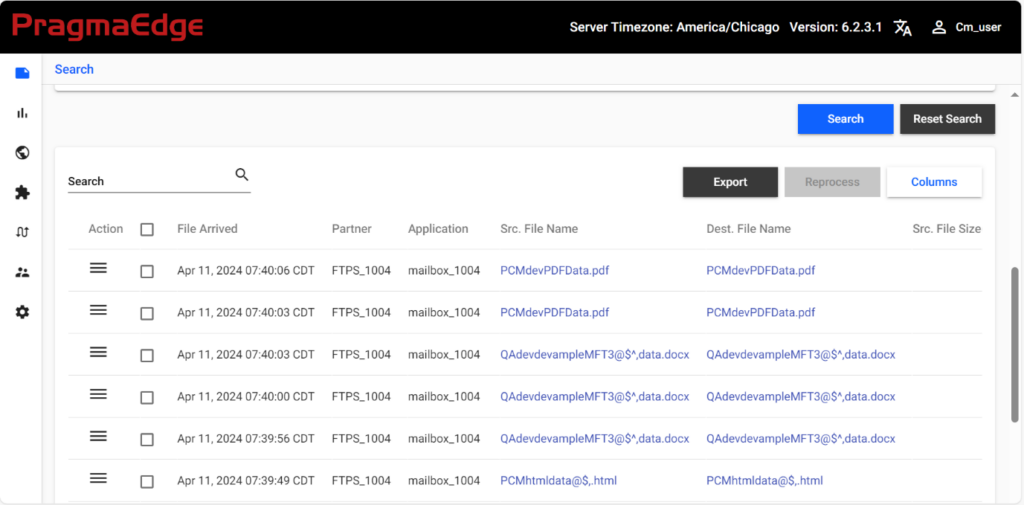
We can view the content of the file by clicking on the filename under Src.FileName and Dest.Filaname, which will show the file content in a pop-up. This is enabled only when the Source File Archival and Destination File Archival rules are used in the Data Flow setup.
Larger files cannot be viewed, but we will have an option to download the file. The size limit is set in the Configuration (Refer to https://www.ibm.com/docs/en/spems/6.2.3?topic=manager-configuring-pcm-installation for more details on the configuration) and any files above the size limit will not be viewable but can be downloaded.
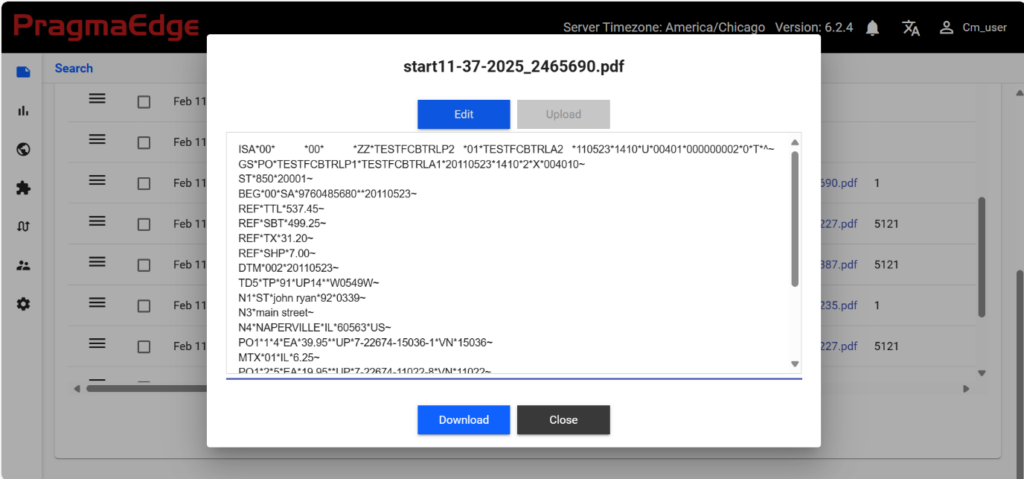
There is also an Edit option, in the View pop-up where we can edit the content of the file and process it again.
The viewing, editing and downloading of the Files are also tracked and can be view in the Audit Info option.
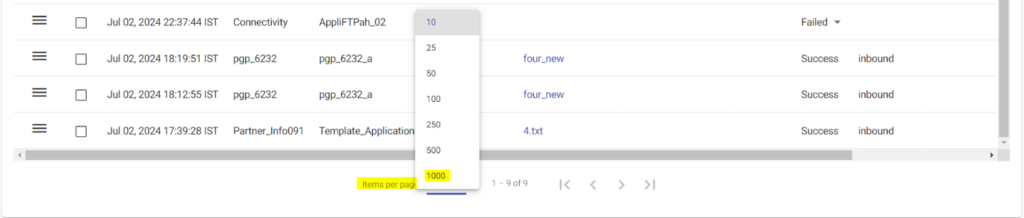
There is pagination enabled, to view a maximum of up to 1000 entries in a page.
We can do bulk operations such as export, reprocess etc. by selecting the maximum limit of 1000.
3.1 Advanced Search
Advanced search is used to search for the correlation details such as Purchase order number, Invoice number, Customer Number, ISA, GS IDs etc.
The search fields for Correlation needs to be configured before in the settings ->Correlation Menu. It can be custom defined. Please refer Correlation Names: for more details.
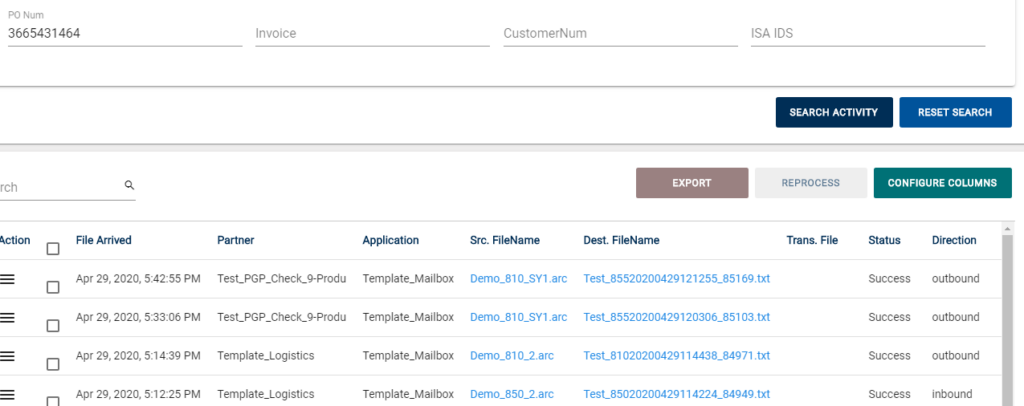
For example, if we want to search for a document which has the Purchase order number “3665431464” and was processed a few days ago. We can give the Purchase order number along with “from” date and “to” date. This will give the result with all the transactions that has the Purchase order number “3665431464”.
Below Picture describes the advanced search using the purchase order number”3665431464”.
3.2 Export Data
Export data functionality will be used to get the search results into a document.
3.3 Action Operations
The Action button provides you with a set of features which you can do for the files which are processed.
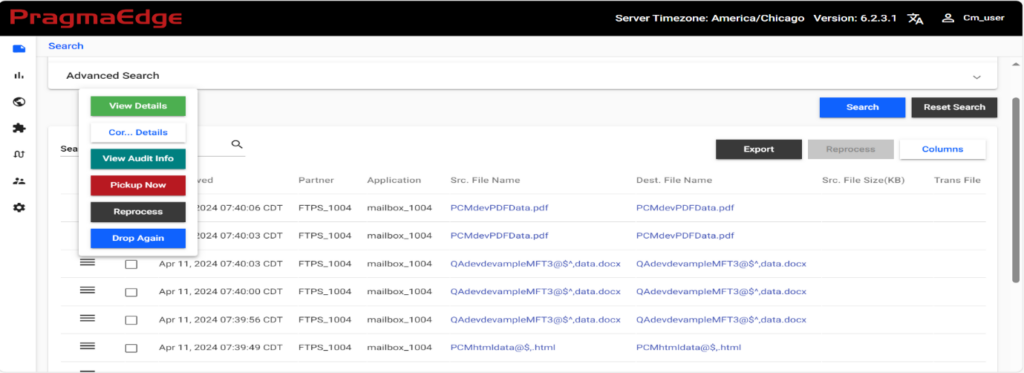
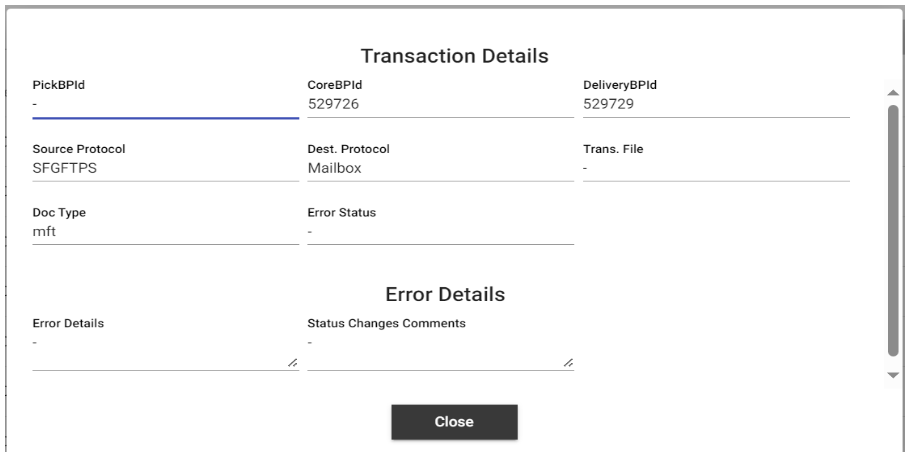
View details:
In view details, we can see the information of core BPID, Pick BPID, Delivery BPID, source protocol, Dest protocol, Trans filename, Doctype, error status message.
If file has processed successfully then we can see the view details as below.
If we get any error in file processing, then we can be able to see the error details below.
Correlation Details:
Correlation Details are the values which are set within the file processing, which can be used to correlate and search for the data. In ideal EDI scenarios, customers may have the Purchase Order (PO) number, Invoice Number as the correlations which will help them correlate between different transactions for the same order.
Below Picture contains the 810 transaction correlation details, where purchase order number “3665431464” is PO number, ”0091082192” is Invoice number.
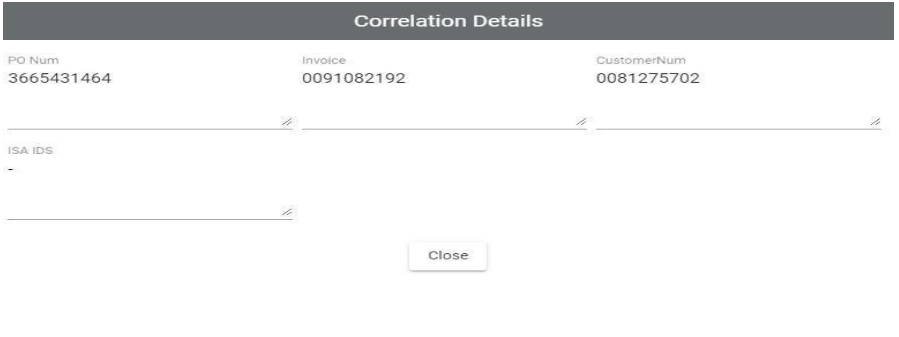
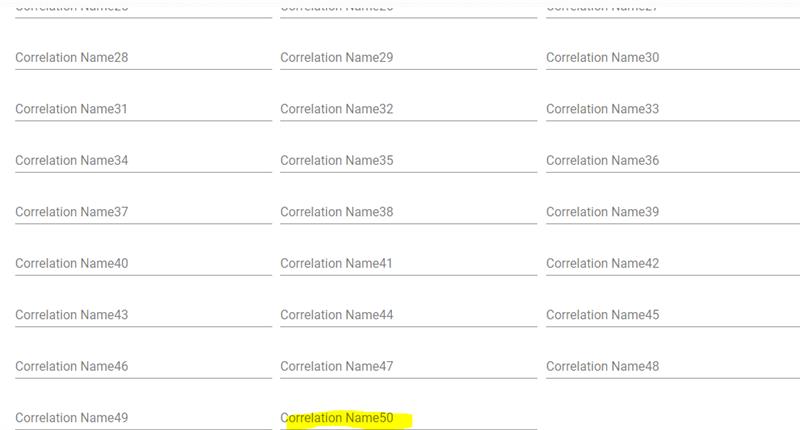
The Correlation can be customized per customer in Settings->Correlation Menu, thereby enabling customer specific correlations. PCM can handle up to 50 correlation values, please find the above screenshot for reference.
Please refer Correlation Names: for more information on how to set up the correlation.
View Audit Info:
View audit Info is used to show the end-to-end process information. It explains the difference process the file was processed through.
It also tracks the viewing and download of the files as well.
Pick up now: If we click on pick up now then the process will try to pick up the file from the source.
Reprocess: If you click on reprocess then the file will get reprocessed, if the original BP Instance ID which processed the file is available in B2Bi and is not purged. If you want to reprocess files even though it’s purged in B2Bi, you can select the Archive Reprocess checkbox during Reprocess Request.
Archive Reprocess fetches the input file from the archived location and uses the required process data of the original execution and invokes the core process. You will be able to see the result of the reprocess in the pop-up.
This feature is enabled only when Source File Archival rule is used for the original file data flow.
The configurations are required to be added in the PCM Configuration for this functionality to work. Refer to https://www.ibm.com/docs/en/spems/6.2.3?topic=manager-configuring-pcm-installation for more details on the configurations.
The status of the reprocessed files can be checked by doing the File Transfer -> Search.
The Reprocess Functionality can be performed for a maximum of 1000 entries at a time, by enabling the pagination to 1000. The users can track the live status of the submitted transactions from the Notification bar. Report can also be viewed here, which shows the Business Process Instance IDs.
Note: Users cannot force log out or close the tab/window of browser as it would disrupt the progress of the bulk reprocess.
Drop Again: If we click on drop again then output file will drop to the destination.
We can also select multiple files up to a maximum of 25 files and do a Reprocess, Pickup Now, Drop Again.
4. Reports In PCM
Export All Workflows:
Select Dataflow under Reports module and you will find a button on the right side as EXPORT ALL DATAFLOWS, where we can export all the workflows created in DATAFLOWS.
We click on the Export all workflows and it downloads a .CSV file, and we can find the partner & application protocols, rules in their workflows, Doc Type, flow either Doc Handling or MFT etc. in the file.
4.1 Data Flow Reports
Select Dataflow under Reports Module, where we can search for the workflows for different partners & applications by using sequence type or flow or rule name or Doc type or Transaction or sender ID or Receiver ID or rule name use this search Data flow page.
For example, if you want to find the workflows for all partners which has a particular rule, give the rule name, and click on search. This will give the appropriate result with all the partners’ workflows which are using that rule.
Also, if you provide the Rule Name as Translation and Rule Value as Map Name, it will give all the flows which use the specified map.
In addition, you can select the Serial Number (#) which is a hyperlink and will take you to that specific Partner/Application’s Data Flow.
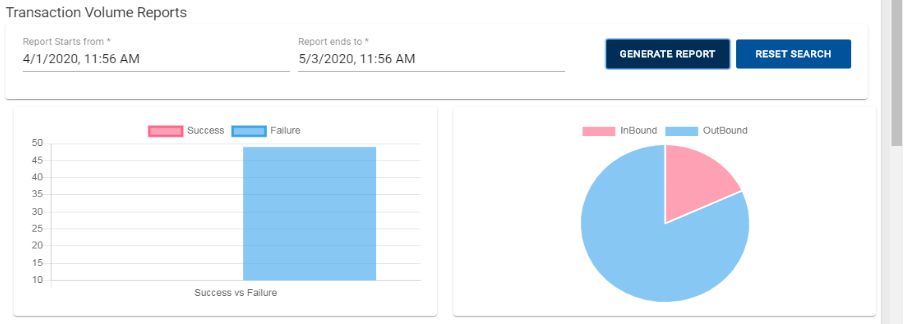
4.2 Transaction Volume Reports
Select Transaction Volume Reports tab under Reports Module, when we can get the number of failed and success files, no of Inbound and outbound Processed files, and to know about the Processed transaction like 810, 850, 856…etc., in the PCM. Choose the Reports starts from and Reports Ends to dates and click on search. This will give the result in the form of Bar and Pie Charts.

4.3 Document Type Reports
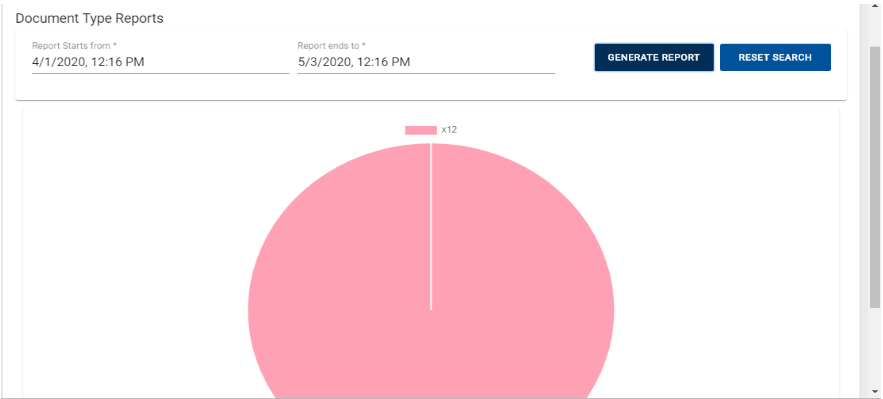
Select Document Type Reports under the Reports Module in the PCM to get the Report based on the Document Types processed. Document type is X12, EDIFACT, UCS, SWIFTNET, ODETTE standards. Whenever we want to know about Percentage of Processed Document types in the PCM, choose the Reports Starts from and Reports End to dates and click on search. This will give the result in the form pie chart.
4.4 Partners Volume Reports
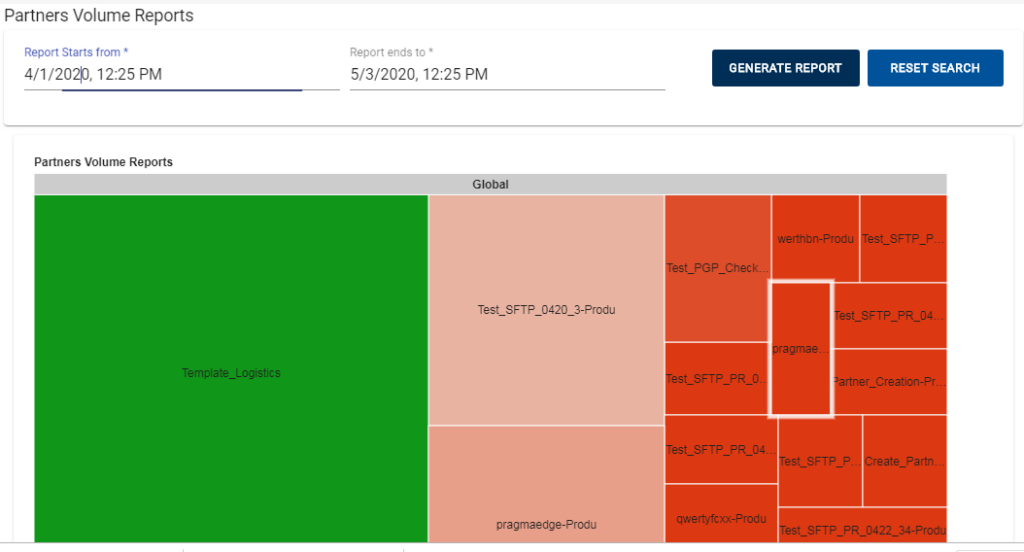
Select the Partners Volume Reports Tab under Reports Module in the PCM to get the report of the number of files processed per partners. When we want to know about volume of files processed for different partners, Choose the Reports Start from and Reports end to dates and Click on the Search. This will give the result in the way of partners names with different color’s i.e., according to whichever partner has more processed files in the PCM.
Below Picture describes the partners Volume Reports.
5. New Trading Partner Setup
- PEM Community Manager provides the ability to set up the partners, through a wide variety of protocols.
- The protocols include AS2, AWS –S3, B2BI Connect Direct, B2Bi-FTP, B2Bi –FTPS, B2Bi-SFTP, Existing Connection, File System, HTTP, HTTPS, Mailbox, MQ/JMS, SAP.
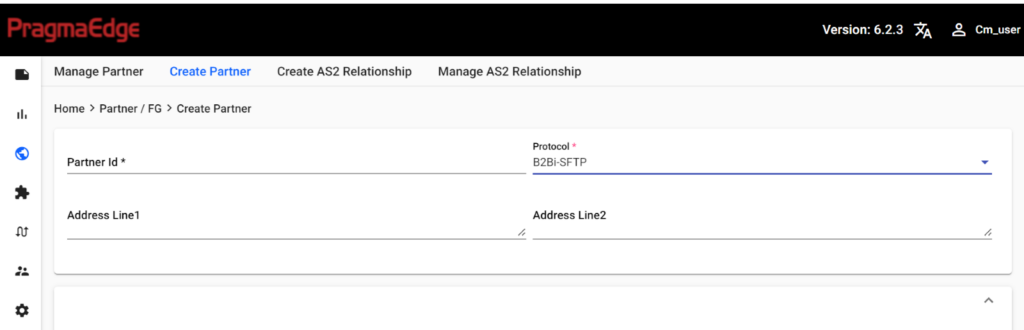
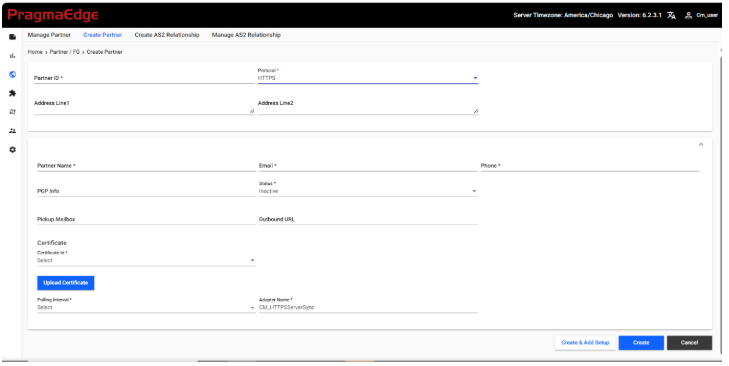
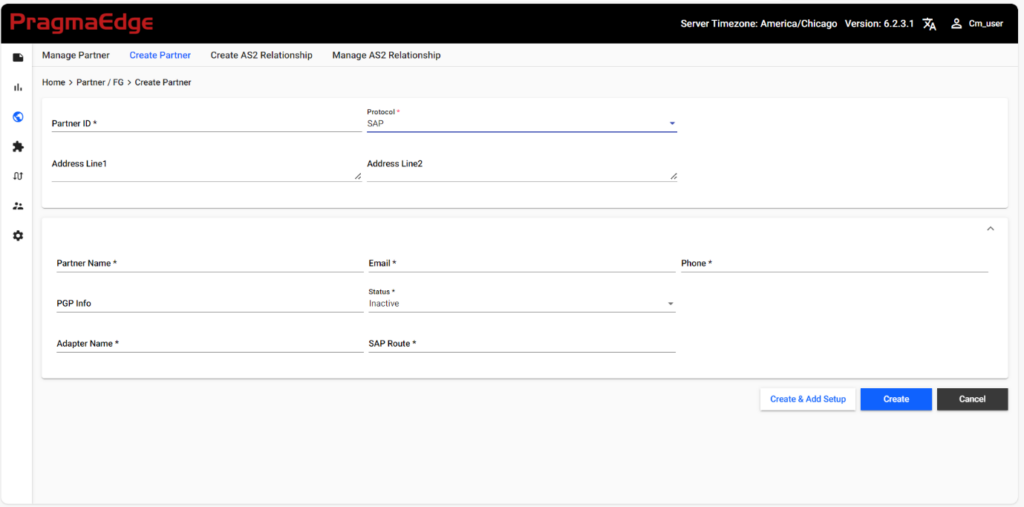
5.1 Create partner
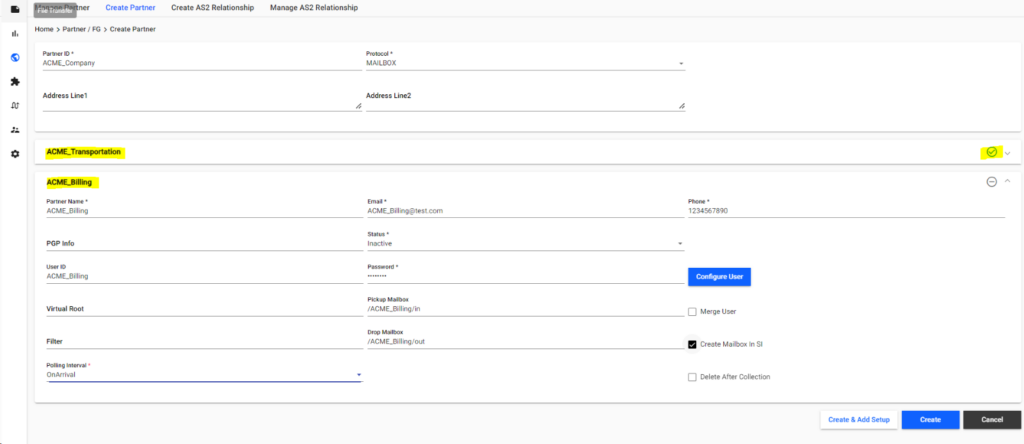
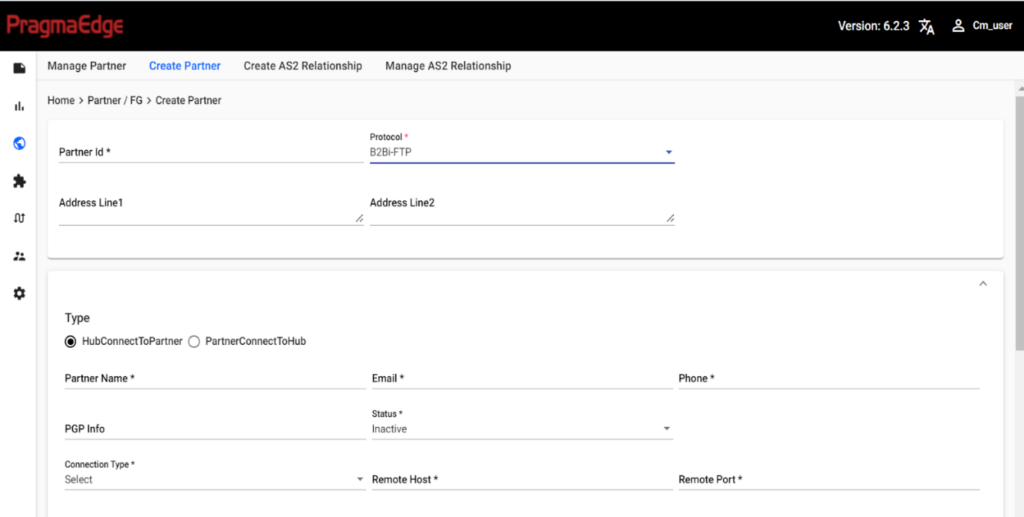
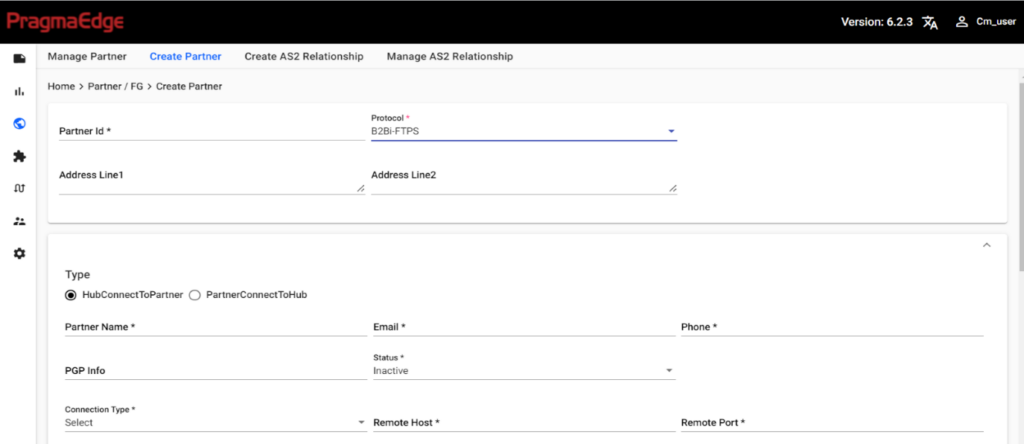
New Partner can be set up by providing contact and protocol information such as Partner Name, Partner Id and other details shown in the below screenshots. PEM provides different certified inbuilt protocols according to the partner requirement.
PCM supports creating multiple accounts (Partner Names) for the same Partner (Partner ID). One Partner ID can have multiple Partner Names attached to it. The same is applicable for Application as well.
You can provide the first account details and click on Create & Add Setup. This will provide a new pane in the same screen for providing the details for the second account. You can do this and add multiple accounts. Once it is all added, you can click on Create to finish the operation.
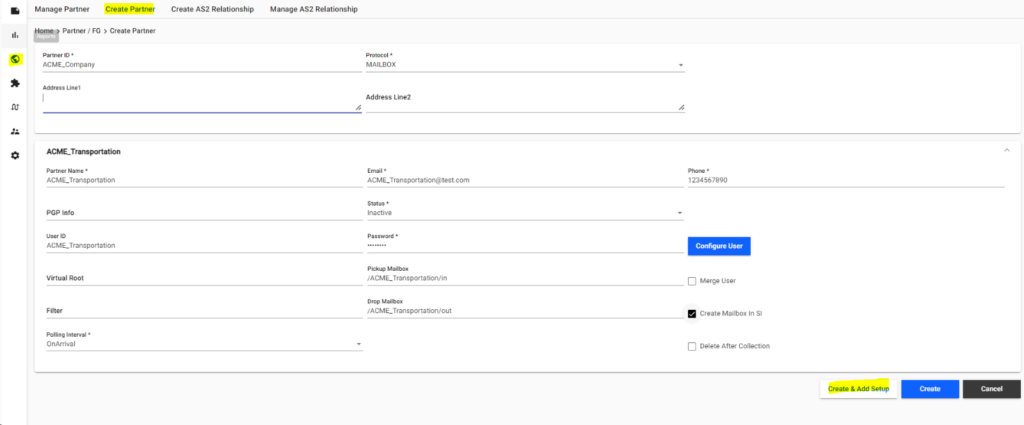
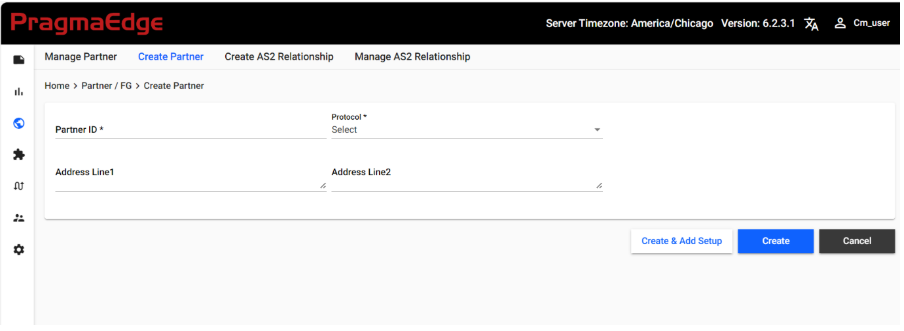
To set up a new partner please see the screenshots below for reference. Go to Partner —>Create Partner
| Property | Description |
|---|---|
| Partner Id | Provide the Trading Partner ID. Partner ID can be duplicate when you want to link same Partner ID with multiple unique Partner Names. This will be the Identity Name in B2Bi |
| Protocol | Provide the protocol which would be used by the Trading Partner for sending/receiving Files. |
| Address Line1 | Address Information1 |
| Address Line2 | Address Information2 |
Special characters can be restricted across all the fields in various protocols. This can be achieved by configuring the specific characters to be restricted in the configuration.
Trading Partner / Application – AS2
5.2 AS2
5.2.1 Organization
You can select Organization to create AS2 organization. Provide Profile Name, AS2 Identifier, Exchange Certificate and Signing Certificate for Organization Profile.
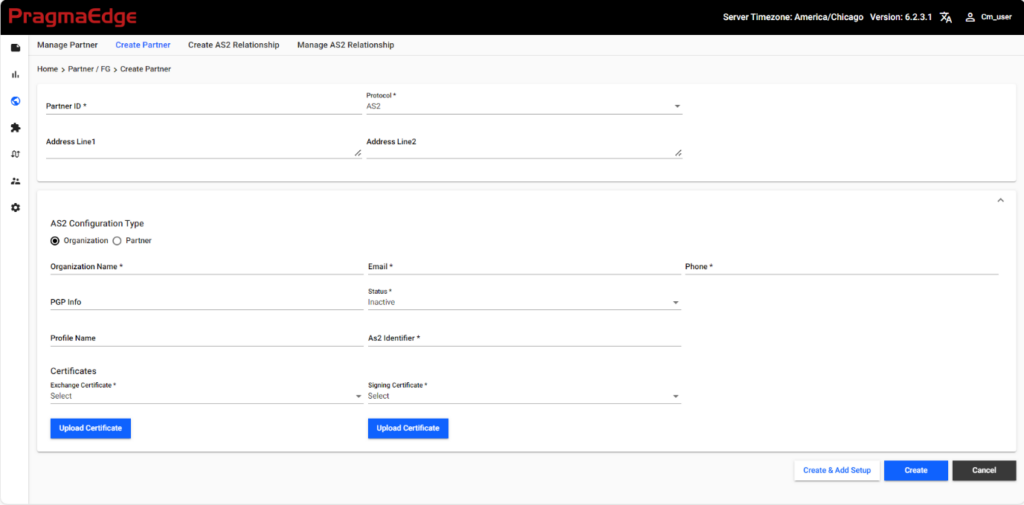
| Property | Description |
|---|---|
| Organization Name | Provide the Organization Name. This will be the Profile Name in B2Bi. |
| Email Id | Provide the email ID of the trading partner contact for the reference |
| Phone Number | Provide the Phone number of the Trading Partner Contact |
| PGP Info | Provide the key ID of the PGP Key. The PGP Key needs to be loaded in B2Bi separately. |
| Status | Provide the status of the partner whether the partner is Active or Inactive If Active, the schedules will look for files. If Inactive, the schedules will ignore. |
| AS2 Identifier | AS2 identifier of your organization. Required. |
| Exchange Certificate | Provide the Exchange Certificate from the drop down if it is already uploaded into B2Bi. If not, click on UPLOAD EXCH CERT button and upload the certificate. |
| Signing Certificate | Provide the Signing Certificate from the drop down if it is already uploaded into B2Bi. If not, click on UPLOAD SYSTEM CERT button and upload the certificate. |
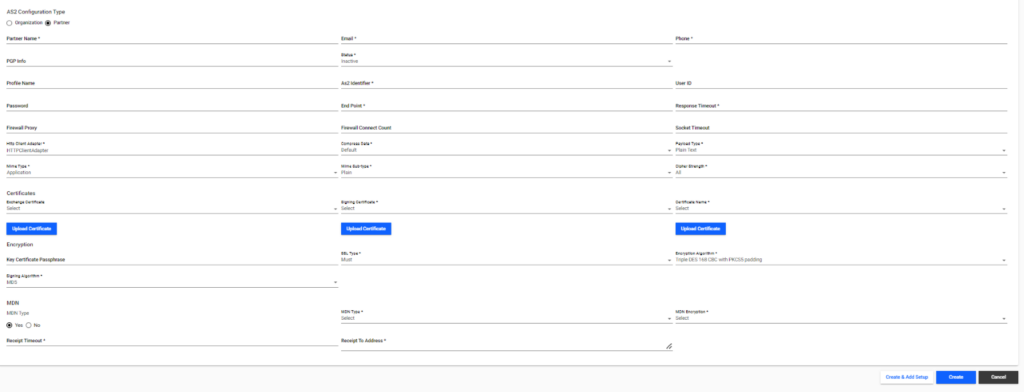
5.2.2 Partner
You can select partner radio button to create AS2 Partner. For Partner Profile provide Sender ID, Sender Qualifier, End Point, Response Timeout, Payload Type, Mime Type, Mime Sub-Type, SSL Type, Exchange Certificate, Key Certification, Payload Encryption Algorithm, Payload security, Signature Algorithm Encryption Algorithm, MDN Required, MDN Type, MDN Encryption and SSL Type.
| Property | Description |
|---|---|
| Partner Name | Provide the Trading Partner Name. It needs to be unique. This will be the Profile Name in B2Bi |
| Email Id | Provide the email ID of the trading partner contact for the reference |
| Phone Number | Provide the Phone number of the Trading Partner Contact |
| PGP Info | Provide the key ID of the PGP Key. The PGP Key needs to be loaded in B2Bi. |
| Status | Provide the status of the partner whether the partner is Active or Inactive If Active, the schedules will look for files. If Inactive, the schedules will ignore. |
| AS2 Identifier | AS2 identifier of your business partner. Required. |
| User Id | Provide the User ID |
| Password | Provide the Password |
| End Point | It is comprised of IP address, port, and a URI. This is where you will send your AS2 data and MDN’s. Each Sterling B2B Integrator has about of the box HTTP Server Adapter that is pre-configured to load with an endpoint for AS2. The canned endpoint is: http://ip_address_of_SI:baseport+33/as2.So if your SI instance is loaded on a box that has the IP address of 11.22.33.44 and you access the dashboard from port 5566, your canned endpoint would behttp://11.22.33.44:5599/as2 |
| Response Timeout | Number of seconds the HTTP client adapter waits for a response from the trading partner’s server before the system times out. |
| Firewall Proxy | Provide the firewall proxy information if AS2 server is configured with firewall. |
| Firewall Connect Count | Provide the firewall connect count information if AS2 server is configured with firewall. |
| Socket Timeout | Timeout interval for the connection. |
| Http Client Adapter | Select the configured HTTP Client Adapter. |
| Compress Data | Level to compress the payload. Optional. Valid values are: None, Low, Medium, High, Default (this is the default) |
| Payload Type | Payload is the document at the inner level of the message. The payload type describes the message format for transporting documents. Optional. Valid values are: Plain Text – Payload is not signed, and it is not encrypted. Signed Detached – Payload is signed with a detached signature, according to the EDIINT specifications. Encrypted – Payload is encrypted according to the EDIINT specifications. Signed Detached Encrypted – Payload is signed with a detached signature and then encrypted, according to the EDIINT specifications. This is the default. |
| Signing Certificate | Name of the Signing Certificate that your trading partner sent you. This certificate can be the same as the exchange certificate if your trading partner uses the same certificate for both encryption and signing. Use the trust certificate that this specific trading partner sent to you. You can check in the trading partner certificate prior to setting up the trading profile in B2Bi and select it from the Drop Down or Upload it from here. Required |
| SSL Type | Whether Secure Sockets Layer (SSL) should be active. SSL is a negotiation between the client and the server that establishes the method of encrypting and decrypting data transmissions. Optional. Valid values are: None – SSL is not used (default). Optional – SSL encryption. Must – Uses this protocol configured for SSL encryption. If you select Optional or Must, the endpoint URL must enable SSL for the appropriate protocol. |
| CA Certification | Certificate used to validate SSL server authentication of the trading partner. Required if you selected Must or Optional in the SSL field. You can check in the trading partner certificate prior to setting up the trading profile in B2Bi and select it from the Drop Down or Upload it from here |
| Key Certification Passphrase | Type a passphrase to be used with the key certificate. Required only if a key certificate is being used for SSL client-side authentication and if the SSL parameter is set to Optional or Must. The Key Certificate must be loaded in B2Bi. |
| Cipher Strength | Strength of the algorithms used to encrypt data. |
| Payload Encryption Algorithm | If you select a payload type requiring encryption, provide the encryption algorithm to use. Triple DES 168 CBC with PKCS5 padding, 56-bit DES CBC with PKCS5 padding (default), 128-bit RC2 CBC with PKCS5 padding, 40-bit RC2 CBC with PKCS5 padding, 128-bit AES CBC with PKC5 padding, 256-bit AES CBC with PKC5 padding. Note: 192-bit AES CBC PKCS5 padding is not supported. |
| Signature Algorithm | Algorithm to use to sign messages to the trading partner. Optional. Valid values are MD5 and SHA1 (Secure Hash Algorithm). The default is SHA1. This field is required if you select a payload type requiring a signature. |
| MDN Required | Whether you request Message Disposition Notifications (MDNs) for messages from your trading partner, select Yes. If not required, select No. |
| MDN Type | Delivery mode for MDNs. Optional. Valid values are: Synchronous – Requests a synchronous receipt. This the default mode. Asynchronous HTTP – Request an asynchronous receipt over HTTP. If you select this option, you must put the complete URL identifying where the partner should send the receipt in the Receipt to Address field. Asynchronous HTTPS – Request an asynchronous receipt over HTTPS. If you select this option, you must put the complete URL identifying where the partner should send the receipt in the Receipt to Address field. Asynchronous SMTP – Request an asynchronous receipt over SMTP. If you select this option, you must put the complete URL identifying where the partner should send the receipt in the Receipt to Address field. |
| MDN Encryption | Type of signing algorithm requested on receipts. Valid values are None (default), MD5, and SHA1. Selection of a value other than None makes the EDIINT Message service request a signed Message Disposition Notification (MDN) when sending messages to the trading partner. |
| Receipt Timeout | The process waits for the specified timeout value to receive an MDN and would timeout if not received in the timeframe. Note: If this value is not provided when MDN type is true, the value of Response timeout would be used for this. |
| Receipt To Address | If you are using EDIINT AS2 requesting asynchronous MDNs, you must type the complete URL where you want your trading partner to send the MDN. This may be your usual AS2 URL. Optional. |
The process for creating an application which uses AS2 is like how the Trading Partner with AS2 is created.
AS2 Relationship
Customers can create AS2 Relationship in Partner Module.
We can click on Partner->Create AS2 Relationship and provide the details to setup the Relationship.
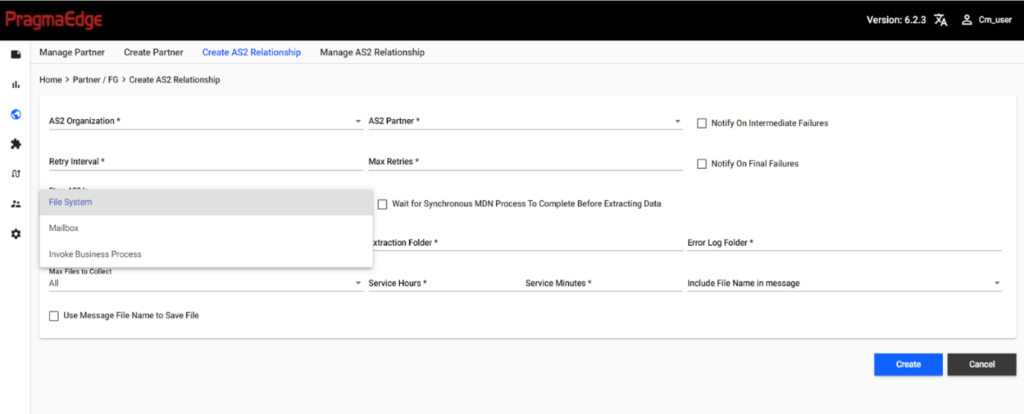
| Property | Description |
|---|---|
| AS2 Organization | AS2 Organization for which the relation needs to be setup |
| AS2 Partner | AS2 Partner for which the relation needs to be setup |
| Retry Interval | In case of failure, retry would be done based on this time value |
| Max Retries | Maximum times to retry the connection in case of failure |
| Notify on Intermediate Failures | If checked, will notify in case of intermediate failures |
| Notify on Final Failure | If selected, will notify in case of final failure |
| Wait for Synchronous MDN Process To Complete Before Extracting Data | Select this, if you want to defer the payload extraction until the sending of MDN is complete. |
| Store AS2 In | File System or Mailbox or Invoke Business Process |
| When Store AS2 In is selected as File System | |
| Collection Folder | File location to pick up file for transfer. |
| Extraction Folder | Extraction location of the file after the transfer. |
| Error Log Folder | Folder location to log errors during file transfer. |
| Max Files to Collect | Maximum number of files to collect during transfer. |
| Service Hours | Number of hours in the interval. For example, to run a service every 2 hours, also include with minutes (2-hour 0 min etc). |
| Service Minutes | Number of minutes in the interval. For example, to run a service every 3 minutes, also include with hours (2-hour 3 min etc). |
| Use Message File Name to Save File | Save File with message name. |
| Include Filename in Message | Value cannot be Full Path. If we select Store Or Invoke Bp as Invoke Business Process Directly. |
| When Store AS2 In is selected as Mailbox | |
| Use Default Inbound/Outbound Mailboxes | Option to select the default Inbound/outbound Mailbox. |
| Select Existing Parent Mailbox | Existing Parent Mailbox. |
| When Store AS2 In is selected as Invoke Business Process | |
| Inbound Success Business Process | Inbound success business process of profile |
| Inbound Error Business Process | Inbound Error BP of the profile. |
| Set Message File Name in Process Data | To set Message File Name in Process Data |
Note: The AS2 File can be processed through PCM only when the AS2 Relationship storage option is selected as Mailbox.
Customers can customize the respective Business Process to handle File System and Direct Process storage options.
Refer to Customizing the AS2 Process for File System, Direct Process Storage Options for more information.
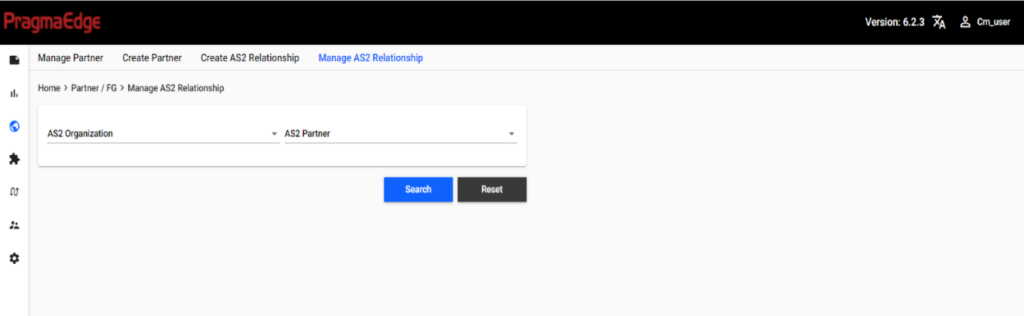
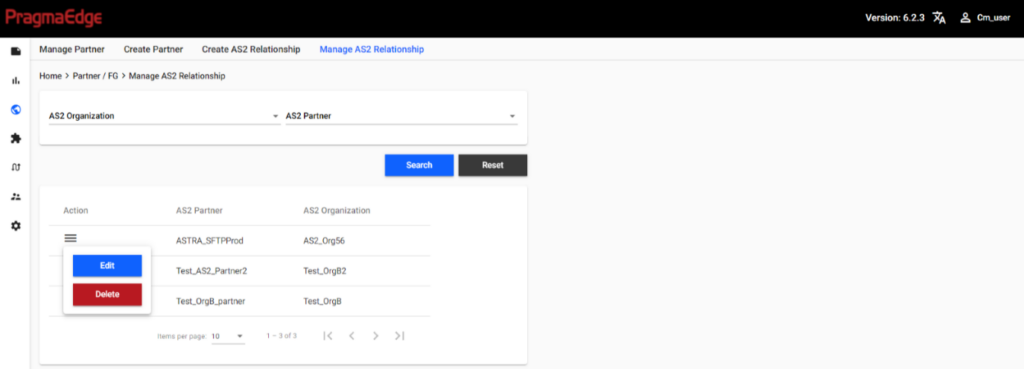
We can Manage AS2 Relationships where we can find all existing relationships or search for specific combination with AS2 Organization and AS2 Partner.
Actions can be performed on the result set of the AS2 Relationship, where we can edit the details or delete it.
Trading Partner / Application – B2Bi-FTP
5.3 B2Bi-FTP
The File Transfer Protocol (FTP) is a standard communication protocol used for the transfer of files from a server to a client on a network. FTP is built on a client-server model architecture using separate control and data connections between the client and the server.
| Property | Description |
|---|---|
| Partner Id | Provide the Trading Partner ID |
| Protocol | Provide the protocol which would be used by the Trading Partner for sending/receiving Files. |
| Address Line1 | Address Information1 |
| Address Line2 | Address Information2 |
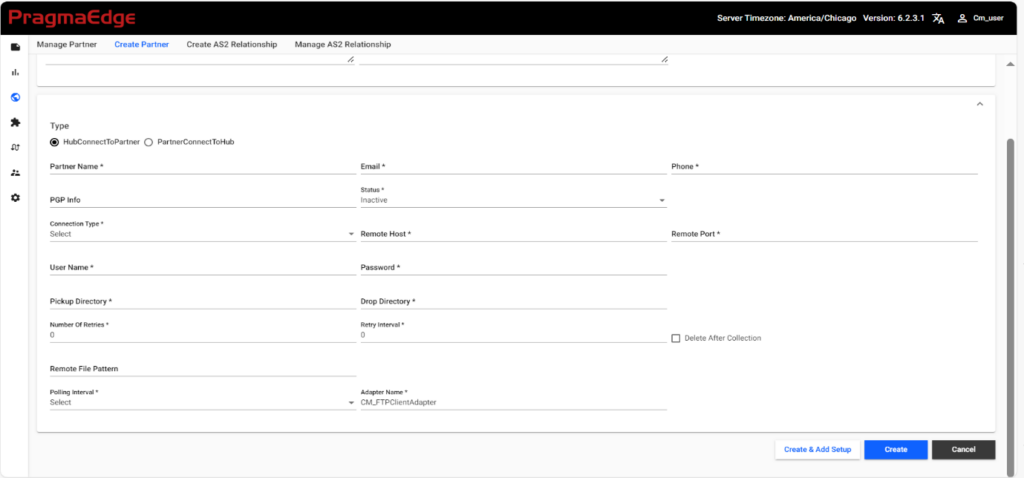
- Hub To Partner –
Hub Connect to Partner is used when the Hub (Customer) must connect to the Partner. This is the case, where Customer acts as the Client and connect to Partner’s server.
| Property | Description |
|---|---|
| Partner Name | Provide the Trading Partner Name. This needs to be unique. The Remote Profile in B2Bi is created with this name. |
| Email Id | Provide the email ID of the trading partner contact for the reference |
| Phone Number | Provide the Phone number of the Trading Partner Contact |
| PGP Info | Provide the key ID of the PGP Key. The PGP Key needs to be loaded manually in B2Bi. |
| Status | Provide the status of the partner whether the partner is Active or Inactive If Active, the schedules will look for files. If Inactive, the schedules will ignore. |
| Connection Type | This requires selection of Active/ Passive connection type. Which party initiates an FTP session through a network firewall. The default transfer mode, ACTIVE, indicates that Sterling B2B Integrator makes the connection to clients. PASSIVE transfer mode indicates that clients make the connection. Required. |
| Remote Host | Remote Host used to the FTP Server to which we are connecting to. |
| Remote Port | Remote Port of the FTP Server to which we are connecting to. |
| Username | Username that is used to connect to the FTP server. |
| Password | Password that is used to connect to the FTP server |
| Pickup Directory | This is the path from where the files are picked up. Both forward and backward slash is supported. |
| Drop Directory | This is the path to where the files are dropped. Both forward and backward slash is supported. |
| Number of Retries | Specify how many times you need to retry connecting to the FTP server after failure. |
| Retry Interval | Provide the value in seconds, based on which the connection will wait before retrying the connection. |
| Remote File Pattern | File name or pattern to do the listing for. If not included the listing will be for a *.* pattern (depending on server implementation). Optional. |
| Pooling Interval | Provide the interval in which we need to collect the files. On Arrival is not applicable as this is a Client Connection. |
| Adapter Name | Provide Adapter Name which is used to connect to the FTP Server. You can give any of your FTP Client Adapter. |
| Delete After Collection | Select this, if you want to delete the file after it is picked up from the Pickup Directory. |
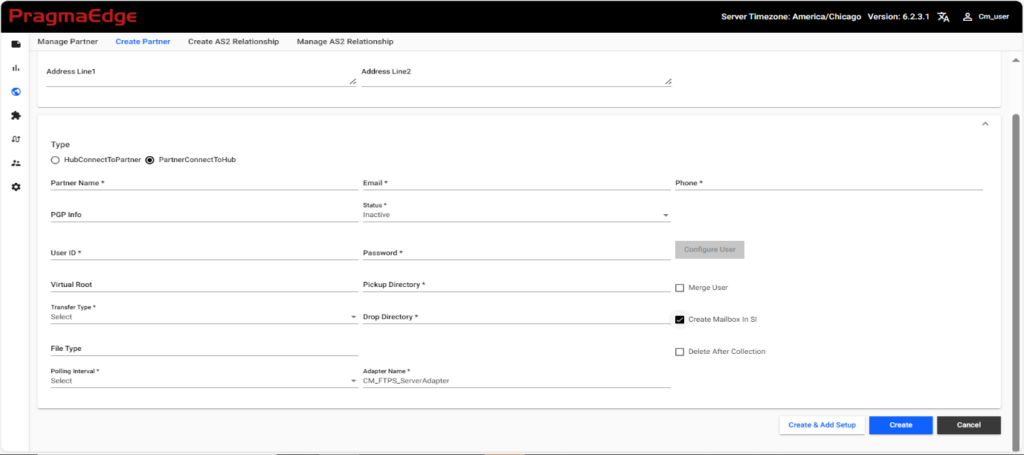
- Partner Connect to Hub
Partner Connect to Hub is used when the Partner must connect to the Hub (Customer). This is the case, where Customer acts as the Server and allows Partners to connect to the server.

| Property | Description |
|---|---|
| Partner Name | Provide the Trading Partner Name. This needs to be unique. |
| Email Id | Provide the email ID of the trading partner contact for the reference |
| Phone Number | Provide the Phone number of the Trading Partner Contact |
| PGP Info | Provide the key ID of the PGP Key. The PGP Key needs to be loaded manually in B2Bi. |
| Status | Provide the status of the partner whether the partner is Active or Inactive If Active, the schedules will look for files. If Inactive, the schedules will ignore. |
| User Id | User Id that is used by the Partner to connect to the B2Bi-FTP server of B2Bi |
| Password | Password that is used by the Partner to connect to the B2Bi-FTP server of B2Bi |
| Virtual Root | Provide the Path which would act as the first level of the directory path for a user. If not provided, the base path of Pickup Directory would be considered as the Virtual Root. |
| Pickup Directory | This is the path from where the files are picked up. If not provided, the path provided in Virtual Root would be used. |
| Transfer Type | Type of the transfer (Binary / ASCII) |
| Drop Directory | This is the path to where the files are dropped. If not provided, the path provided in Virtual Root would be used. Note: In case of using the connection for both Inbound and Outbound files, please make sure to provide Pickup/Drop Directory to have unique directories for Inbound and Outbound files. |
| File Type | File name or pattern to do the listing for. If not included the listing will be for a *.* pattern. |
| Merge User | Select this if you want to use Existing User Account which is already available in B2Bi. In this case, Password is not required. |
| Create Mailbox in SI | Select this if you want to create Mailboxes in SI |
| Delete After Collection | Select this if you want the picked file to be deleted from the Pickup Directory. |
| Pooling Interval | Provides the interval in which we need to collect the files. On Arrival would create Routing Rule with the Partner Name in B2Bi. Separate Routing Rule is created per Partner which helps in the cleanup during decommission/inactivating of Partner. |
| Adapter Name | Provide Adapter name through we are going to connect. You can select any of the FTP Server Adapter. |
| Configure User | Select this option to provide additional information of the user account such as authentication type, adding groups, permissions. Note: This is not a mandatory option; If required, customers can click on this button to add extra information for the user account. |
Application – B2Bi-FTP
The process for creating an application which uses B2Bi-FTP is like how the Trading Partner with B2Bi-FTP is created as explained above.
Trading Partner / Application – B2Bi-FTPS
5.4 B2Bi-FTPS
B2Bi-File Transfer Protocol Secure with SSL Security (FTPS) is an extension to the FTP protocol that adds Secure Socket Layer (SSL)/Transport Layer Security.
| Property | Description |
|---|---|
| Partner Id | Provide the Trading Partner ID |
| Protocol | Provide the protocol which would be used by the Trading Partner for sending/receiving Files. |
| Address Line1 | Address Information1 |
| Address Line2 | Address Information2 |
- Hub Connection to Partner
Hub Connect to Partner is used when the Hub (Customer) must connect to the Partner. This is the case, where Customer acts as the Client and connect to Partner’s server.
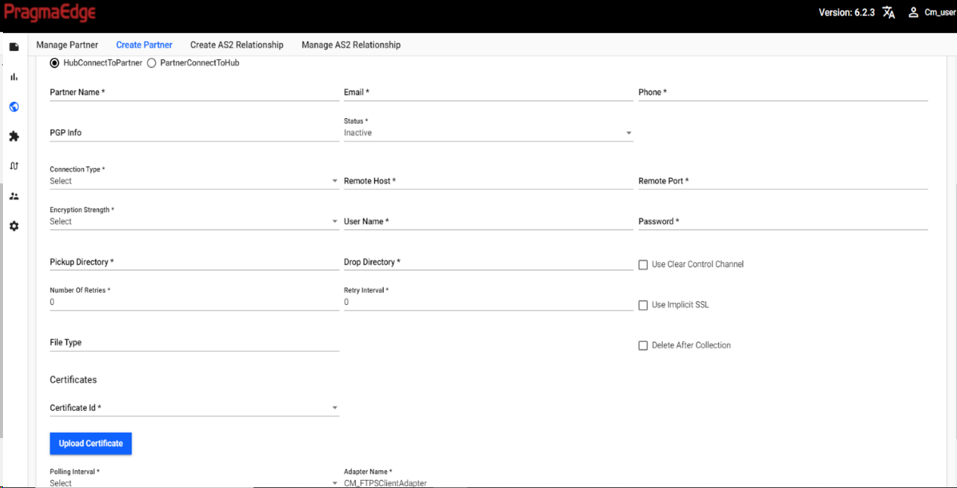
| Property | Description |
|---|---|
| Partner Name | Provide the Trading Partner Name. This needs to be unique. The Partner Configurations (Identities, Transports etc) in B2Bi is created with this name as the prefix. |
| Email Id | Provide the email ID of the trading partner contact for the reference |
| Phone Number | Provide the Phone number of the Trading Partner Contact |
| PGP Info | Provide the key ID of the PGP Key. The PGP Key needs to be loaded manually in B2Bi. |
| Status | Provide the status of the partner whether the partner is Active or Inactive If Active, the schedules will look for files. If Inactive, the schedules will ignore. |
| Connection Type | This requires selection of Active/ Passive connection type. Which party initiates an FTP session through a network firewall. The default transfer mode, ACTIVE, indicates that Sterling B2B Integrator makes the connection to clients. PASSIVE transfer mode indicates that clients make the connection. Required. |
| Remote Host | Remote Host used to the FTPS Server to which we are connecting to. |
| Remote Port | Remote Port of the FTPS Server to which we are connecting to. |
| Encryption Strength | The level of encryption which needs to be set for the connection. |
| Username | Username that is used to connect to the FTPS server. |
| Password | Password that is used to connect to the FTPS server. |
| Pickup Directory | All the Inbound files are picked up from In Directory. Both forward and backward slash is supported. |
| Drop Directory | This is the path to where the files are dropped. Both forward and backward slash is supported. |
| Number of Retries | Specify how many times you need to retry connecting to the FTP server after failure. |
| Retry Interval | Provide the value in seconds, based on which the connection will wait before retrying the connection. |
| File Type | File name or pattern to do the listing for. If not included the listing will be for a *.* pattern (depending on server implementation). Optional. |
| Certificate Id | Provide the SSL Certificate from the Drop down if the Certificate is checked in to B2Bi. If not, Click the UPLOAD CERT button and upload the certificate. |
| Use CCC | Indicates if information that travels across the control channel should be clear. Valid values are Yes and No. |
| Use Implicit SSL | Select this to use Implicit SSL. If not, it uses Explicit SSL. SSL_IMPLICIT – FTPS server expects and requires SSL to happen automatically at the time of connection. SSL_EXPLICIT – FTPS client requests SSL and a secure connection is negotiated. |
| Delete After Collection | Select this to Delete the file after it is picked up. |
| Pooling Interval | Provides the interval in which we need to collect the files. |
| Adapter Name | Provide the FTPS Client Adapter which is configured in B2Bi. |
- Partner Connection to Hub
Partner Connect to Hub is used when the Partner must connect to the Hub (Customer). This is the case, where Customer acts as the Server and allows Partners to connect to the server.
| Property | Description |
|---|---|
| Partner Name | Provide the Trading Partner Name. This needs to be unique. |
| Email Id | Provide the email ID of the trading partner contact for the reference |
| Phone Number | Provide the Phone number of the Trading Partner Contact |
| PGP Info | Provide the key ID of the PGP Key. The PGP Key needs to be loaded manually in B2Bi. |
| Status | Provide the status of the partner whether the partner is Active or Inactive If Active, the schedules will look for files. If Inactive, the schedules will ignore. |
| User Id | User Id that is used by the Partner to connect to the B2Bi-FTP server of B2Bi |
| Password | Password that is used by the Partner to connect to the B2Bi-FTP server of B2Bi |
| Virtual Root | Provide the Path which would act as the first level of the directory path for a user. If not provided, the base path of Pickup Directory would be considered as the Virtual Root. |
| Pickup Directory | This is the path from where the files are picked up. If not provided, the path provided in Virtual Root would be used. |
| Transfer Type | Type of the transfer (Binary / ASCII) |
| Drop Directory | This is the path to where the files are dropped. If not provided, the path provided in Virtual Root would be used. Note: In case of using the connection for both Inbound and Outbound files, please make sure to provide Pickup/Drop Directory to have unique directories for Inbound and Outbound files. |
| File Type | File name or pattern to do the listing for. If not included the listing will be for a *.* pattern. |
| Merge User | Select this if you want to use Existing User Account which is already available in B2Bi. |
| Create Mailbox in SI | Select this if you want to create Mailboxes in SI |
| Delete After Collection | Select this if you want the picked file to be deleted from the Pickup Directory. |
| Pooling Interval | Provides the interval in which we need to collect the files. On Arrival would create Routing Rule with the Partner Name in B2Bi. Separate Routing Rule is created per Partner which helps in the cleanup during decommission/inactivating of Partner. |
| Adapter Name | Provide Adapter name through we are going to connect. You can select any of the FTPS Server Adapter. |
| Configure User | Select this option to provide additional information of the user account such as authentication type, adding groups, permissions. Note: This is not a mandatory option; If required, customers can click on this button to add extra information for the user account. |
Application – B2Bi-FTPS
The process for creating an application which uses B2Bi-FTPS is like how we created the Trading Partner with B2Bi-FTPS above.
Trading Partner / Application – B2Bi-SFTP
5.5 B2Bi-SFTP
B2Bi-SFTP (Secure File Transfer Protocol) is a network protocol that provides file access, file transfer, and file management over any reliable data stream. It is run over a secure channel, such as SSH, that the server has already authenticated the client, and that the identity of the client user is available to the protocol.
| Property | Description |
|---|---|
| Partner Id | Provide the Trading Partner ID. |
| Protocol | Provide the protocol which would be used by the Trading Partner for sending/receiving Files. |
| Address Line1 | Address Information1 |
| Address Line2 | Address Information2 |
- Hub Connection to Partner
Hub Connect to Partner is used when the Hub (Customer) must connect to the Partner. This is the case, where Customer acts as the Client and connect to Partner’s server.
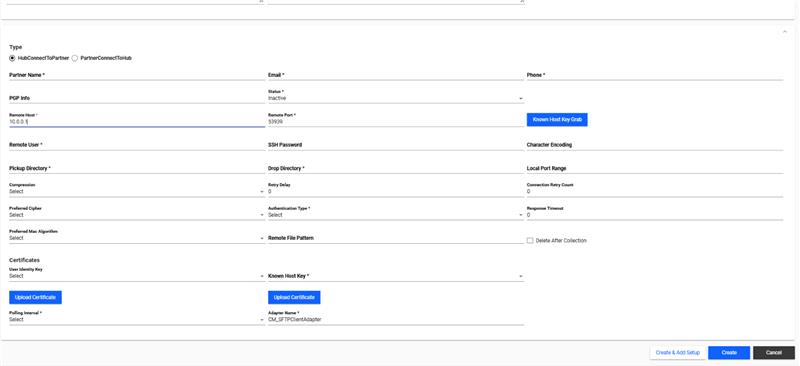
| Property | Description |
|---|---|
| Partner Name | Provide the Trading Partner Name. This needs to be unique. The Partner Configurations (Identities, Transports etc) in B2Bi is created with this name as the prefix. |
| Email Id | Provide the email ID of the trading partner contact for the reference |
| Phone Number | Provide the Phone number of the Trading Partner Contact |
| PGP Info | Provide the key ID of the PGP Key. The PGP Key needs to be loaded manually in B2Bi. |
| Status | Provide the status of the partner whether the partner is Active or Inactive If Active, the schedules will look for files. If Inactive, the schedules will ignore. |
| Remote Host | Hostname used to the B2Bi-SFTP Server to which we are connecting to. |
| Remote Port | Port number of the B2Bi-SFTP Server to which we are connecting to. |
| Known Host Key Grab | It becomes active, once you provide the Remote Host and Port. Click on it to automatedly fetch the remote server’s host key and provide a name for the Key. |
| Preferred Mac Algorithm | The MAC the client prefers to use for stream encryption. |
| Remote User | Provide Remote username that is used to connect to the SFTP server |
| SSH Password | Password that is used to connect to the SFTP server |
| Character Encoding | The encoding format is used to encode all outgoing commands and incoming data. If Character Encoding is not specified, the default system encoding will be used. Valid value is any valid encoding scheme supported by Java. Optional. |
| Pickup Directory | All the Inbound files are picked up from this Directory. Both forward and backward slash is supported. |
| Drop Directory | This is the path directly where the files are dropped. Both forward and backward slash is supported. |
| Local Port Range | Any valid port number(s) not being used by another application running on the system. A port in the specified range will be used to establish an SSH channel to the remote SFTP server. Optional. Valid values are: (empty) – system selects an available port. 0 – system selects an available port nnnn – use specified port nnnn, for example 9012. nn-yy – use a port in the range of nn to yy, for example 462-863 would use a port in the range of 462 to 863, inclusive. Multiples of the above values can be specified, separated by commas, for example 9012, 462-863, 4925. |
| Compression | Specifies whether data is to be compressed, which reduces the amount of data transmitted as the file is copied from one node to another. The file will be automatically decompressed at the destination. Required. Valid values: None, ZLIB. Default is None. |
| Retry Delay | If the connection has failed to connect to the system, then it will try again to connect that to the system within the time limit |
| Connection Retry Count | Specify how many times you need to retry connecting to the SFTP server after failure. |
| Preferred Cipher | The cipher the client prefers to use for both client to server and server to client stream encryption |
| Authentication Type | Method used to authenticate users (Password/Public Key) |
| Response Time Out | The maximum number of seconds it can take for the trading partner system to respond before the session times out and terminates. If a number less than 30 is specified, 30 seconds will be used. Optional |
| Remote File Pattern | File name or pattern to do the listing for. If not included the listing will be for a *.* pattern. |
| User Identity Key | User Key that is used to validate the user for connecting to SFTP. We can upload the Key in this option or Select the Key which is available in B2Bi in Trading Partner -> SSH -> User Identity Key . Provide the public part of the key to your trading partner. |
| Known Host Key | Public key used to authenticate remote SFTP servers to the Sterling B2B Integrator SFTP Client, this Key must be checked into the Sterling B2B Integrator in the – Trading Partner -> SSH -> Known Host key and selected from Drop Down or Select Upload button to upload the Key from here. We can select one or more Known Host Keys for the connection. |
| Pooling Interval | Provides the interval in which we need to collect the files |
| Adapter Name | Provide SFTP adapter name in the PCM. |
| Delete After Collection | Select this if you want the picked file to be deleted from the Pickup Directory. |
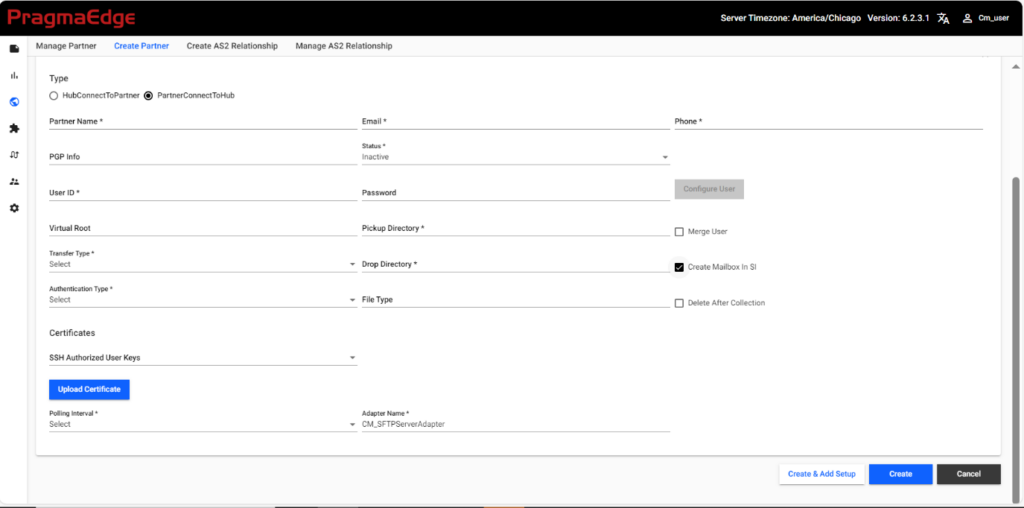
- Partner Connection to Hub
Partner Connect to Hub is used when the Partner must connect to the Hub (Customer). This is the case, where Customer acts as the Server and allows Partners to connect to the server.
| Property | Description |
|---|---|
| Partner Name | Provide the Trading Partner Name. This needs to be unique. |
| Email Id | Provide the email ID of the trading partner contact for the reference |
| Phone Number | Provide the Phone number of the Trading Partner Contact |
| PGP Info | Provide the key ID of the PGP Key. The PGP Key needs to be loaded manually in B2Bi. |
| Status | Provide the status of the partner whether the partner is Active or Inactive If Active, the schedules will look for files. If Inactive, the schedules will ignore. |
| Username | Username that is used to connect to the B2Bi-SFTP server. |
| Password | Password that is used to connect to the B2Bi-SFTP server |
| Virtual Root | Provide the Path which would act as the first level of the directory path for a user. If not provided, the base path of Pickup Directory would be considered as the Virtual Root. |
| Pickup Directory | This is the path directly where the files are picked up from on the Inbound. If not provided, the path provided in Virtual Root would be used. |
| Transfer Type | Type of the transfer (Binary / ASCII) |
| Drop Directory | This is the path directly where the files are dropped. If not provided, the path provided in Virtual Root would be used. Note: In case of using the connection for both Inbound and Outbound files, please make sure to provide Pickup/Drop Directory to have unique directories for Inbound and Outbound files. |
| Authentication Type | We can select the password or public key for the purpose of security on how we want Partner to connect to our B2Bi-SFTP server. |
| File Type | File name or pattern to do the listing for. If not included the listing will be for a *.* pattern. |
| SSH Authorized User Keys | Provide the SSH User key. This is mandatory if the authentication type is public key. The Key can be loaded into B2Bi under Trading Partner->SSH->Authorized User Key and selected from the Drop down here or click on the Upload button to upload it from here. |
| Pooling Interval | Provides the interval in which we need to collect the files. On Arrival would create Routing Rule with the Partner Name in B2Bi. Separate Routing Rule is created per Partner which helps in the cleanup during decommission/inactivating of Partner. |
| Adapter Name | Provide the SFTP Server Adapter Name through we are going to connect. |
| Merge User | Select this if you want to use Existing User Account which is already available in B2Bi. |
| Configure User | Select this option to provide additional information of the user account such as authentication type, adding groups, permissions. Note: This is not a mandatory option; If required, customers can click on this button to add extra information for the user account. |
| Create Directory in SI | Select this if you want to create Mailboxes in SI |
| Delete After Collection | Select this if you want the picked file to be deleted from the source. |
Application– B2Bi-SFTP
The process for creating an application which uses SFTP is like how we created the Trading Partner with SFTP above.
Trading Partner/Application: HTTP
5.6 HTTP
HTTP (Hyper Text Transfer protocol) is used by Partners/Applications where connection to a HTTP endpoint is required.
Note: The business process for this protocol doesn’t come out of box. Customers need to create their own process.
| Property | Description |
|---|---|
| Partner Name | Provide Partner Name |
| Partner Id | Provide the Trading Partner ID |
| Email Id | Provide the email ID of the trading partner contact for the reference |
| Phone Number | Provide the Phone Number of the Trading Partner Contact |
| PGP Info | Provide the key ID of the PGP Key. The PGP Key needs to be loaded in B2Bi. |
| Pickup Mailbox | The files can be stagged in this mailbox path after picking from HTTP. |
| Outbound URL | Provide the HTTP URL to which the connection is made. |
| Polling Interval | Provides the interval in which we need to collect the files. |
| Adapter Name | Provide HTTP adapter name in the PCM |
Application – HTTP
The process for creating an application which uses HTTP is like how we created the Trading Partner with HTTP above.
Trading Partner/Application
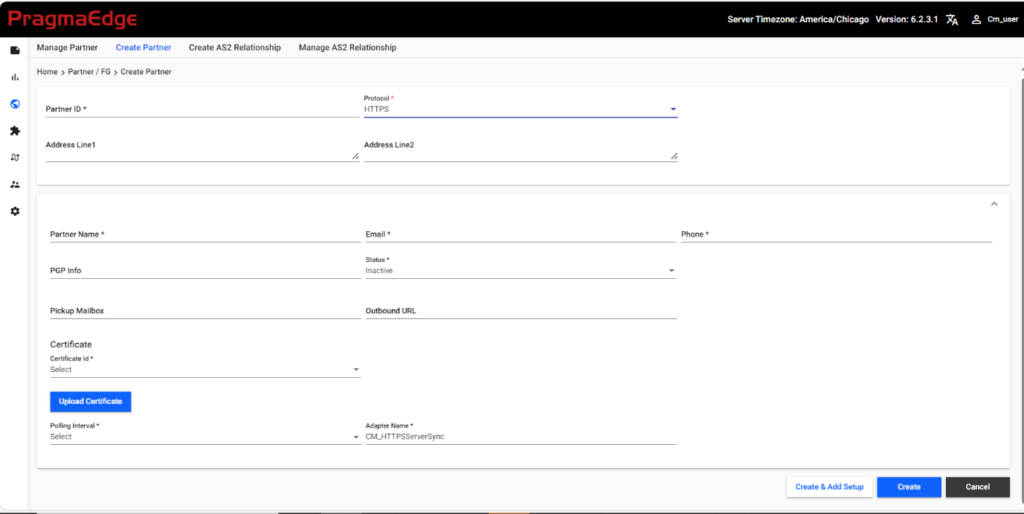
5.7 HTTPS
HTTPS (Hyper Text transfer protocol Secure) is used by Partners/Applications where connection to a HTTPS endpoint is required.
Note: The business process for this protocol doesn’t come out of box. Customers need to create their own process.
| Property | Description |
|---|---|
| Partner Name | Provide Partner Name |
| Partner Id | Provide Valid Trading Partner ID to identify the Trading Partner in Partner ID section Partner id is the application id |
| Email Id | Provide the email ID of the trading partner contact for the reference |
| Phone Number | Provide the Phone number of the Trading Partner Contact |
| PGP Info | Provide the key ID of the PGP Key. The PGP Key needs to be loaded in B2Bi. |
| Pickup Mailbox | The files can be stagged in this mailbox path after picking from HTTPS. |
| Outbound URL | Provide the HTTPS URL which needs to be invoked. |
| Certificate Id | Provide CA Certificate in the dropdown, otherwise upload the certificate to the system. |
| Polling Interval | Provides the interval in which we need to collect the files |
| Adapter Name | Provide HTTPS adapter name in the PCM |
Application – HTTPS
The process for creating an application which uses HTTPS is like how we created the Trading Partner with HTTPS above.
Trading Partner / Application – File System
5.8 File System
Collects (imports) files from the file system and extracts (exports) files to the file system. The collected file becomes the primary document in a business process for file collection. A primary document is input to the File System adapter for file extraction.
Commonly used at the beginning of a business process to bootstrap a workflow by reading one or more files from disk and starting a business process. Another common use is to write files to disk for some external purpose.
The File System should be mounted to the B2Bi server if it is a remote File System. If the File System is within the same server as B2Bi, then mounting is not required.
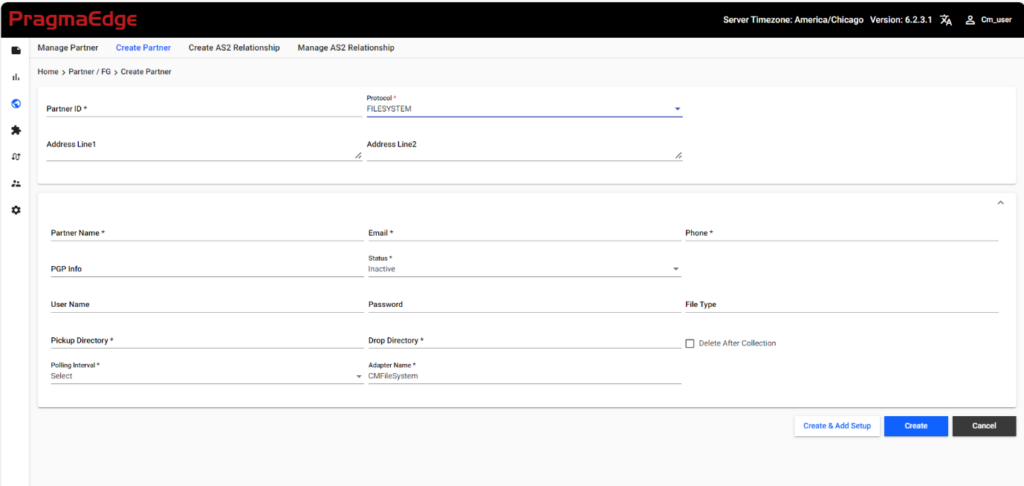
| Property | Description |
|---|---|
| Partner Name | Provide the Trading Partner Name. This needs to be unique. |
| Partner Id | Provide the Trading Partner ID. |
| Email Id | Provide the email ID of the trading partner contact for the reference. |
| Phone Number | Provide the Phone number of the Trading Partner Contact. |
| PGP Info | Provide the key ID of the PGP Key. The PGP Key needs to be loaded manually in B2Bi. |
| Status | Provide the status of the partner whether the partner is Active or Inactive If Active, the schedules will look for files. If Inactive, the schedules will ignore. |
| Adapter Name | File System Adapter from B2Bi which needs to be used for the partner. |
| Pick Up Directory | The files are picked up from this directory. Both forward and backward slash is supported. |
| Drop Directory | The files are dropped to this directory. Both forward and backward slash is supported. |
| Polling Interval | Provides the interval in which you need to collect the files. |
| Username | Provide Username for the remote system |
| Password | Provide password for the remote system |
| File Type | File name or pattern to do the listing for. If not included the listing will be for a *.* pattern (depending on server implementation). Optional. |
| Delete After Collection | Use the check box if you want to delete files after the file is picked from source. |
Trading Partner / Application – Mailbox
5.8 Mailbox
Mailboxes allow you to organize, store, and manage trading partner documents and transactions, by providing business document repositories. In addition, setting up mailboxes within Sterling B2B Integrator can also facilitate how you stage and schedule data transmissions, making the storage and retrieval of files more transparent to all parties—senders and recipients alike.
To create a trading partner with mailbox protocol, navigate to Partners -> Create Partner.
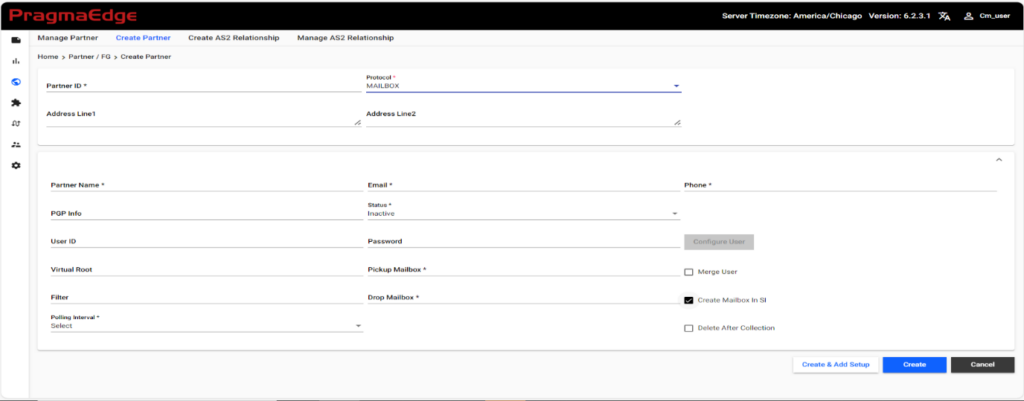
| Property | Description |
|---|---|
| Partner Name | Provide the Trading Partner Name. This needs to be unique. |
| Partner Id | Provide the Partner ID |
| Email Id | Provide the email ID of the trading partner contact for the reference |
| PGP Info | Provide the key ID of the PGP Key. The PGP Key needs to be loaded in B2Bi. |
| Phone Number | Provide the Phone number of the Trading Partner Contact |
| Status | Provide the status of the partner whether the partner is Active or Inactive If Active, the schedules will look for files. If Inactive, the schedules will ignore. |
| Username | User Id that is used by the Partner to connect to the B2Bi-FTP server of B2Bi |
| Password | Password that is used by the Partner to connect to the B2Bi-FTP server of B2Bi |
| Virtual Root | Provide the Path which would act as the first level of the directory path for a user. If not provided, the base path of Pickup Directory would be considered as the Virtual Root. |
| Filter | File name or pattern to do the listing for. If not included the listing will be for a *.* pattern. |
| Pickup Mailbox | This is the path from where the files are picked up. If not provided, the path provided in Virtual Root would be used. |
| Drop Mailbox | This is the path to where the files are dropped. If not provided, the path provided in Virtual Root would be used. Note: In case of using the connection for both Inbound and Outbound files, please make sure to provide Pickup/Drop Directory to have unique directories for Inbound and Outbound files. |
| Polling Interval | Provides the interval in which we need to collect the files. On Arrival would create Routing Rule with the Partner Name in B2Bi. Separate Routing Rule is created per Partner which helps in the cleanup during decommission/inactivating of Partner. |
| Merge User | Select this if you want to use Existing User Account which is already available in B2Bi. In this case, Password is not required. |
| Create Directory in SI | Select this if you want to create Mailboxes in SI. |
| Configure User | Select this option to provide additional information of the user account such as authentication type, adding groups, permissions. Note: This is not a mandatory option; If required, customers can click on this button to add extra information for the user account. |
Application – MAILBOX
The process for creating an application which uses MAILBOX is like how we created the Trading Partner with MAILBOX above.
Trading Partner / Application – Message Queue
5.9 Message Queue
Message Queue are a medium of communication, where the files are transferred to queues which would be received from the queue at the destination. It enables asynchronous communication between different components or systems, to increase system reliability, scalability, and flexibility.
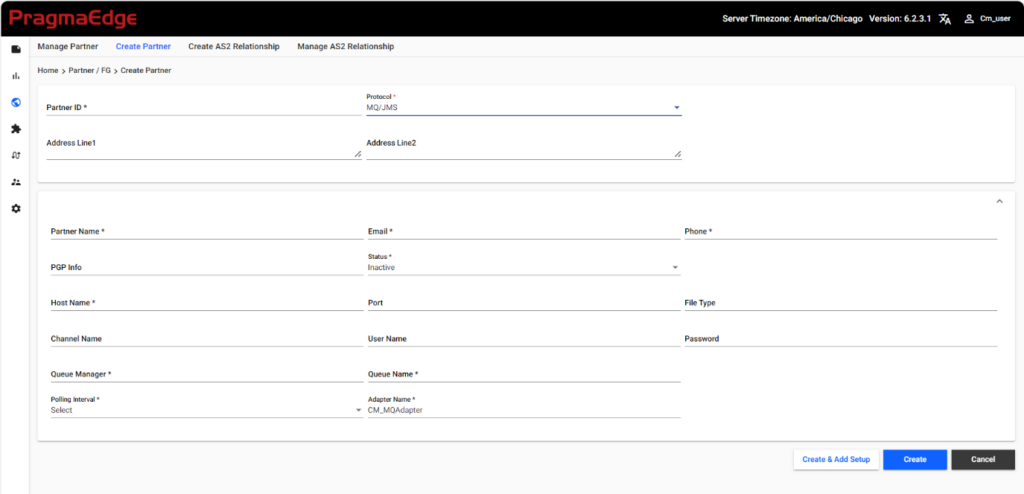
| Property | Description |
|---|---|
| Partner Name | Provide the Trading Partner Name. This needs to be unique. |
| Partner Id | Provide the Partner ID |
| Email Id | Provide the email ID of the trading partner contact for the reference |
| Phone Number | Provide the Phone number of the Trading Partner Contact |
| PGP Info | Provide the key ID of the PGP Key. The PGP Key needs to be loaded in B2Bi. |
| Status | Provide the status of the partner whether the partner is Active or Inactive If Active, the schedules will look for files. If Inactive, the schedules will ignore. |
| Queue Manager Name | Provide the queue Manager Name which is used to connect to. |
| Queue Name | Provide the queue name to drop/pick the file. |
| File Type | File name or pattern to do the listing for. If not included the listing will be for a *.* pattern. |
| Host Name | Provide the Host Name of the MQ Server. |
| Username | Username that is used to connect to the MQ server. |
| Channel Name | Provide the channel which will be monitored to get/put the files. |
| Password | Password that is used to connect to the MQ server. |
| Polling Interval | Provides the interval in which we need to collect the files. |
| Adapter Name | Provide the MQ Adapter from B2Bi which needs to be used for the connection. |
Note: Message Queue with SSL is not supported.
Application -Message Queue
The process for creating an application which uses Message Queue is like how we created the Trading Partner with Message Queue above.
Trading Partner / Application – SAP
5.10 SAP
PCM allows to connect with SAP through the B2Bi SAP Adapters. The Adapter must be configured in B2Bi.
| Property | Description |
|---|---|
| Partner Name | Provide the Trading Partner Name. This needs to be unique. |
| Partner Id | Provide the Partner ID |
| Email Id | Provide the email ID of the trading partner contact for the reference |
| Phone Number | Provide the Phone number of the Trading Partner Contact. |
| PGP Info | Provide the key ID of the PGP Key. The PGP Key needs to be loaded manually in B2Bi. |
| Adapter Name | Provide the SAP JCO Adapter name to connect to SAP. |
| SAP Route | Provide SAP route to route IDocs to/from B2Bi. |
Application – SAP
The process for creating an application which uses SAP is like how we created the Trading Partner with SAP above.
Trading Partner / Application – Connect: Direct
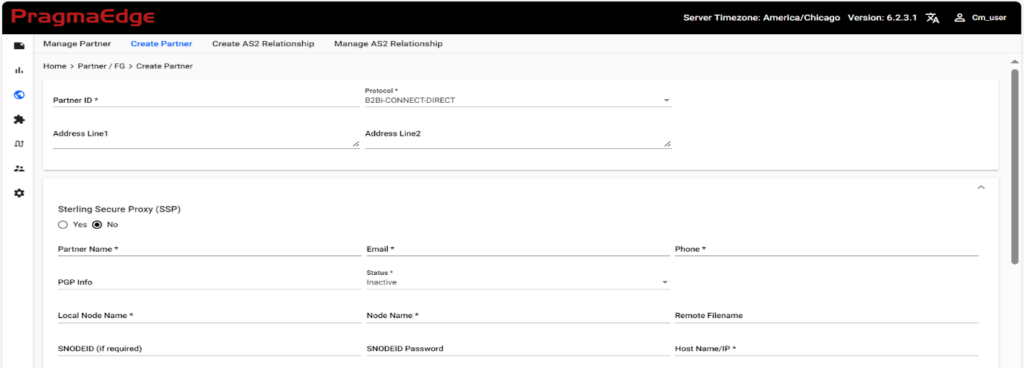
5.11 B2Bi-Connect Direct
Connect Direct is a mode of transfer to send large files between applications. All the Connect: Direct protocol information would be stored in PCM, and it uses CD Adapter/Services of B2Bi to connect and send/receive files.
| Property | Description |
|---|---|
| Partner Name | Provide the Trading Partner Name. This needs to be unique. |
| Partner Id | Provide the Trading Partner ID. |
| Email Id | Provide the email ID of the trading partner contact for the reference. |
| Phone Number | Provide the Phone number of the Trading Partner Contact. |
| PGP Info | Provide the key ID of the PGP Key. The PGP Key needs to be loaded manually in B2Bi. |
| Sterling Secure Proxy (SSP) | Select Yes, if you want the certificates to be loaded to SSP and No, if you want the certificates to be loaded to B2Bi. |
| Local Node Name | Provide the local Node Name |
| Node Name | Trading Partner’s node name |
| Remote File Name | Provide Remote Filename which needs to be picked up. |
| Snodeid | User id of the Partner’s node |
| Snodeid Password | Password of the Partner’s node |
| Host Name/IP | External Trading Partner host system (IP Address or DNS name). It’s an Optional field. |
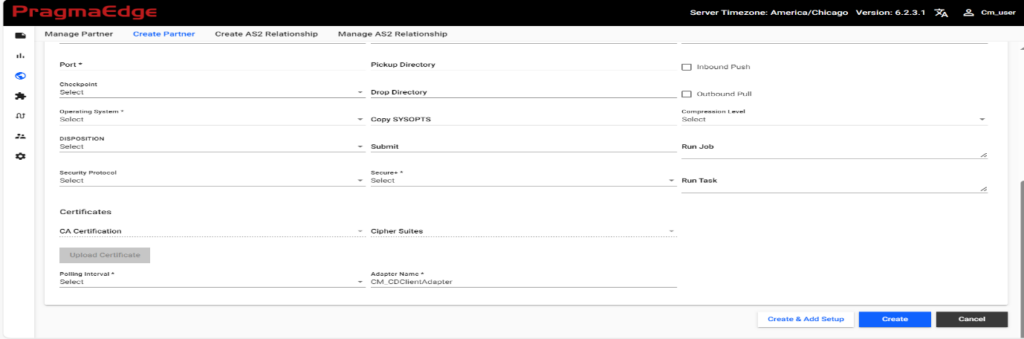
| Port | Port number of the Server to which we are connecting to. |
| Inbound Push | Select this checkbox if Partner is connecting to our CD server to push the file. |
| Outbound Pull | Select this checkbox if Partner is connecting to our CD server to pull the file. |
| Pickup Directory / Folder | This is the path from where the files are picked up. |
| Checkpoint | To make a check when the file size reaches the limit mentioned here (to restart interrupted transmissions) |
| Drop Directory/ Folder | This is the path directly where the files are dropped. |
| Operating System | Choose required operating system Etc., windows, UNIX, or mainframe. |
| DCB Params | Specify the data control block for mainframe |
| DSN Name | Data Set Name |
| Unit | Unit to use for the mainframe. |
| Storage Class | Storage Class to use for the mainframe. |
| Space | Allocation to use for the file in mainframe |
| Copy SYSOPTS | It can be used to copy files in cd. |
| Compression Level | To compress the file |
| Disposition | How the file must be opened |
| Submit | To submit the process in cd |
| Run Job | Used to run any commands synchronous in the server. |
| Run Task | Used to run any commands asynchronous in the server. |
| Security Protocol | Uses cryptography to secure data during transmission |
| Secure+ | Secure Plus provides enhanced security for Connect: Direct. It’s an optional, dropdown field and has options like Enable, Disable |
| CA Certificates | Certificate used to validate SSL server authentication of the trading partner. Required if you selected Must or Optional in the SSL field. |
| Cipher Suits | This field is mandatory when Secure plus is enabled. |
| Polling Interval | Provides the interval in which we need to collect the files. |
| Adapter Name | Provide Adapter name through we are going to connect. |
Application – Connect: Direct
The process for creating an application which uses Connect: Direct is like how we created the Trading Partner with Connect: Direct above.
Trading Partner / Application – AWS S3
5.12 AWS-S3
AWS Simple Storage Service (S3) is a service offered by Amazon Web Services that provides object storage. It is an object storage service that offers industry-leading scalability, data availability, security, and performance. You can use Amazon S3 to store and retrieve any amount of data at any time, from anywhere.
PCM stores the S3 onboarding protocol data and uses the B2Bi Adapter/Services which are used to connect to AWS S3 storages. The AWS S3 Jars need to be deployed in B2Bi for the adapter/services to work.
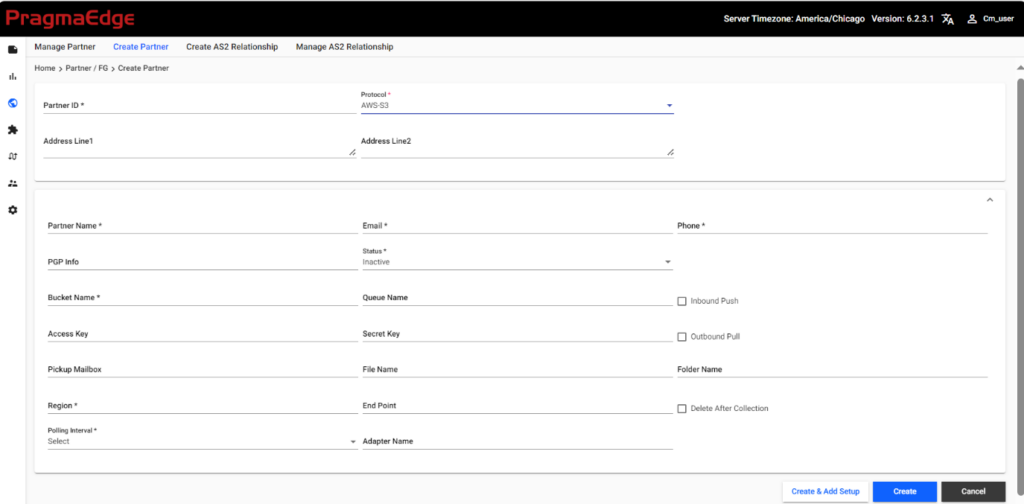
| Property | Description |
|---|---|
| Partner Name | Provide the Trading Partner Name. This needs to be unique. |
| Partner ID | Provide the Trading Partner ID |
| Provide the email ID of the trading partner for the reference. | |
| Phone | Provide the Phone number of the Trading Partner for reference. |
| PGP Info | Provide the key ID of the PGP Key. The PGP Key needs to be loaded manually in B2Bi. |
| Bucket Name | Provide the bucket name to which we need to connect. |
| Queue Name | Provide the queue name to drop the file. |
| Access Key | Provide the access key which needs to be used to connect to the bucket. This is optional when the credentials are stored in other methods. Refer to https://www.ibm.com/docs/en/b2b-integrator/6.1.2?topic=l-amazon-web-service-simple-storage-service#concept_pkc_wky_w2b__AWSKeys for more details. |
| Secret Key | Provide the Secret key which needs to be used to connect to the bucket. This is optional when the credentials are stored in other methods. Refer to https://www.ibm.com/docs/en/b2b-integrator/6.1.2?topic=l-amazon-web-service-simple-storage-service#concept_pkc_wky_w2b__AWSKeys for more details. |
| Pickup Mailbox | Mailbox which can be used for storage. Note: This is not used in the out of box Business Process. |
| File Name | Provided the File Name Note: The Out of box Business process can be customized to include filter based on the Filename. |
| Folder Name | Provided the Folder Name Note: The Out of box Business process can be customized to get files based on the Folder name. |
| Region | Provide the Region of the bucket which needs to be connected |
| End Point URL | Provide the Endpoint of the bucket which needs to be connected. |
| Polling Interval | Provides the interval in which we need to collect the files. |
| Adapter Name | Provide Adapter name which you need to use to connect to the S3 storage. |
| Delete After Collection | Select this, to delete the file from source after it is picked up. |
5.13 Custom Protocol
Sterling File Gateway supports adding Custom Protocols which can be created through PCM as well. The configuration of the AFT Extensions must be done in SFG. It will use the SFG Community which is configured in PCM Configuration File.
We can provide the details for the custom protocol as mentioned below.
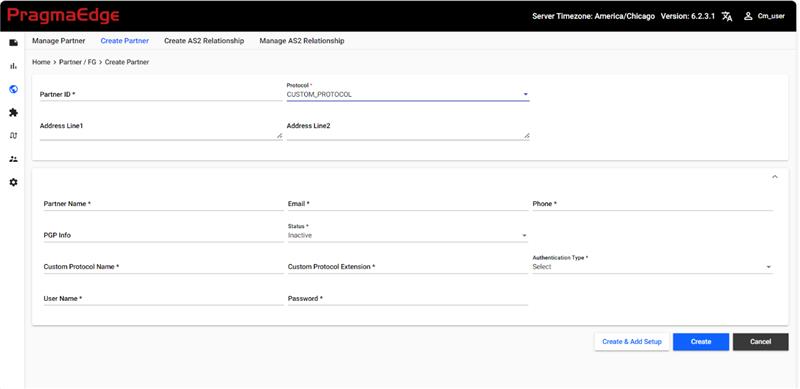
| Property | Description |
|---|---|
| Partner Name | Provide the Trading Partner Name. This needs to be unique. |
| Partner ID | Provide the Partner ID |
| Provide the email ID of the trading partner for the reference | |
| Phone | Provide the Phone number of the Trading Partner for reference. |
| PGP Info | Provide the key ID of the PGP Key. The PGP Key needs to be loaded manually in B2Bi. |
| Address Line1 | Address Information1 |
| Address Line2 | Address Information2 |
| Custom Protocol Name | Provide the Custom Protocol Name which is configured in SFG |
| Custom Protocol Extension | Provide the Custom Protocol Extensions which will be a combination of all extension values separated with ; |
| Username | Username that is used to connect to the server. |
| Password | Password that is used to connect to the server. |
| Authentication Type | Select Local or External Authentication for the User Account. |
5.14 Manage Partner
Manage Partner option helps to search for the created partners, view and edit the information and to activate and deactivate the partners.
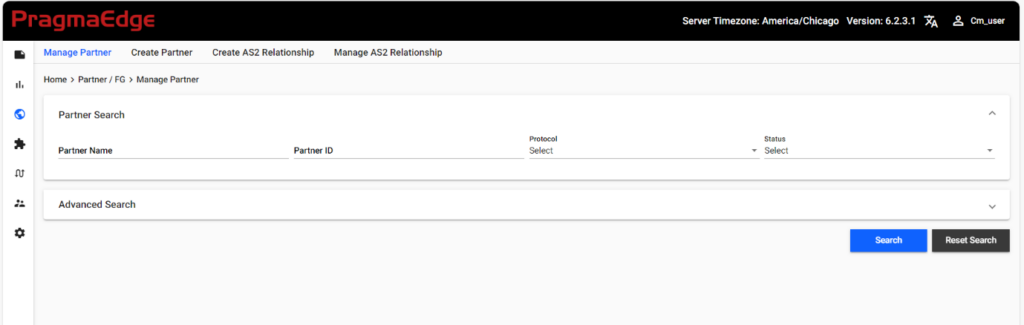
5.14.1 Search/Edit/Edit All/Add/Delete Partners
Navigate to Partner -> Manage Partner
We can search for the partner based on Partner Name, Partner ID, Protocol or Status (Active/ Inactive). Select any of the options and click Search Partner.
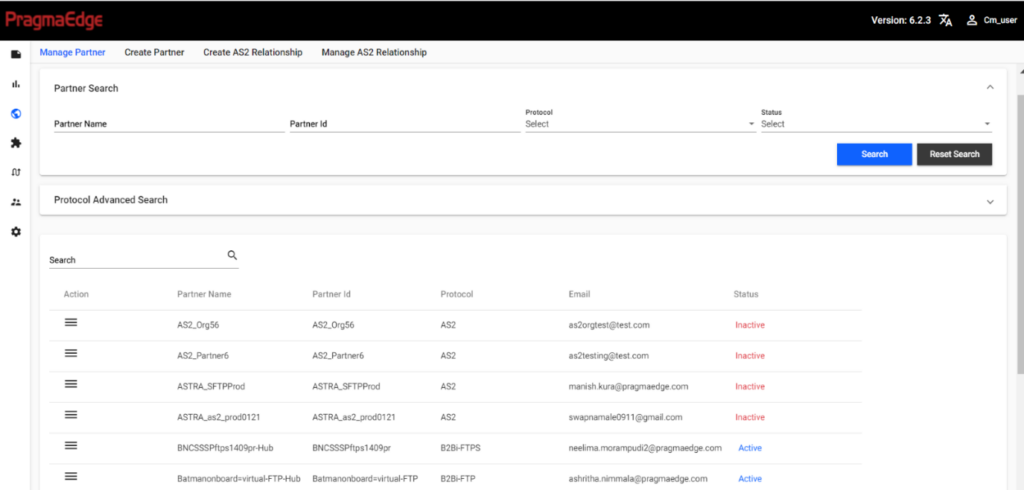
We can Activate/Deactivate, Edit, Delete and View Aduit Info of the partner by clicking on Actions for each partner.
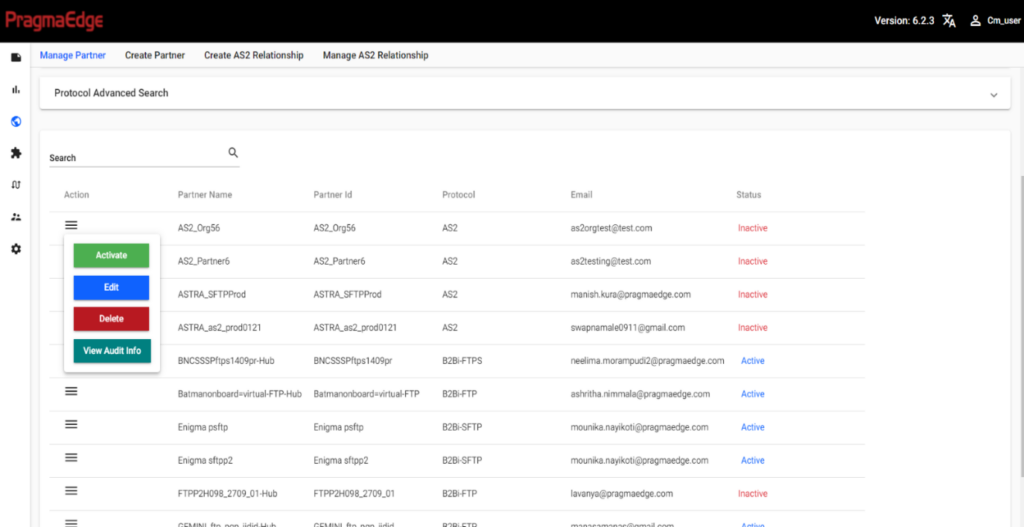
We can click on Actions-> EDIT to view the protocol information under the Protocol Tab.
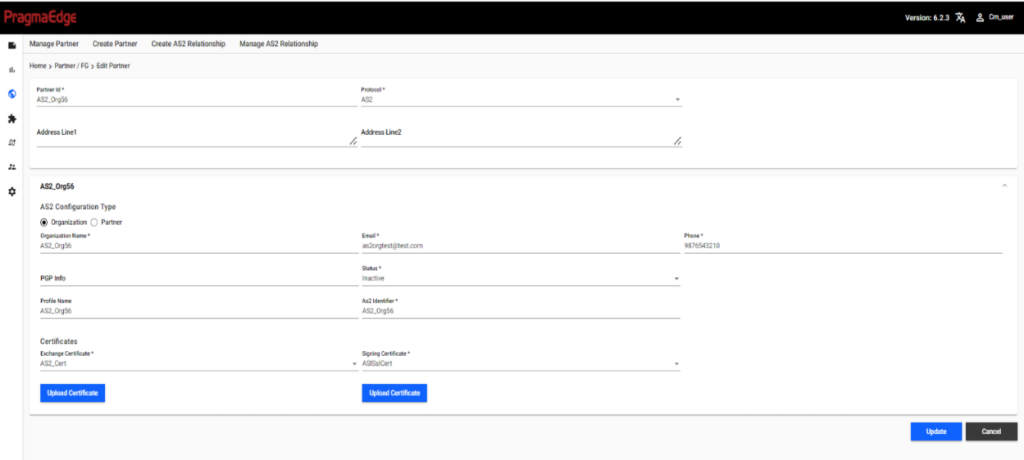
We can click on Actions-> View Audit Info to view the activity history of the Partner/Application setup.
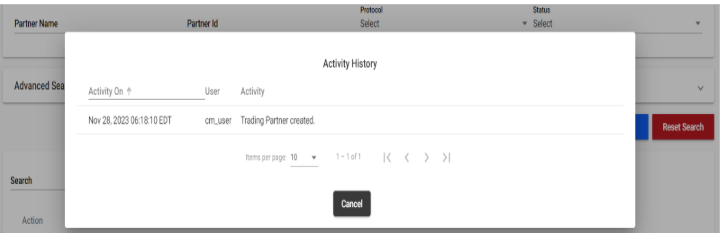
We can see the history of what has happened to the Partner, who created the partner and when it was created, and all other changes made to the setup.
We can use Actions -> Edit All option, to view all the related partner/application details correlated in the same screen. This will show you all the Partner/Application details which have the same Partner ID/Application ID respectively.
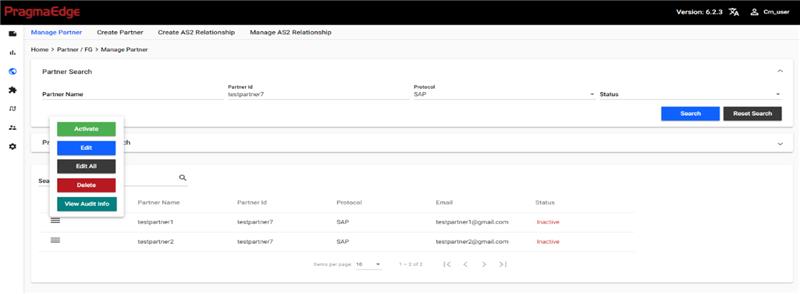
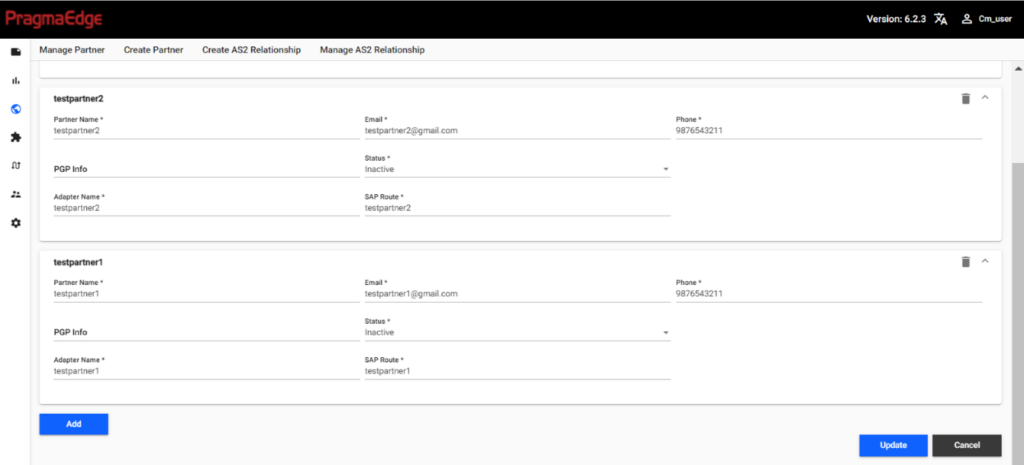
We can click on the arrow on the right side of the pane, to minimize or delete any of the Accounts (Partner Name/Application Name). The delete will only remove it from the screen and will not delete it from the server.
We can also, click on the Add button, which opens a new pane for creating a new account (Partner Name) to the Company (Partner ID). Once all changes are done, you can update to save the details.
We can click on Actions->DELETE to delete the Partner. This functionality will delete the unique Partner Name upon which the Delete action is used. It will also give you a confirmation pop-up option, where you can select if you want to delete the setups in SI as well. Selecting those and confirming Delete will delete the setups in B2Bi, and if not selected will just delete the connection setup in PCM.
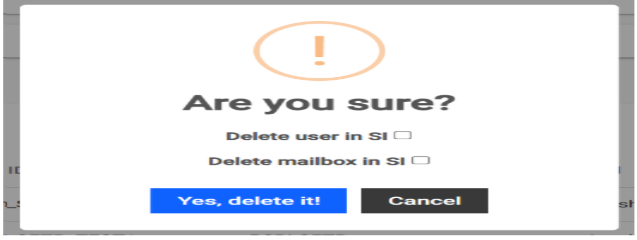
5.14.2 Test Connectivity
Customers can test the protocol endpoints to make sure if the details are valid and connection is successful. We can go to the Action button of the Partner/Application and click on Test. It will open a pop-up, where you can see the test results.
We can also get the B2Bi BP Instance ID which performed the connection test. It can be used to look up in B2Bi for more details. Also, the failure error message is also showcased, which can be used to update the invalid details in the connection setup.
This functionality is applicable only for SFTP/FTPS/FTP Hub to Partner, AS2, Connect-Direct and AWS-S3 Protocols. Refer to https://www.ibm.com/docs/en/spems/6.2.3?topic=manager-configuring-pcm-installation to add the required configurations for the connection test to work.
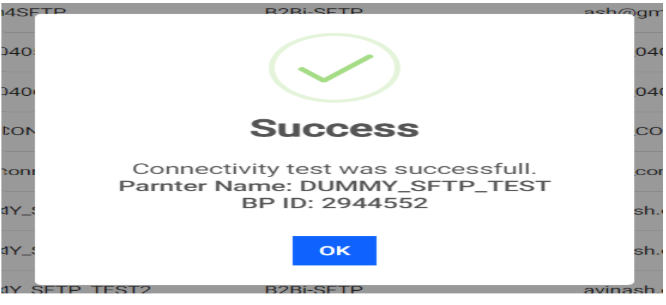
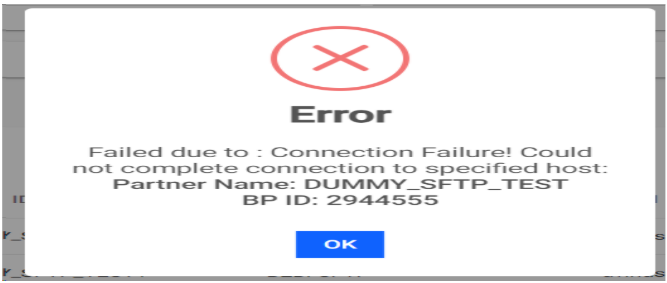
5.15 Protocol Advanced Search
We can perform advanced search to look up specific data across different protocols. We can click on the Protocol Advanced Search which will open the pane for Advanced Search parameters. We can select Property Name as the search parameter and Property Value as the value to search for. We can search with a total of 6 unique parameters.
Example: Property Name can be as Remote Host and Property Value can be 23.22.96.149. This will look up the DB and provide us with the result of all the different Partners who have their host as 23.22.96.149.
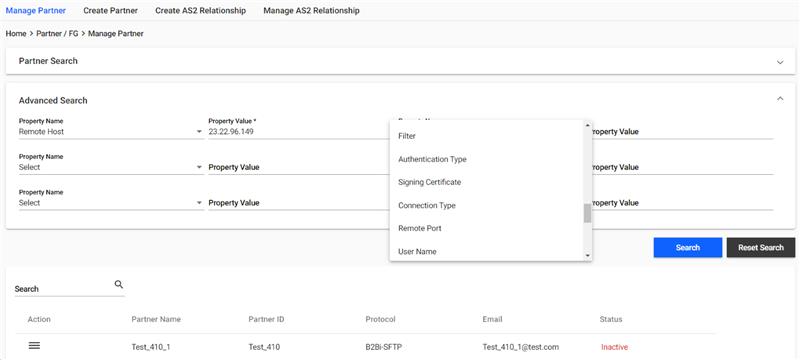
6. New Application Setup
Application is a backend connection within our gateway (e.g., ERP system). The outbound files will be picked up from the Application and sent to the Partner and the Inbound files from the Partner will be dropped to the Application.
6.1 Creation of Application
Navigate to Application -> Create Application
| Property | Description |
|---|---|
| Application Name | Name of the Application |
| Application ID | Provide the Application ID |
| Email address to send notifications when there is an error | |
| Phone Number | Provide the Phone number |
| Protocol | Protocol that is utilized to integrate into the application. SFTP, FTP, FTPS, File System, MQ, SAP, Web service, AS2, SFGFTP, SFGFTPS, SFGSFTP and Connect: Direct |
| Status | Active / Inactive |
Protocol information is very similar to the Partner Protocol information explained in the previous section.
6.2 Manage Application
Manage Application option is used to edit the already created application and for activating and deactivating it.
All the features mentioned in the Manage Partner are applicable in Manage Application as well. You can refer to Manage Partner for more information.
Search/Edit/Edit All/Delete Application:
Navigate to Application->Manage Application
We can search and edit the applications that exist in the system.
We can Edit, Edit All, Activate/Deactivate, Delete and View Audit Info of the applications by clicking on Actions for each application.
7. Setting up Workflow for TRADING PARTNER
Data Flows:
The data flow links the trading partner with the application with the transactions/files which need to be processed within them.
It includes the Build Workflow option, which is the key to building flexible processes that are required between a trading partner and application. Once the trading partner information and the required application are selected then we can build the workflow to transfer the files between them.
7.1 Build data flow
The process of moving the files from one end point (partner) to the other end point (application) is Build data flow. PEM Community Manager exhibits non- disruptive workflow by creating rules between partner and application.
Click on Build Workflow and select Partner profile and Application Profile in the required fields. If it is a new setup, there won’t be any matching workflow between the Partners and Application Profile.
Click on Setup Workflow to setup a new flow between Partner and Application.
All Inbound Transactions are setup on the Inbound Tab and All Transactions that are outbound from the application are setup in the Outbound Tab.
7.1.1 Setup workflow
We can create Inbound and Outbound transaction details. This transaction details consist of File Name, Document Type (XML, Flat File, etc.), Transaction (810, 811, etc.), Sender ID and Receiver ID.
Selecting Inbound/Outbound, will provide the below two radio button options.
- MFT
- Doc Handling
MFT:
We can select this option, when we want the file to be routed based on the file name pattern.
Provide document properties, which can be either pattern such as *.*, *.txt etc. or it can also be any Regular Expressions such as ^[A-Z].txt. Click on -> Add to add the file type.
Doc handling:
We can select this option, when we want the file to be routed based on the content of the file. The file will be picked up according to the Document Parameters sender ID, Receiver ID, and DOC Transaction.
INBOUND FILE SETUP & OUTBOUND FILE SETUP:
| Name | Description | (*) Mandatory |
|---|---|---|
| File Name | Name of the file naming pattern It can be any regular expression as well. | Mandatory for MFT |
| Filter | Any additional filter to apply for MFT. Example: We can provide any mailbox paths and match the Filename on the files which are available in that mailbox paths alone etc Note: The custom logic needs to be added to the Core Business Process. | |
| Document Type | Provide Document Type (Ex: XML, FLAT FILE) | Mandatory for Doc Handling |
| Version | Provide version | |
| Transaction | Provide Transaction number to identify the transaction type (Ex:850,820) | Mandatory for Doc Handling |
| Sender Id | Provide Sender Id | Mandatory for Doc Handling |
| Receiver Id | Provide Receiver Id | Mandatory for Doc Handling |
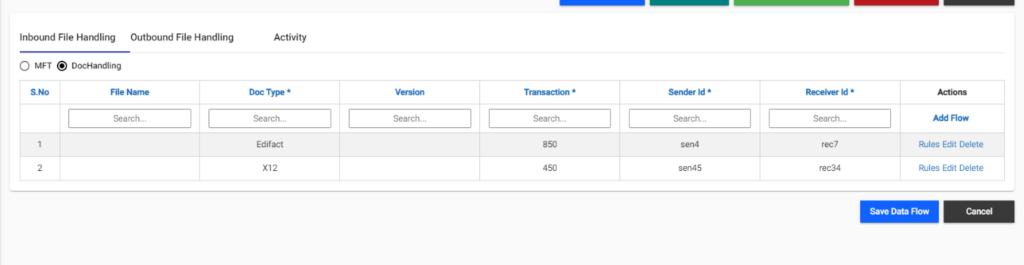
7.1.2 Workflow Rules
Rules can be applied to the File Types which are setup as explained above for the Inbound/Outbound and MFT/Document Handling file types.
The Rules are considered as the business logic which needs to be applied for the file flow. We can add one or more rules based on the requirements. The rules are executed in sequential order and can be re-arranged as required.
We can click on Edit to make changes to the File Type details and can use Delete to Delete the File Type. Rules can be selected to apply rules for the specific file type.
Once we click on Rules, it will open a pop up, with the list of all available rules on the left pane.
Select the required rule as per the workflow for file processing; we can also search with Rule Name and then Click on -> Add to apply the rule.
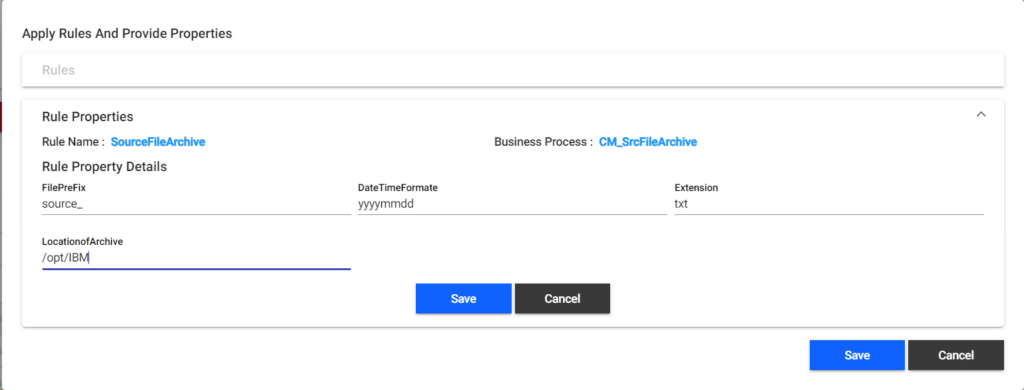
ADD: Select the rule from the Available Rules and click on add to add the new rule.
REMOVE: Select the Rule from the Applied Rule and click on Remove to remove the rule.
UP& DOWN: To change the order of the rules we can use up and down options.
EDIT: By using the edit option, we can edit the properties of the rule. Refer to Workflow Rule Properties for more details regarding Properties.
Below table shows some of the Rules with the description. Similarly, there are many rules which come out of the box. Refer to Predefined Rules for more details on the out of box Rules.
| RULES | USE / DESCRIPTION |
|---|---|
| Source File Archive | This rule is a combination of file rename and file archive, it provides ability to directly view/ download input file from PCM File Transfers menu. |
| De envelope | Invokes the De-Envelope Service to validate the Input File against the Envelopes. |
| CHAR_REPLACE | This rule can replace a char to another chars at time for entire file. |
| Translation | Translation is used to perform the translation of the file; this rule utilizes the map that is being checked in B2Bi. |
| Destination file Archive | This rule is a combination of file rename and file archive; it provides ability to directly view/download input file from PCM File Transfer menu. |
| Drop Process | This rule is to send the file to the destination. |
7.1.3 Workflow Rules Properties
Rules are tagged with certain properties which can be provided dynamically for each flow. The values provided for the properties are passed dynamically to the business process during execution. It allows dynamic property mapping, which can be specific to trading partners. Example: Translation Process which can have maps specific to each trading partner’s flows.
Rules can also be extended by creating/modifying by updating the business process in B2Bi.
Below table shows some of the Rules with their Properties. Each Rule can have its own set of Properties. Similarly, there are many rules which come out of the box. Refer to Predefined Rules for more details on the out of box Rules.
| RULES Properties | RULE PROPERTIES Description |
|---|---|
| Prefix | Prefix which needs to be added to the filename going to the archive. |
| Date Time Format | Date time format to be included as part of the filename going to the archive. |
| Extension | Extension for the filename. |
| Location of Archive | Location where the file needs to be archived. |
7.1.4 Data Flow Audit Info
All the data created/updated in the Data Flow is being tracked and can be viewed through Audit Info.
We can traverse to the Audit Info tab for the Partner/Application Data Flow where we can see all the tracking details.
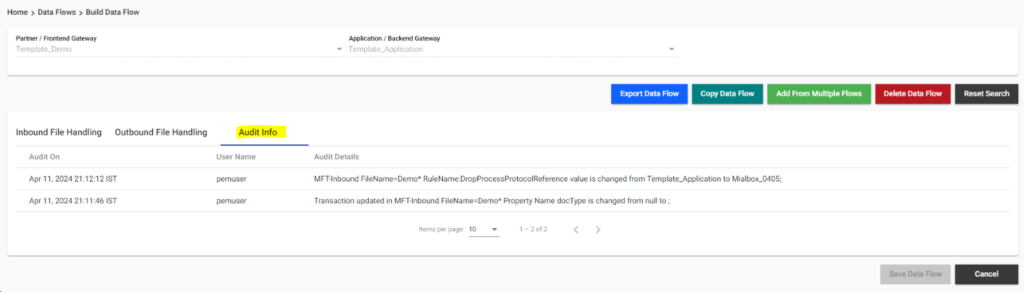
7.1.5 Export Workflow
Export Workflow exports the complete workflow in an XML file, which can be imported to other Partner/Application Flow in the same server or into another server. It can be used to move the setups to other environments.
Selecting the Export Data Flow button will ask a confirmation and once confirmed will download the Export File.
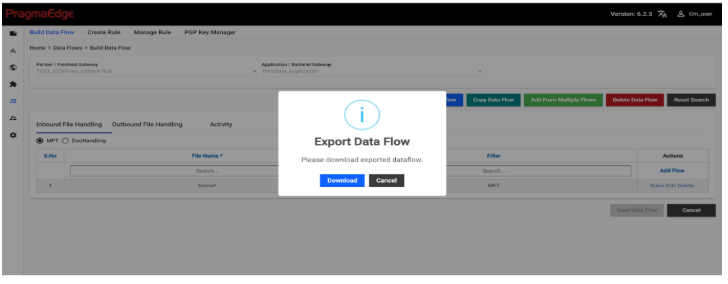
7.1.6 Import workflow
Import Workflow can be used to import one partner/application workflow to another partner. The XML export file generated through Export Workflow is used to Import the Workflow. Import workflow will reduce the time of developing the same workflow to the other partner.
We can click on the Import Data Flow, which will open a pop-up window, where you can click on the Attachment icon and upload the XML file and select Upload to add the Workflow from the export file.
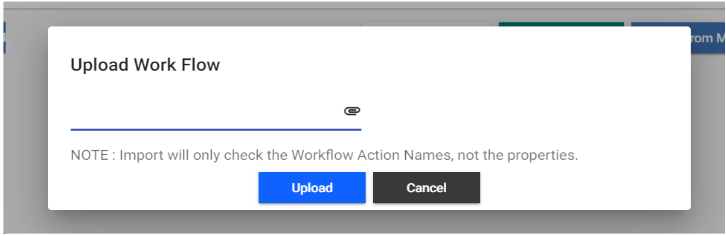
7.1.7 Copy workflow
Copy Workflow can be used to copy the workflow from one partner to another within the same instance/environment. Building a new workflow may take to add flows, rules, properties from scratch, whereas the copy workflow will reduce the onboarding time.
Every partner can have a different process, but most of the rules might be the same with a few changes. In that case, we can use the copy workflow feature. After copying the workflow, it allows you to change a few properties or any details which you want to modify.
We can open the Data Flow which we want to copy and select COPY Data Flow. We will get a pop-up where we can select the destination Partner and Application to which it needs to be copied. Moreover, we can also provide the Sender ID and Receiver of the destination flow as those would be unique. Once all details are provided, click on Update. The Data Flow will be copied to Destination Partner and Application. We can make any changes required and click on Save Data Flow.
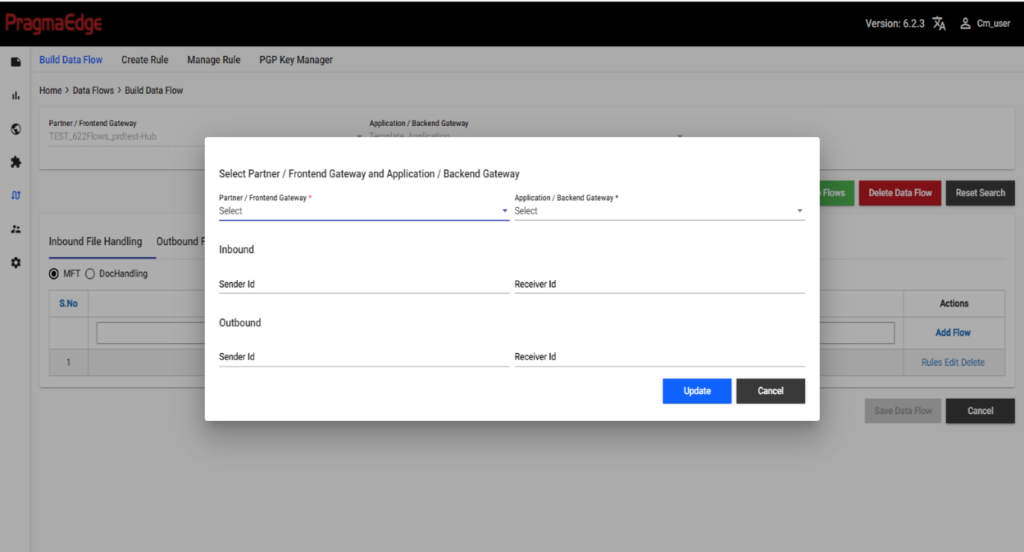
7.1.8 Add from Multiple flows
We can use ‘Add from Multiple Flows’ to grab the workflows from different application and partner combinations, after which we can select what flows are required to be added to our Partner.
We can select the Partner and Application for which we need to add the flows from other setups and select Add from Multiple Flows and in the search criteria, search with the required data and click SEARCH, which would give us the list of all flows which are matching the criteria. We can select what flows we need to add and click on NEXT, which would add the selected flows to our setup.
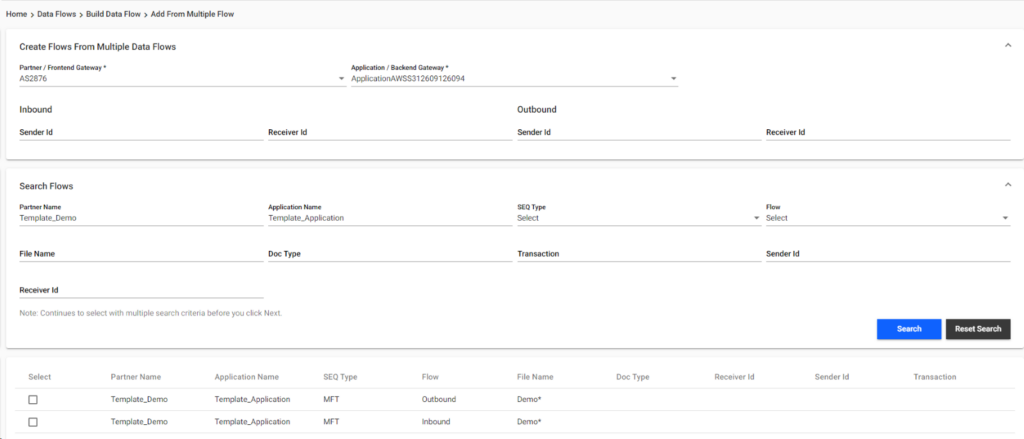
7.1.9 Delete Workflow
We can delete the entire workflow between the partner and application by using the Delete Data Flow button.
Reset search:
Reset Search resets the selected Partner and Application. It can be used to reset and search with any other Partner Application combination for the data flows.
7.2 Create Rule
Rule is a business process of B2Bi used to perform specific business operations. To create a rule, first we need to develop a business process and deploy in the Sterling Integrator B2Bi. After which, the Create Rule in PCM will show the business process name in the drop down for selection.
Rule Name: Name of the rule, which is user defined and can define what the process is about.
Business Process name: Business process names come from the Sterling Integrator, as PEM Community Manager is integrated with the Sterling Integrator.
Property Names: Property Names are inputs to the Business process; Property names have Key and value pair relationship. Example: Date Time Format is the key and can have any user defined value such as “yyyyMMddHHmmss” or “yyyymmdd” etc. We need to mention the Property names according to the Business Process functionality.
We can give any custom data as a property which needs to be sent to business process. The property value can be dynamic; the same Rule applied for different partners can have different property values.
The business process must be created in B2Bi. Refer to https://www.ibm.com/docs/en/b2b-integrator/6.2.0?topic=process-creating-business-models for more details regarding business process creation.
The Properties can be fetched from PCM Rule into the business process; The Out of Box CM_ProcessRules business process, will get the details from the Rules and passes onto the business process of the appropriate rules. It will be available in the XPATH /ProcessData/CM_FRAMEWORK/ExecRules/VALUE1/text() for the Property1 Value,
/ProcessData/CM_FRAMEWORK/ExecRules/VALUE2/text() for the Property2 Value and so on.
Example: To create concatenation of two names which are passed as properties, we create a rule as Concatenation with Property1 and Property2. In the business process, we add the concatenation logic as <assign to=”output” from=”concat(/ProcessData/CM_FRAMEWORK/ExecRules/VALUE1/text(),
/ProcessData/CM_FRAMEWORK/ExecRules/VALUE2/text())”/>
7.3 Manage rule
Manage Rule can be used to update any of the existing rules. We can add/remove/update properties or business process of the existing rule.
Below picture describes the Manage rule of Source File Archive, where we can update any of the details if required.

When the Properties are modified in PCM Rules, the corresponding business process in B2Bi also needs to be updated. Refer to the Create Rule section for more details regarding business process correlation with PCM Rule Properties.
7.4 Predefined File Processing Flow

The process is bootstrapped through scheduler or routing rule and is routed to the Core Process business process. Core Process BP finds if the file matches the MFT pattern or Doc Handling data and executes the appropriate file type’s rules. Once all the rules are executed, the details are logged into the transfer tables.
In case of any errors, the Error Handler business process is invoked to send email notification.
7.5 Customizing the Predefined File Processing Flow
7.5.1 Bootstrapping Process
Create a Custom Business Process for Mailbox File Retrieval and Core Process Integration
Create your own business process (BP) to retrieve files from the Mailbox specified in the Routing Rule, obtain the Partner/Application details for the Mailbox, and implement your custom logic. You must then send file and the necessary data to the Core Process.
To do this, follow the steps:
- Retrieve and extract the file from the mailbox path specified in the Routing Rule.
- Use the Lightweight JDBC Adapter to obtain the Partner/Application details associated with the Mailbox Path specified in the Routing Rule.
- Send the extracted file and the obtained Partner/Application details to the Core Process BP.
For more information on the standard process, refer to the CM_MailBox_GET_RoutingRule_Inbound and CM_MailBox_GET_RoutingRule_Outbound BPs.
Note: You must provide the BP name in PCM Configuration to assign it to the Routing Rules during Partner/Application creation, which uses the On Arrival polling interval.
Create a Custom Business Process for Partner/Application Detail Retrieval and Protocol Pickup Scheduling
Create your custom business process and incorporate the logic to retrieve Partner/Application details based on the polling interval. Invoke the respective protocol pickup BPs for the Partner/Application. Schedule the BP to align with the corresponding polling interval.
To do this, follow the steps:
- Use the Lightweight JDBC Adapter to obtain the Active Partner/Application details assigned to your polling interval. For example, if your custom BP is scheduled for every 10 minutes, write the logic to retrieve the active Partner/Applications set to a 10-minute polling interval.
- Create a choice/repeat logic to send the Partner/Application details to the specific Pickup BPs.
For more information on the standard process, refer to CM_PICKUP_PROCESS_24h or a similar PICKUP BP.
7.5.2 Pickup Process
Create a custom pickup business process based on your requirements. The pickup/GET BPs must be invoked from the BP assigned to the Scheduler, as explained in Bootstrapping Process. The retrieved file and necessary data must then be sent to the Core Process.
To do this, follow the steps:
- Use the standard protocol services/adapters and create your custom logic for file retrieval.
- Pass the values to the services/adapters using the data received from the Bootstrapping BP. For example, in case of SFTP, you can use the SFTP Begin Service, GET Service, and so on, and pass the necessary parameters to them.
For more information on the standard GET/Pickup process. refer to CM_SFG_S_FTP_S_GET BP.
7.5.3 Drop Process
Create a custom drop BP based on your requirements. The drop/PUT BPs must be invoked within the CM_DropProcess BP. The retrieved file and necessary data for the Drop BP must be passed from the Drop Process.
To do this, follow the steps:
- Use the standard protocol services/adapters and create your custom logic for file dropping.
- Pass the values to the services/adapters using the data received in from the CM_DropProcess BP. For example, in the case of SFTP, you can use SFTP Begin Service, PUT Service, and so on, and pass the necessary parameters to them.
For more information on the standard PUT/Drop process, refer to CM_S_FTP_S_PUT BP.
Note: You are responsible for handling customizations, and Pragma Edge does not assume responsibility for any issues related to the custom artifacts.
7.5.4 Rule Process
Pragma Edge PCM comes equipped with a set of standard out-of-the-box Business Process (BPs) that are designed to handle core operational tasks efficiently. These BPs components are integrated into the rule engine and can be invoked automatically based on predefined conditions, enabling seamless execution of business logic.
In addition to the standard BPs, PCM allows users to define custom business logic tailored to specific operational needs by creating custom business process in IBM Sterling Integrator and configure it in PCM Rule. This flexibility ensures that PCM can adapt to unique business scenarios while maintaining consistency and control.
The Rules can be customized as referred in Create Rule:
7.6 Customizing the AS2 Process for File System, Direct Process Storage Options
The out of box business process allows the files to be processed through PCM for the Mailbox configured AS2 Relationships. In the case of File System or Direct Process, customer needs to add the logic to send the file to PCM in it.
While using File System, you need to update the Predefined AS2Extract Business Process to send the inbound file to PCM.
Steps:-
- After the Operation “ExtractToFileSystem”, add the logic to check if the File coming from the AS2 location is available in PCM Partner/Application.
- If available, use Assign and capture the Partner and File information and invoke the CM_CoreProcess Business Process.
Refer to MailboxAS2Add Business Process to get more details on how this is configured for Mailbox storage.
You need to customize the CM_DropProcess Business Process to push the Outbound file from PCM to the FileSystem location configured in the AS2 Relationship.
Steps:-
- You will have a Sequence “AS2Drop”, which has the logic to send the file to Mailbox Path configured in AS2 Relationship.
- You can update the LWJDBC query to fetch the File System location of the respective AS2 Partner/Application.
- Pass all the File/Partner related information to the File System Adapter to write the files.
Refer to CM_DropProcess Business Process under the AS2Drop Sequence to get more details on how this is configured for Mailbox storage.
While using Direct Process, you need to add the logic to send the File and Partner/Application details to CM_CoreProcess Business Process for Inbound Files and Customize CM_DropProcess to send File and Partner/Application details to your custom BP for Outbound Files.
7.7 PCM Best Practices
File Search
The View Activity/Audit Info, which logs the steps of file processing, can be commented out if it is not required to troubleshoot or logging the processing steps.
To do this, edit the CM_CoreProcess BP and comment out the CM_Database_LogInformation invocation:
<operation name=”DataBase_Information”>
<participant name=”InvokeBusinessProcessService”/>
<output message=”InvokeBusinessProcessServiceTypeInputMessage”>
<assign to=”INVOKE_MODE”>INLINE</assign>
<assign to=”NOTIFY_PARENT_ON_ERROR”>ALL</assign>
<assign to=”WFD_NAME”>CM_Database_LogInformation</assign>
<assign to=”.” from=”*”></assign>
</output>
<input message=”inmsg”>
<assign to=”.” from=”*”></assign>
</input>
</operation>
Polling Interval
Avoid using a polling interval of less than 30 minutes for partners processing large volumes or sizes of files. Instead, schedule them for 30 minutes or 1 hour. If files need to be picked up immediately upon arrival, move them to on-arrival.
MFT Setup Review
Assume an application named Application1 that sends files with unique patterns to specific Partners. For example, files with *.txt are sent to Partner1, and files with *.xml are sent to Partner2. Instead of creating two separate data flows (Partner1 ↔ Application1, Partner2 ↔ Application1), create a single data flow and add a Drop Process Rule to route files to the respective partners. Set up the data flow at the application level, allowing a single application to send files to different partners within the same data flow.
BP Log Level
Reduce the log/persistence level to BP Start Stop – Engine May Override. This is a best practice in Sterling B2B Integrator and should be leveraged for improved performance
Asynchronous Drop Process
Change the drop process to Async based on your requirements.
You can change the Protocol PUT BPs invocation to ASYNC in the CM_DropProcess BP and update CM_CoreProcess to perform CM_Database_LogInfo based on the ASYNC results.
Set Queue Configuration
You can create multiple core processes and configure the core process based on priority. Set up the BPs to run on specific queues based on your business priorities.
Setup Batching
Create a batch process when multiple files must be sent over a single connection. Collect the files and add them to a Mailbox, then create a BP to pick all files from the Mailbox and push to destination using a single connection.
7.8 PGP Key Manager
The PGP Keys can be uploaded through the PGP Key Manager menu from Data Flow -> PGP Key Manager. On the Upload tab, we can select Partner/Application name, Name for the key to be stored and upload the PGP Key file and click on Save. The Keys will be loaded to Native PGP of B2Bi.
Note: The Upload File of the key must be in ASCII format, and this is supported through SFG APIs.
The PGP Keys can be searched/downloaded/deleted through the PGP Key Manager menu from Data Flow -> PGP Key Manager under the Manage tab. We can search for all the existing Keys or based on the Key Name or Key ID or Partner/Application name.
We can also perform Actions like DELETE or DOWNLOAD the PGP keys.
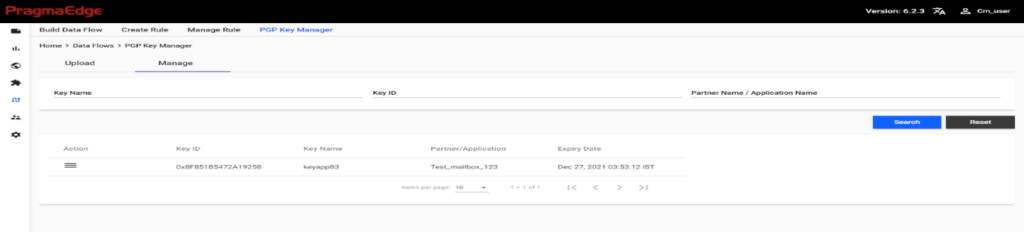
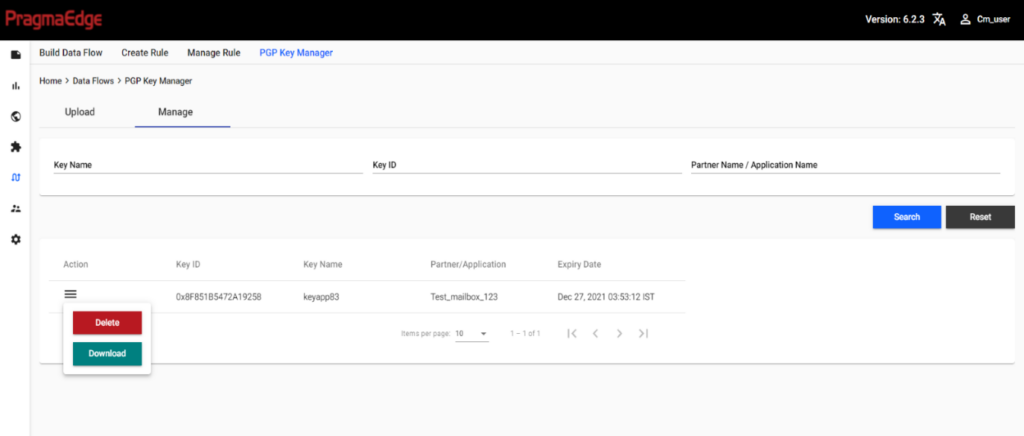
8. Predefined RULES in PCM
PCM comes with predefined rules which cover most of the business use cases. Rules in the PCM are extendable by creating our own business process as well.
| RULES | USE / DESCRIPTION |
|---|---|
| File Rename | Renames the file based on the properties provided. |
| Source file Archive | This rule is a combination of file rename and file archive; it provides ability to directly download input file from PCM for the source file. |
| Destination file Archive | This rule is a combination of file rename and file archive; it provides ability to directly download input file from PCM for the destination file. |
| Translation | Transition is used to perform the translation of the file; this rule utilizes the map that is being checked in sterling b2b integrator. |
| CHARREPLACE | Replaces the specified character with the provided character. |
| Drop process | The drop process is utilized when sending the files to the destination. In the Inbound process it is used to send the files to the application. In the outbound the rule is used to send the file to the trading partners. |
| Envelope | Translated file will come with no ISA, GS and ST Envelopes and this rule adds envelopes to translated document. |
| De-envelope | Invokes de-envelope service to verify the file with the Envelopes available in B2Bi. |
| Deferred envelope | Stores the document for deferred envelope process. |
| Doc Extraction | Extract the document based on the properties provided. |
| Zip | Zips the file. |
| Multi Drop | Drops file to the group, where the group can have set of partners/applications. Note: Out of the box business process supports SFTP, FTP and Mailbox Protocols. If any other protocol is required, customers must customize the business process. |
| ITXA Translate | Translate the file using the ITXA map; this rule utilizes the map that is being checked in SPE. |
| ITXAImmediate Envelope | Envelopes the file using SPE. |
| ITXAEnvelope Create | Creates Envelope in SPE using the ITXA Map provided in the property. |
| ITXADeferred Envelope | Stores the document for deferred envelope process using SPE. |
| ITXADeenvAndTranslate | Invokes SPE de-envelope service and translates the file. |
| ITXADeEnvelope | De-envelopes the file using SPE. |
| HTTP Send | Sends file to HTTP/S location. |
| Doc Priority | Assigns priority to the transfer. |
| REMOVE CRLF | Removes the CRLF from the file. |
| Append CRLF | Adds CRLF to the file. |
| Encrypt | Encrypts the file; the encryption logic needs to be created and used as part of CLA. |
| Edifact Deenvelope | De-enveloping the EDIFACT messages. |
| Edifact Envelope | Translated file will come without UNG, UNH and envelopes are added to translated document. |
| Email Notification | Sends notifications via email. |
| Email DocSend | Sends Document as an attachment to the email. |
| Encode | Encodes from one format to other as specified in the property. |
| PGP Encrypt | Encrypts the file based on details provided in property. It uses Native PGP. |
| PGP Decrypt | Decrypts the file based on details provided in property. It uses Native PGP. |
| Release Objects | This service is used to release the object specified in the property. |
| Lock Service | To lock the service with key/name. |
| Unlock Service | To Unlock the service with key/name. |
| Wait Service | To specify the time interval to wait. |
The Archive will basically archive the file as it was received/processed. But can also be configured to be encrypted and stored. To enable the encryption, the appropriate values need to be configured in the application YAML configurations under the File->PGP section.
| Parameter | Description |
|---|---|
| private-key | Provide the path where the private key is stored |
| cmks | Provide the passphrase for the private key |
Audit Info:
All the details of the rules are being tracked and can be viewed through the Actions button and View Audit Info.
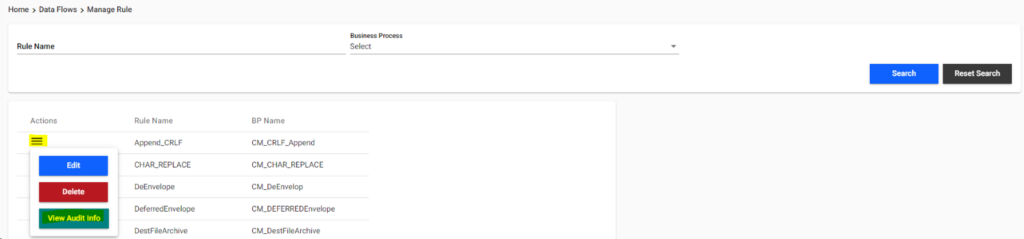
9. Configuring Settings:
9.1 Correlation Names
We can add custom defined correlation names through Settings->Correlation Names menu. A maximum of 50 correlation names can be defined.
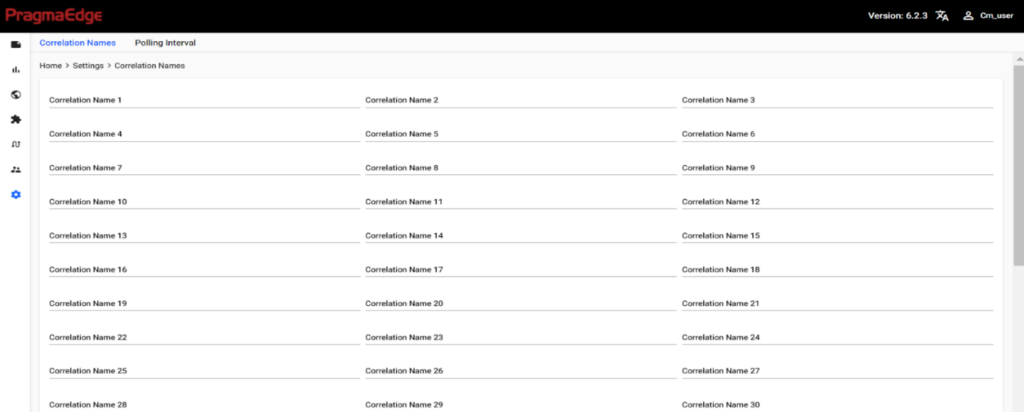
Correlation can be any custom data point which you need to store within PCM. And it can be used for search operations as well. Refer to Advanced Search in File Transfers, to know more about searching based on the Correlation Values.
The correlation names are only defined here. The actual logic to add the dynamic values from the processed file for the defined correlation names needs to be added in the Maps in B2Bi.
9.2 Polling Intervals
Polling Intervals can be defined as per customer needs from Settings-> Polling Intervals menu. The created Polling Intervals will be visible within the Partner and Application creation process.
You can click on ADD to add a new Polling Interval. It will create a new row where you can provide the Interval Value, Interval Name, Description and select CREATE.
Interval Value needs to be configured within the Schedulers in B2Bi.
Interval Name can be anything, and it would be visible in Partner/Application Creation.
Description can be anything as per our convenience.
You can click on SAVE to save the entries.
You can click DELETE on the right of each Polling Interval to delete that polling interval.