Community Manager Standalone Installation Document
PCM Fresh Installation Standalone Deployment Documentation
Overview:
This document provides step-by-step instructions for a fresh installation of the PCM application. Before proceeding, ensure that the necessary prerequisites are met, and all required configurations are properly set up.
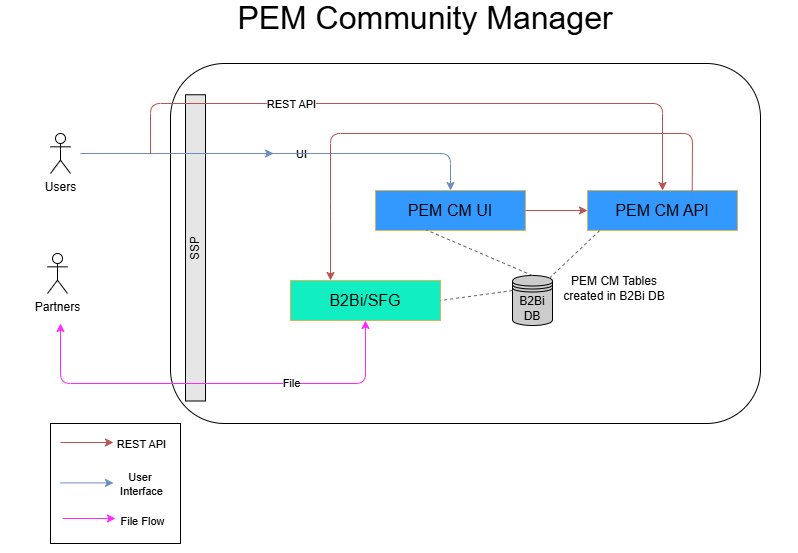
Architecture
Pragma Edge Community Manager (PCM) is an enterprise solution built on IBM Sterling B2B Integrator, designed to simplify and accelerate the onboarding of trading partners using secure protocols such as FTP, SFTP, FTPS, AS2, HTTP/S, SMTP, and IMAP. PCM enables seamless data translation across multiple formats, including but not limited to EDI, EDIFACT, XML, SWIFT, HIPAA, HL7, and flat files, ensuring compatibility with diverse business requirements.
Prerequisites:
• Ensure that Java 1.8/8 is installed on the server.
• Obtain Sterling Integrator (SI) schema database details for configuration.
• Verify that the server has necessary permissions and network access to required resources.
Minimum System Requirements
| CPU (Request) | CPU (Limit) | RAM (Request) | RAM (Limit) | Java |
|---|---|---|---|---|
| 1 Core | 2 Cores | 2 GB | 4 GB | IBM Semeru java 17 |
Directory Structure (Recommended)
├── Config
│ ├── application.yml
│ ├── keystore.pfx
│ └── logo
│ └── logo.png
├── jars
│ ├── db2j4cc.jar
│ ├── mssql-jdbc-6.4.0.jre8.jar
│ └── ojdbc7.jar
├── logs
│ └── community-manager-cm.log
└── PCMArch
5 directories, 7 files
Step-by-Step Installation Instructions:
1. Backup the Database
Before proceeding with the installation, take a backup of the Sterling Integrator (SI) schema database to avoid any data loss.
2. KeyStore Creation
A keystore is a secure file that stores private keys and certificates.
We will create a keystore using the Java keytool utility.
Step 1. Run the Keytool Command
Open a terminal or command prompt and run the following command:
Step 2. Explanation of Command Parameters
- genkey: Generates a new key pair (private key and a self-signed certificate).
- alias community-manager: The alias is a label used to refer to the key entry inside the keystore.
- storetype PKCS12: The format of the keystore file. PKCS12 is a widely supported and standard format.
- keyalg RSA: The algorithm used for the key pair. RSA is the most common choice.
- keysize 2048: The size of the RSA key in bits. 2048 bits is secure and recommended.
- keystore keystore.p12: The name of the keystore file that will be created.
- validity 3650: The validity of the certificate in days. 3650 days is approximately 10 years.
Step 3. Interactive Prompts
When you run the command, keytool will ask you a series of questions.
Below is an example of what you will see, with example responses provided:
Enter keystore password: ********
Re-enter new password: ********
What is your first and last name?
[Unknown]:
What is the name of your organizational unit?
[Unknown]:
What is the name of your organization?
[Unknown]:
What is the name of your City or Locality?
[Unknown]:
What is the name of your State or Province?
[Unknown]:
What is the two-letter country code for this unit?
[Unknown]:
Is CN=[Unknown], OU=[Unknown] O=[Unknown], L=[Unknown],
ST=[Unknown], C=[Unknown] correct?(type “yes” or “no”)
[no]: yes
Explanation of each prompt:
- Keystore password: Password to protect the entire keystore file.
- First and Last Name (CN): This is the “Common Name”. Often it is set to the server hostname (example: as2.mycompany.com).
- Organizational Unit (OU): The department or team within the organization (example: IT Department).
- Organization (O): The legal name of the company (example: MyCompany Ltd).
- City/Locality (L): The city where the organization is located.
- State/Province (ST): The state or province.
- Country Code (C): Two-letter ISO country code (example: IN for India, US for United States).
- Confirmation: You must type yes to confirm the information.
Step 4. Result
After confirmation, a file named keystore.p12 will be created in your current working directory.
This file contains:
A private key (kept secret and never shared).
A self-signed certificate (public part that can be shared).
Step 5. Verify the Keystore
To confirm that the keystore has been created correctly, run:
You will be asked for the password you set earlier.
If successful, you will see output similar to:
Keystore type: PKCS12
Keystore provider: SUN
Your keystore contains 1 entry
Alias name: community-manager
Creation date: Sep 30, 2025
Entry type: PrivateKeyEntry
Certificate chain length: 1
Certificate[1]:
Owner: CN=[Unknown], OU=[Unknown], O=[Unknown],
L=[Unknown], ST=[Unknown], C=[Unknown]
Issuer: CN=[Unknown], OU=[Unknown], O=[Unknown],
L=[Unknown], ST=[Unknown], C=[Unknown]
Important Notes
The keystore password must be remembered. Without it, you cannot access the keystore.
The private key inside the keystore must never be shared. Only the public certificate can be given to partners.
If you need a certificate signed by a Certificate Authority (CA), you can later generate a Certificate Signing Request (CSR) from this keystore and submit it to the CA.
3. Setup application.yml Configuration Properties
General
PCM theme color
cm
color: black# Available Themes: red,
green, grey, yellow, black
#api-connect-enabled: true #This should
not be released to precisely
protocol:
disallowed-special-characters: “!@#:$%^&*()+?,<>{}[]|;\”‘/\\” #We need to add the special characters in double quotes,
by default <> are restricted and make sure escape characters are being handled properly
Apache JServ Protocol (AJP), PCM header, and ports
ajp:
enabled: false #true, for cluster deployments
port: 8585
SSL Configuration
To enable secure HTTPS connections, create a keystore (keystore.p12) and store it inside /opt/IBM/PCM/Config.
enabled: true
key-store: /opt/IBM/config/keystore.p12
key-store-password: <KeystorePassword>
key-store-type: PKCS12
- key-store → Absolute path to your SSL certificate (keystore).
- key-store-password → Password you set during keystore creation.
- key-store-type → Typically PKCS12.
Spring Configuration
jackson:
time-zone: America/Chicago
liquibase:
enabled: true
tablespace: <tablespace>
datasource:
type: com.zaxxer.hikari.HikariDataSource
url: jdbc:db2://<DB-Host>:<Port>/<SchemaName>
username: <DB-Username>
driver-class-name: com.ibm.db2.jcc.DB2Driver
hikari:
connection-timeout: 60000
maximum-pool-size: 60
auto-commit: false
jpa:
show_sql: true
open-in-view: false
database-platform: com.pe.pcm.config.database.dialect.Oracle10gExtendedDialect
properties:
id:
new_generator_mappings: true
hibernate:
naming:
physical-strategy: com.pe.pcm.config.database.PhysicalNamingStrategy
- <DB-Host> → Database hostname or IP.
- <Port> → DB2 port (default: 50000).
- <SchemaName> → Target schema name.
- <DB-Username> → Database user ID.
Database Connection
Oracle:
com.pe.pcm.config.database.dialect.Oracle10gExtendedDialect
##ORACLE
## i.URL : jdbc:oracle:thin:@HostName:1521/SID (ex=jdbc:oracle:thin:@localhost:1521/XE)
## ii.DRIVER : oracle.jdbc.driver.OracleDriver
## iii.USERNAME : dbUserName
## iv.DATABASE_PLATFORM :
com.pe.pcm.config.database.dialect.Oracle10gExtendedDialect (For 12c :
com.pe.pcm.config.database.dialect.Oracle12cExtendedDialect)
## v.DATABASE : oracle:
MSSQL:
##b.MSSQL
## i.URL : jdbc:sqlserver://HostName;databaseName=DbName (ex=jdbc:sqlserver://localhost;databaseName=TestDB)
## ii.DRIVER : com.microsoft.sqlserver.jdbc.SQLServerDriver
## iii.USERNAME : dbUserName
## iv.DATABASE_PLATFORM : org.hibernate.dialect.SQLServer2012Dialect
#org.hibernate.dialect.SQLServerDialect (for lower) (Part of application.wml)
DB2:
## v.DATABASE : sql_server
##c.DB2
## i.URL : jdbc:db2://HostName:Port/DbName (ex=jdbc:db2://localhost:50000/TestDB)
## ii.DRIVER : com.ibm.db2.jcc.DB2Driver
## iii.USERNAME : dbUserName
## iv.DATABASE_PLATFORM : com.pe.pcm.config.database.dialect.DB2ExtendedDialect
## v.DATABASE : db2
Mail Configuration
mail:
host: <SMTP-Host>
port: <SMTP-Port>
tls_protocol: “TLSv1.3”
username: <SMTP-User>
cmks: <SMTP-Password>
from: pcm-notifications-noreply@<yourdomain>
app-contact-mail: pcmtechsupport@<yourdomain>
mail-signature: Community Manager Portal support team
- <SMTP-Host> → SMTP server host (e.g., office365.com).
- <SMTP-Port> → 587 (TLS) or 25.
- <SMTP-User> → SMTP username.
- <SMTP-Password> → SMTP password (encrypted if using CMKS).
PCM UI and API Authentication
login:
sm: # Site minder PCM UI, API authentication
enable: false
param-name: SM_USER
max-false-attempts: 5 # Max false attempts allowed by Application
reset-false-attempts: 5 #minutes, user will be reset after 5 min.
#Execute the following command to generate the JWT secret key #> openssl rand -base64 32
jwt: #PCM UI and API authentication
secretkey: #Specify the JWT secret key
session-expire: 60 # Minutes
saml: # SAML PCM UI and API authentication setup
jwt:
secret-key: #Specify the JWT secret
key
session-expire: 60 # Minutes
idp:
metadata: D:\jks\FederationMetadata.xml #Provide the IDP metadata file
entity-id: PcmEntityIdp
scheme: https # PCM protocol name.
host: # Application host.
url:
client: https://hostname:7080 #Provide the Application Access URL
entity: https:// hostname:7080 #Provide the Application Access URL
ssl: # configure SAML SSL
key-store: D:\jks\localhost-keystore.jks
key-cmks: pass@localhost
SAML Configuration
saml:
sso-url: https://trial-9976564.okta.com/app/trial-9976564_pcmdev_1/exk8vrtwbsSlfTdQ0697/sso/saml
#https://dev-37961581.okta.com/app/dev-37961581_pcmlocal_1/exk5x8pgqakiU5Tup5d7/sso/saml
#https://dev-37961581.okta.com/app/dev-37961581_pcmdev_1/exk5x8ncbuaHtPyRE5d7/sso/saml
idp:
metadata: C:\IDPConfigs\pcm-local-okta-metadata.xml
registration-id: pcm
idp-groups-role-mapper: madmin_app3538395-super_admin,mmin_app3538395- admin,metl_cmonboarder_app3538395-on_boarder,meadmin_app3538395- business_admin,metl_cmb3538395-business_user,messor_app3538395-data_processor,mcessorrestricted_app3538395-data_processor_restricted,metl_cmfileoperator_app3538395-file_operator
default-role: super_admin
jwt:
secret-key: #Specify the JWT secret key
session-expire: 60 # Minutes
Configure Connection Properties
Configure connection properties for IBM Sterling B2B Integrator and IBM Sterling File Gateway:
sterling-b2bi:
core-bp:
inbound: CM_MailBox_GET_RoutingRule_Inbound # Inbound Mailbox bootstrap BP
outbound: CM_MailBox_GET_RoutingRule_Outbound # Outbound Mailbox bootstrap BP
user:
cmks: #Password from IBM Sterling B2B Integrator security.properties file
cmks-validation: true #Set value to true ensure proper functionality of PCM API’s
cmks-validation-profile: CM_Profile # Profile created in IBM Sterling B2B Integrator to match the password; the profile should be an SFTP profile. Set the value of the profile as Expl@re
connectivity: #To perform Test Connection, Archive Reprocess and Known Host Key Grab, configure the connectivity details
api:
baseUrl: http://<B2Bi-Host>:<HTTP-Port>/
username: <B2Bi-User>
password: <B2Bi-Password>
- <B2Bi-Host> → Host/IP of B2Bi.
- <HTTP-Port> → B2Bi HTTP adapter port.
- <B2Bi-User> / <B2Bi-Password> → Credentials for API access.
B2Bi and SFG API Configuration
b2bi-api:
active: true
auth-host: ‘[SEAS Authentication]’: 1
api:
username: <API-User>
cmks: <API-Password>
baseUrl: http://<B2Bi-Host>:<APIPort>/B2BAPIs/svc b2bi-sfg-api:
active: true
community-name: <SFG-Community-Name>
sfg-api:
active: true
api:
username: <SFG-User>
cmks: <SFG-Password>
baseUrl: http://<B2Bi-Host>:<APIPort>/sfgapis
- <API-User> / <API-Password> → B2Bi API credentials.
- <APIPort> → API service port.
- <SFG-Community-Name> → SFG community name.
SSP Integration
ssp:
active: true
api:
username: <SSP-User>
cmks: <SSP-Password>
baseUrl: https://<SSPCM-Host>:<SSPCM-Port>/sspcmrest/sspcm/rest
- <SSP-User> / <SSP-Password> → SSP credentials.
- <SSPCM-Host> → SSP server hostname.
- <SSPCM-Port> → SSP REST port.
Configure IBM PEM Standard to work with ConnectDirect
Configure IBM PEM Standard to work with ConnectDirect, using the net-map-name value as the ConnectDirect name:
net-map-name: Test_CD
Note: The following items should be left blank if ConnectDirect is not used:
internal:
server-host: 10.0.0.1
server-port: 1364
secure-plus-option: ENABLED
ca-cert: CA_cd_0099
system-certificate: B2BHttp
security-protocol: TLS 1.2
cipher-suites:
ECDHE_RSA_WITH_3DES_EDE_CBC_SHA
external:
server-host: 10.0.0.1
server-port: 1364
secure-plus-option: ENABLED
ca-cert: CA_cd_0099
system-certificate: B2BHttp
security-protocol: TLS 1.2
cipher-suites:
ECDHE_RSA_WITH_3DES_EDE_CBC_SHA
Configure IBM PEM
IBM Sterling Secure Proxy (SSP)
active: true
api:
username: user cmks: password
baseUrl: https://hostname:port/sspcmrest/sspcm/rest
Configure Adapters
Configure adapters using the adapter names created when PCM artifacts were imported. If communication adapters are already configured for IBM Sterling B2B Integrator, update values to reflect current settings:
ftpServerAdapterName: PragmaFTPServerAdapter
ftpClientAdapterName: FTP Client Adapter
ftpsServerAdapterName: Pragma_FTPS_ServerAdapter
ftpsClientAdapterName: FTP Client Adapter
sftpServerAdapterName: Pragma_SFTPServerAdapter
sftpClientAdapterName: Pragma_SFTPClientAdapter
as2ServerAdapterName: Pragma_AS2ServerAdapter
as2ClientAdapterName: Pragma_AS2ClientAdapter
as2HttpClientAdapter: HTTPClientAdapter
cdClientAdapterName: Pragma_CDClientAdapter
httpServerAdapterName: Pragma_HTTPServerSync
httpsServerAdapterName: Pragma_HTTPSServerSync
mqAdapterName: Pragma_MQAdapter
wsServerAdapterName: Pragma_HTTPSServerSync
fsAdapter: PragmaFileSystem
sfgSftpClientAdapterName: Pragma_SFTPClientAdapter
sfgSftpServerAdapterName: Pragma_SFTPServerAdapter
sfgFtpClientAdapterName: Pragma_FTPClientAdapter
sfgFtpServerAdapterName: PragmaFTPServerAdapter
sfgFtpsClientAdapterName: Pragma_FTPSClientAdapter
sfgFtpsServerAdapterName: Pragma_FTPS_ServerAdapter
Configure External Database API
pem: #Configure external database integration
remote:
server:
pem-key: #Provide the absolute path of remote server pem-key(if server is in aws we have to provide pem key of the server)
base-directory:
path: #Provide the base directory path
session-timeout: 5000 #Time in milliseconds(can be increased based on database connectivity speed)
datasource: #External database details to connect VIA API
url: jdbc:<host:port>/ORCL
username: PCM_UAT #PEM Database username
cmks: password #PEM Database password
driver-class-name: oracle.jdbc.driver.OracleDriver #Database driver class name oracle/mssql/db2
api-ws: #PEM API Configurations
active: true #Default value is true (if it is set to false we cannot connect to pem)
base-url: https://<host:port>/pemws/sponsors/<sponsorname>
username: # PEM API username
cmks: password # PEM API user password
Configure IBM Sterling B2B Integrator key
Enable file decryption in the PCM file transfer search screen, ensuring that files are encrypted using the IBM Sterling B2B Integrator key.
file:
archive:
scheduler: #Scheduler to call the Delete script which can delete the files from source
#file and destination file archive according to the file age configured in
cron: #Cron setup
delete-files-job:
active: false #it will enable or disable the filejob scheduler which will delete
#the files in filesystem
script-file-loc: #Absolute path of Delete script file
pgp:
private-key: #Absolute path of PGP public key which will be used while decrypting
#PCM files set in the source file and destination file archive rules
#with encryption on
cmks: #PGP key passphrase
aes:
secret-key: # Key for decrypting the PCM files set in the source file and
# destination file archive rules with encryption on
salt: #Salt value for decrypting the PCM files set in the source file and
#destination file archive rules with encryption on
Configure SSO with SSP and SEAS
sso-ssp-seas:
ssp:
logout-endpoint: #SSP Logout endpoint ,default value is : /Signon/logout.html
user-header-name: #User header name config in SSP, default value is : SM_USER
token-cookie-name: #Token cookie name config in SSP, default value is : SSOTOKEN
seas:
auth-profile: #Authentication Profile Name in SEAS
host: #SEAS Host Name
port: #SEAS Port
ssl:
enabled: false #SSL enable or not in SEAS
protocol: #SEAS Protocol (Optional)
cipher-suits: #SEAS Cipher Suits (Optional)
trust-store:
name: #SEAS truststore file name (Absolute path)
cmks: #SEAS truststore password
alias: #SEAS truststore alias
type: #SEAS truststore type
key-store:
name: #keystore file name (Absolute path)
cmks: #keystore password.
alias: #keystore alias
type: #keystore type
user-request:
user: #Custom properties config in SEAS
email: email #Email property name config in SEAS
role: role #Role property name config in SEAS
first-name: firstName #FirstName property name config in SEAS
last-name: lastName #LastName property name config in SEAS
phone: phone #Phone property name config in SEAS
external-id: externalId #FirstName property name config in SEAS
preferred-language: preferredLanguage #Language property name config in SEAS(Optional)
user-roles: #LDAP roles mapping to PCM (CM Role – LDAP Role)
super_admin: #LDAP user super admin role name
admin: #LDAP user admin role name
on_boarder: #LDAP user onboarder role name
business_admin: #LDAP user business admin role name
business_user: #LDAP user business user role name
data_processor: #LDAP user data processor role name
data_processor_restricted: #LDAP user dataprocessor restricted admin role name
file_processor: #LDAP user fileprocessor role name
business_admin_dpr: #LDAP user business_admin_dpr role name
role-delimiter: #LDAP role name to assign more than one roles to PCM
Setting Up Microsoft OAuth
enable: true #we can enable or disable oauth for send-email api by giving true or false
token-url: https://login.microsoftonline.com/e16b3we5-6e25-4446-99443c-d19c0eb0f803/oauth2/token #token url for ms oauth token generation
grant-type: client_credentials #grant type can be password or client_credentials
client-id: #app registered client id
client-secret: #app registered client secret
username: pem_standard #username used to create the app registration
cmks: Kos00495 #user account password used for app registration
scope: openid #default
resource:
token:
response-parser: access_token
prefix: Bearer
header: Authorization
file-transfer: #configure the max-file-length
search:
time-range: 24 #Hours, Time range in File Transfer search screen in UI
max-file-length: #Default is 10 MB max file size allowed to view
4. Deploy the PCM Application
Run the following command to start the PCM application using the new JAR file:
nohup java -Dspring.profiles.active=APP_PROFILE \
-Dspring.datasource.cmks=DB_PASS \
-Dserver.host=NODE_IP \
-Dserver.port=NODE_PORT \
-Dspring.config.location=file:///opt/IBM/config/application.yml \
-Dlogging.config=file:///opt/IBM/PCM/logs/LOG_FILE_NAME \
-cp /opt/IBM/PCM/community-manager-api-1.0.0.jar \
-Dloader.path=file:///opt/IBM/PCM/jars
org.springframework.boot.loader.PropertiesLauncher & Property Definitions:
• APP_PROFILE: Provide the application profile being used in your current setup or you can provide cm.
• DB_PASS: Provide the database password in the command and remove spring.datasource.password from the application.yml.
• NODE_IP: Provide the server IP address.
• NODE_PORT: Provide the port to bring up the new application.
• LOG_FILE_NAME: Specify the logfile name and path.
Ensure that all paths and parameters are updated as per your server setup.
5. Verification
Once the application starts, verify the logs and application status to confirm the new installation is running correctly. Use the following command to check logs:
tail -f /opt/IBM/PCM/logs/community-manager-api.log
If any issues are encountered, review the log files and verify the configuration properties.
Important Note:
Since this is a fresh installation, ensure that all required Sterling Integrator (SI) schema
configurations are correctly set before starting the application.