Data Sync User Manual
1. Introduction:
Data Sync is an automated process to extract Profiles from database based on protocol selected with relevant email details and ultimately create profiles in PCM and PEM with the dataflow rules chosen.
Data Sync provides insights of data processed through live logs and progress tracker which provides information of profiles processed.
2. Data Sync Benefits:
1. No Limit for Migration:
We can migrate multiple partners present in the database directly to another application.
2. Decreases workload of clients as all the partners present in Database will directly be created in desired applications using Data Sync without manual creation.
3. Using Data Sync, once the partner is created, it will be reflected in the desired applications which are editable.
4. Improves User Satisfaction
5. User friendly display of information about profile status through logs and Progress Tracker.
3. Login
To login into Data Sync application, below are the input elements that validate the user.
i) Username
ii) Password
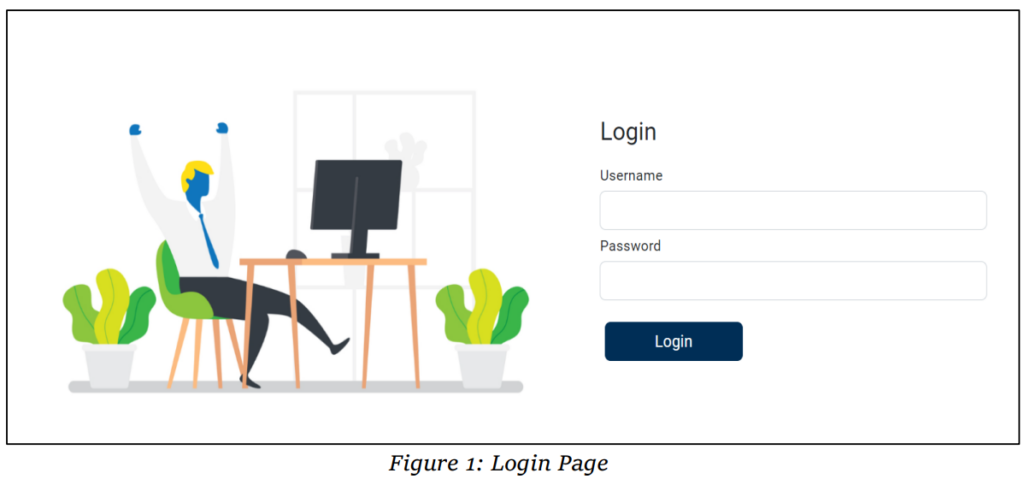
| Properties | Description |
|---|---|
| Username | To be entered by the user |
| Password | Correct password to be entered by the user. Valid credentials provide access to the application |
| Sign In | Logs in to the application post credentials validation |
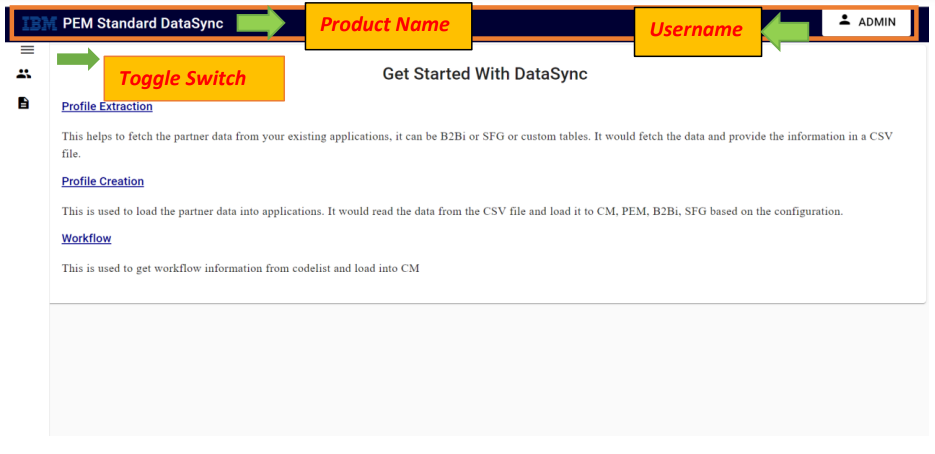
4. Dashboard
Data Sync Application provides below provided actions that helps in onboarding numerous partners.
➢ Partner Profile
• Profile Extract
• Profile Creation
➢ Dataflow
The Home screen of the Data Sync initially displays available actions – Profile Extract, Profile Creation and Dataflow creation The Layout of the dashboard is categorized into four sections (displayed in all modules).
1. Header
2. Breadcrumb
3. Left navigation Menu
4. Content Area
Header consists of Logo on the top left followed by product name. Username is displayed at the top right click of it which opens the menu of Logout. On click of Logout, it is redirected to the login screen.
Breadcrumb reduces the number of actions taken in order to get to a higher-level page. An effective visual element that indicates the location of the user within the website’s hierarchy, making it a great source of contextual information for landing pages.

Left Navigation Menu is placed on the left side of the application which displays all operations tabs. where corresponding tabs redirect to their respective pages.
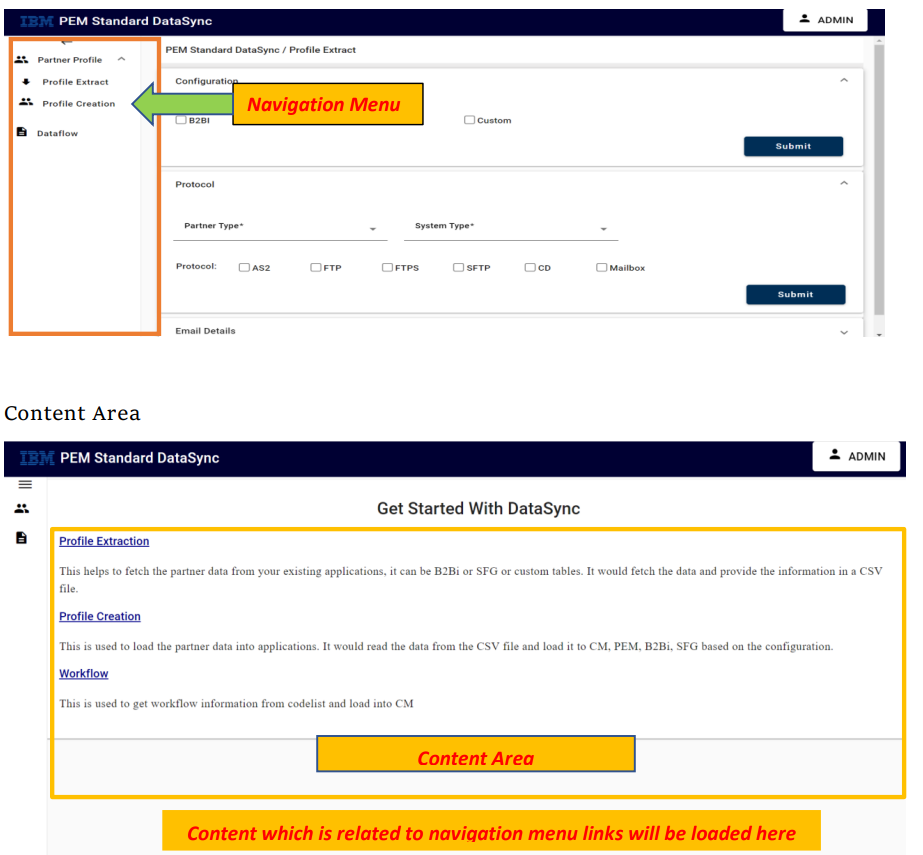
This panel has various fields which fetches the data upon the user search criteria. Based on the input, user could perform actions on the data that is fetched or retrieved. Based on the need user will choose the option from side navigation. Profile Extract, Profile Creation, Dataflows.
5. Partner Profile
Partner Profile aims at creating partners in applications like PCM and PEM based on details specified by user.
Profile Extract
consists of configuration details, protocol details and email details.
Path:
Login -> Dashboard-> Partner Profile-> Partner Extract

Configuration Details can be B2BI, SFG or custom. This aims to get information about the partners from the database.
A) Configuration –
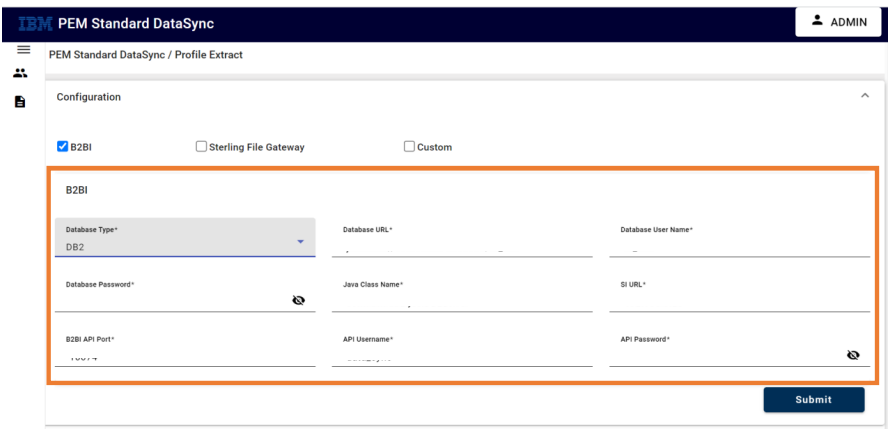
• B2BI
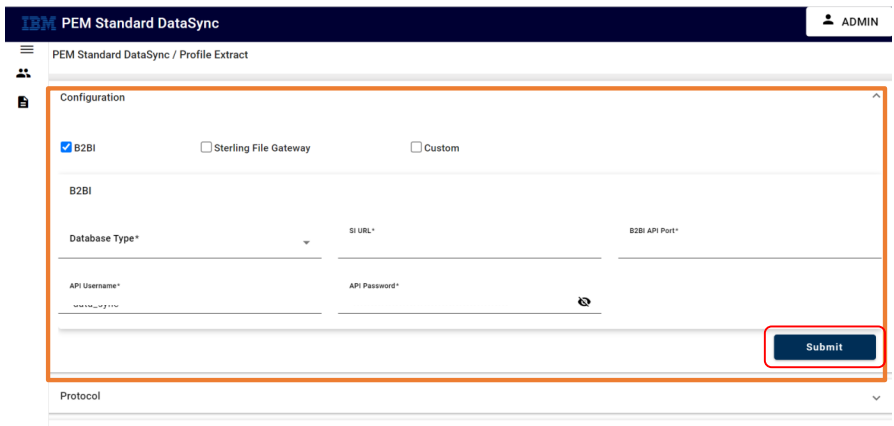
We can get the profile details from DB2 Database or Oracle Database.
– From DB2 Database
– From Oracle Database

| Properties | Description |
|---|---|
| Database Type | Connected Database(DB2/Oracle/MY SQL) |
| Database URL | URL of Database to be Connected |
| Database Username | Username of Database |
| Database Password | Encrypted Password of Database |
| SI Host | Sterling Integrator Host |
| B2BI API Port | API Port for API |
| API Username | Username of API |
| API Password | Password of API |
• Sterling File Gateway
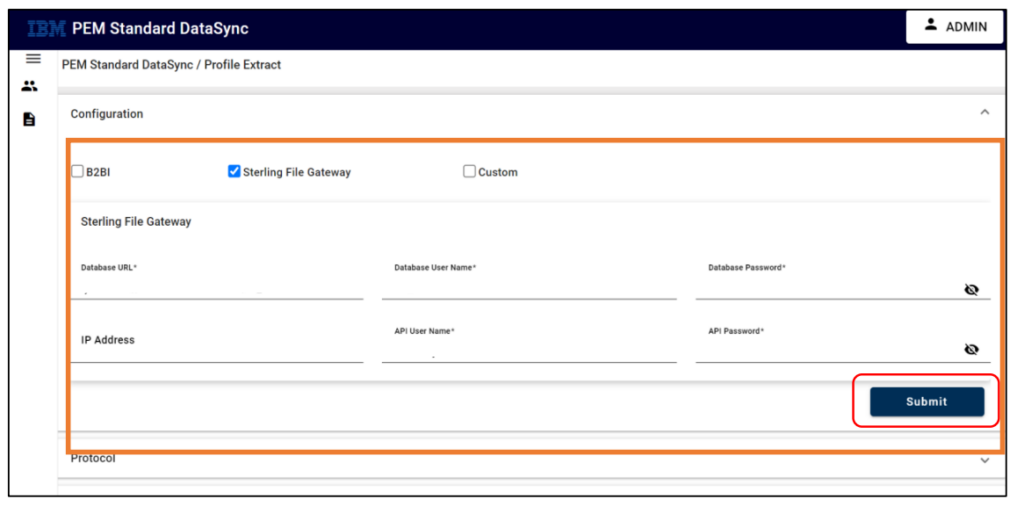
| Properties | Description |
|---|---|
| Database Type | Connected Database(DB2/Oracle/MY SQL) |
| Database URL | URL of Database to be Connected |
| Database Username | Username of Database |
| Database Password | Encrypted Password of Database |
| SI Host | Sterling Integrator Host |
| IP Address | IP Address of Sterling File Gateway |
| API Username | Username of API |
| API Password | Encrypted Password of API |
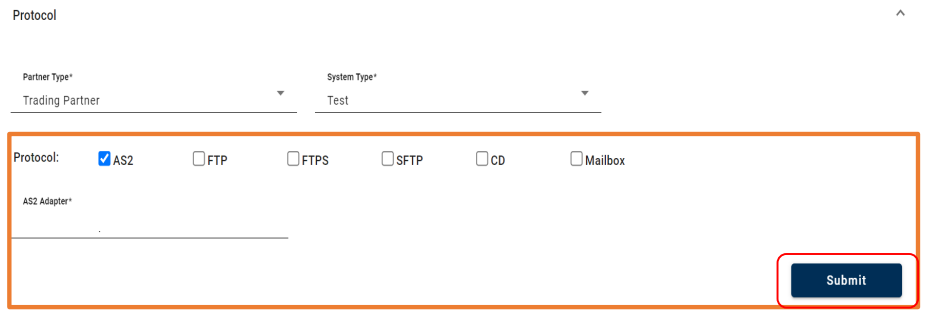
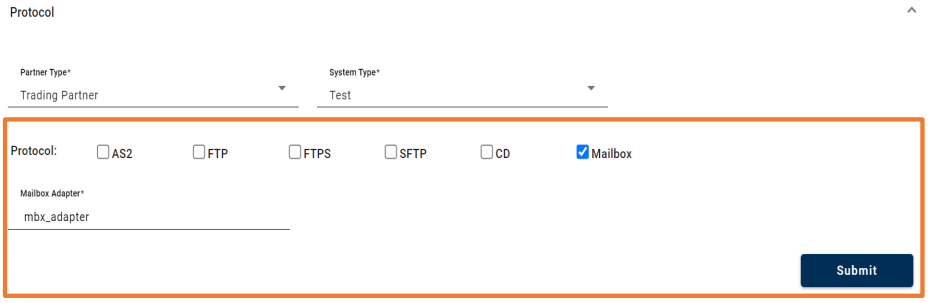
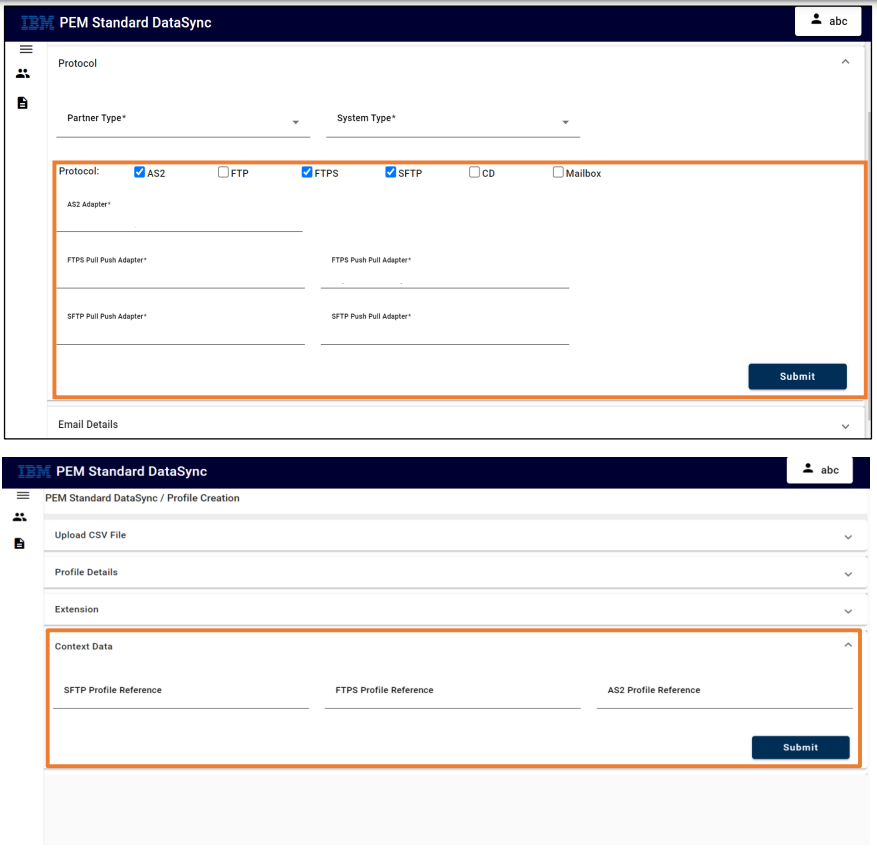
B) Protocol Details

| Properties | Description |
|---|---|
| Partner Type | Partner Type can be Trading Partner or Application Partner |
| System Type | Test System Type or Production System Type |
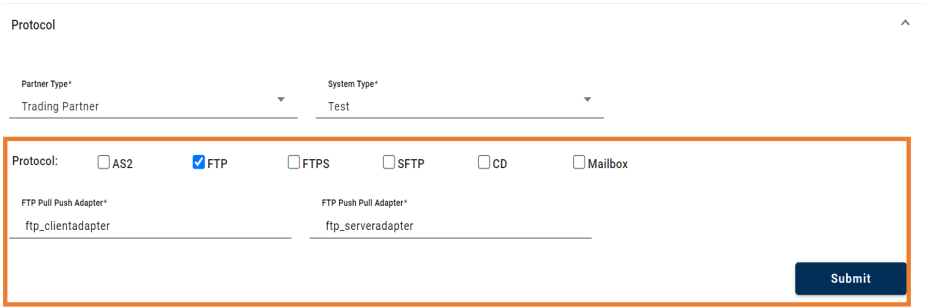
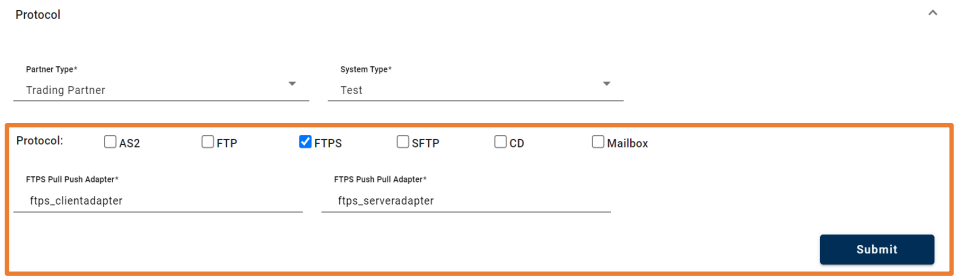
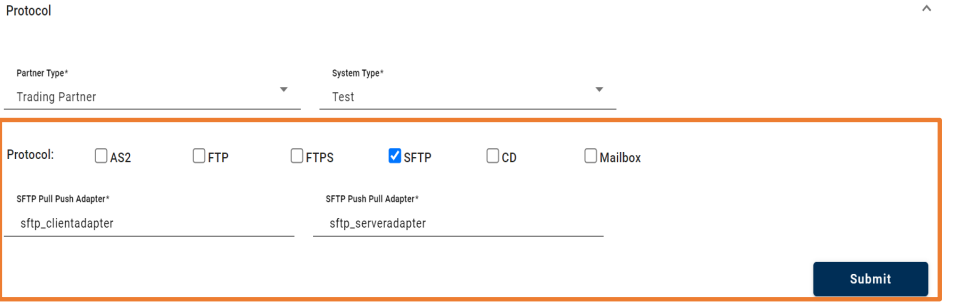
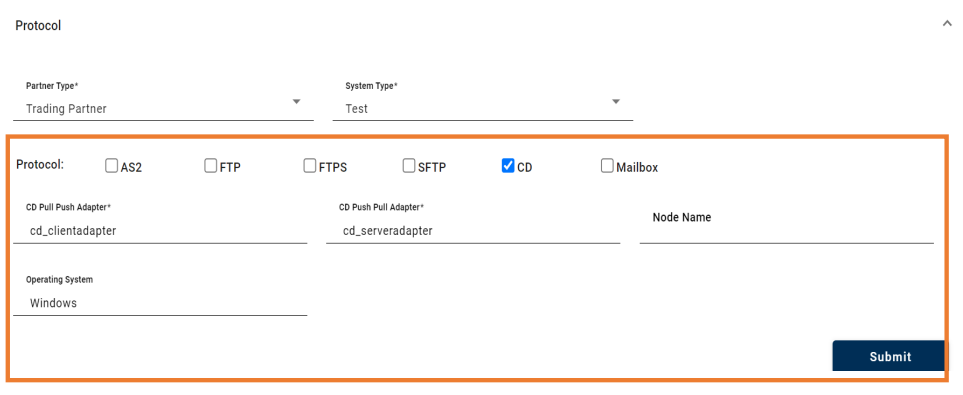
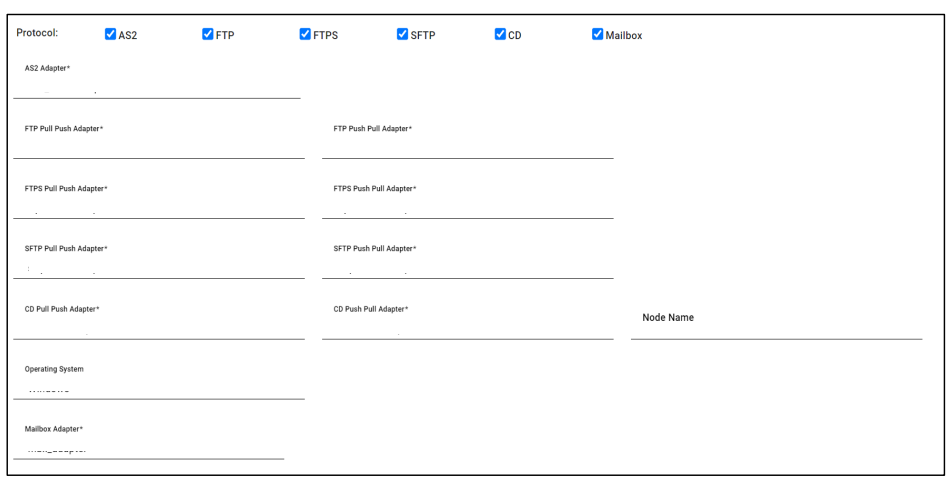
| Protocol | Protocol – AS2, SFTP, FTP, FTPS, CD, Mailbox |
On selecting the required protocol, we get its adapter details from the PEM.
• For AS2 Protocol
• For FTP Protocol
• For FTPS Protocol
• For SFTP Protocol
• For CD Protocol
• For Mailbox Protocol
• For AS2, FTP, FTPS, SFTP, CD, Mailbox individually or in combination protocols:
C) Email Details:
We can enable or disable email notification regarding extraction status. In order to receive email notifications, we need email details.
• We can disable email requirement using False dropdown of Enable option.

• We can activate email requirement by selecting True dropdown from Enable field.
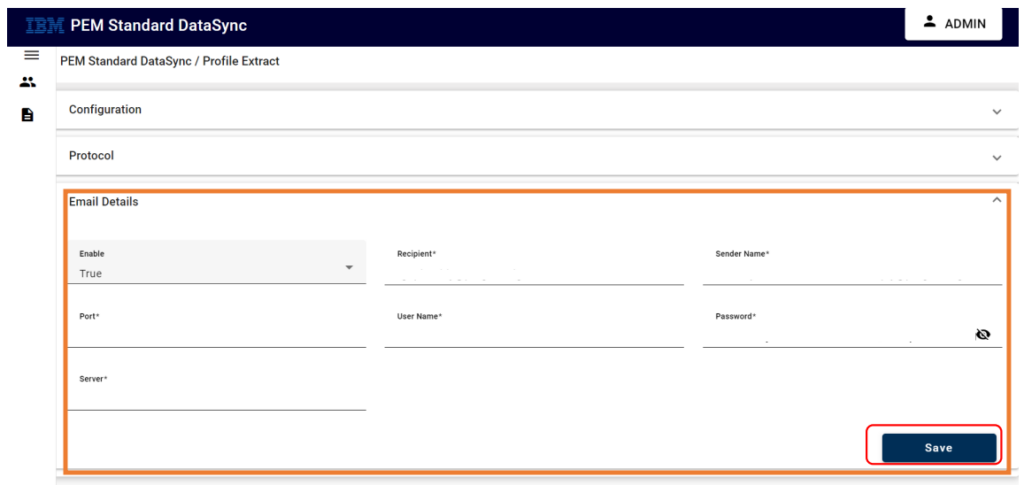
| Properties | Description |
|---|---|
| Enable | Enable or Disable Email Requirement |
| Recipient | Receiver Email ID |
| Sender Name | Sender Email ID |
| Port | SMTP Port |
| Username | SMTP Username |
| Password | SMTP Password |
| Server | SMTP URL |

Extract Data will fetch the entire partner information based on the inputs.
The Download Log button helps us in downloading the live logs which gives the entire details of profiles fetched.
The Download CSV button helps us in downloading the CSV file which contains the information of profile extracted.
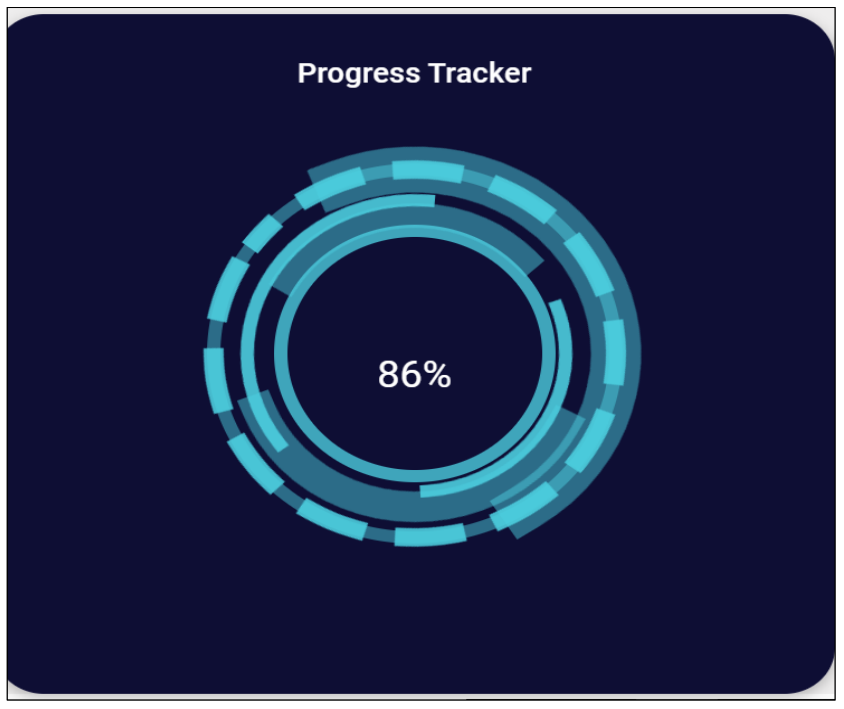
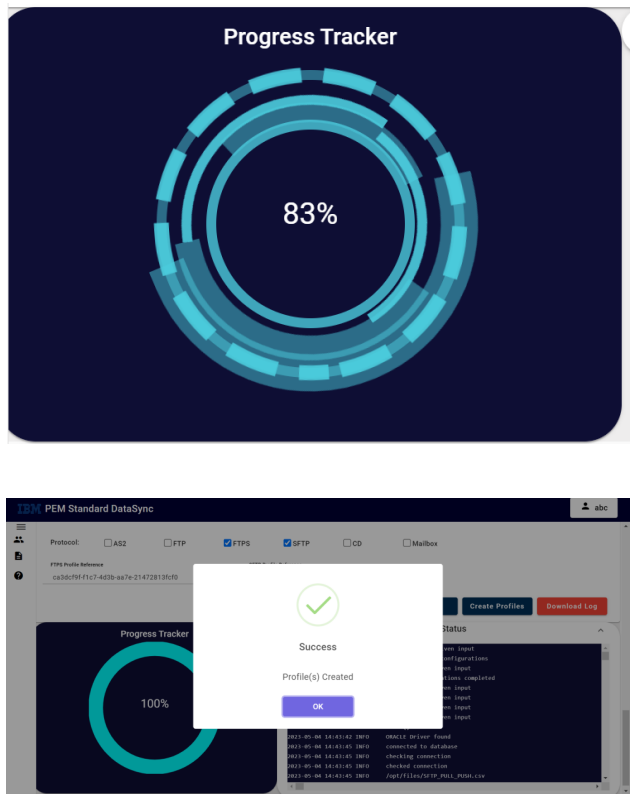
Progress Tracker is user friendly representation of live logs which indicates the percentage of profiles fetched.
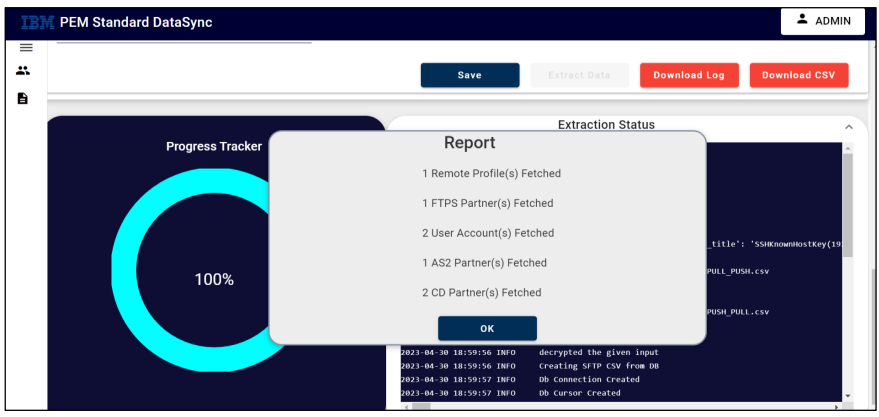
Report gives us the complete status of profiles fetched.
Profile Creation
Path: –
Login-> Dashboard-> Profile Extract-> Profile Creation
This operation allows the user to create profiles based on the information extracted from profile extract component in the form of CSV file and by providing profile details (PEM/PR, PEM, B2BI, SFG). It involves all the steps required for profile creation in PCM/PEM.

• Upload CSV File

It allows user to either use the extracted preexisting CSV File or gives the access to upload modified CSV File for profile creation.
• Profile Details
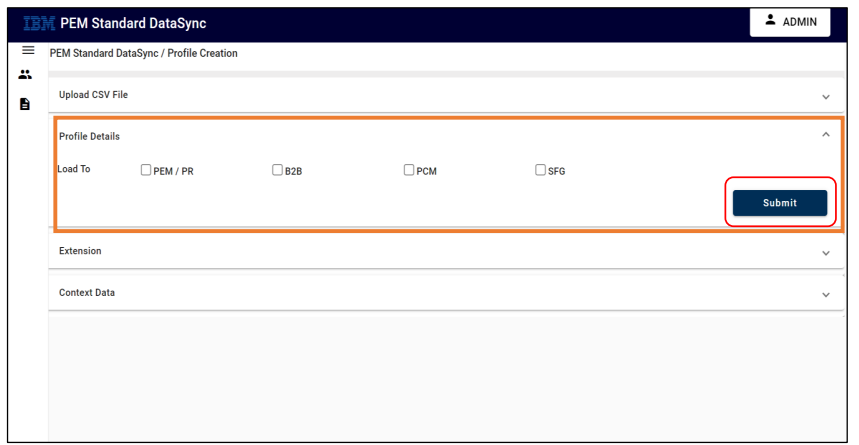
Profile details are loaded from CSV to PEM/PCM/B2B/SFG individually or in combination as per the requirement selected by the user.
Load To: PEM/PR
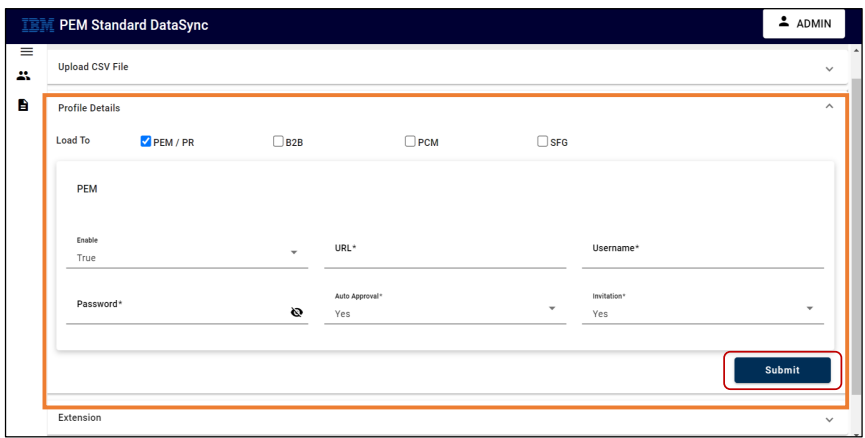
| Properties | Description |
|---|---|
| Enable | True/ False |
| URL | URL of PEM Tool |
| Username | Username used for login in PEM |
| Password | Password used for login in PEM |
| Auto Approval | To approve partner automatically in PEM (YES)( |
| Invitation | Send an email invite to the partner (Yes) |
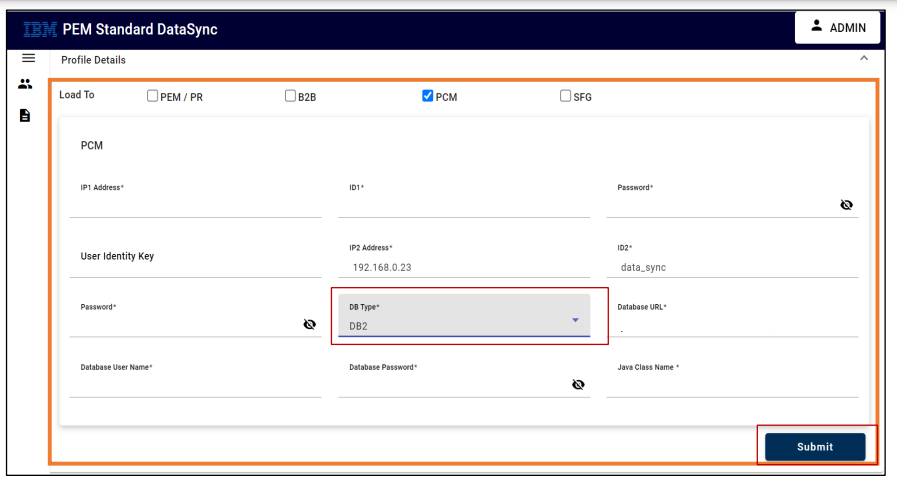
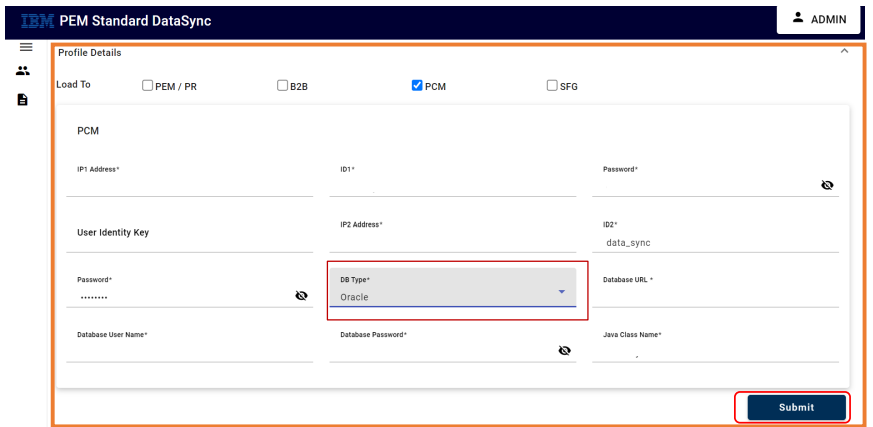
Load To: PCM
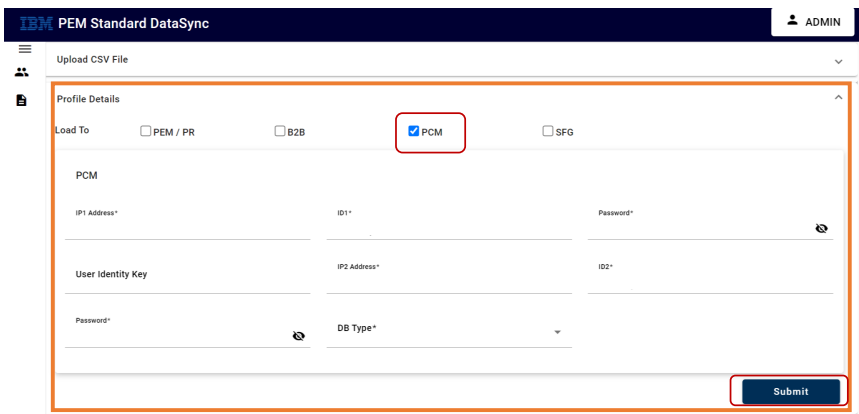
Load To: PCM in DB2 Database-
Load To: PCM in Oracle Database
| Properties | Description |
|---|---|
| IP Address | OLD SI/ SFG application IP Address |
| ID1 | OLD SI/ SFG application User ID |
| Password | OLD SI/ SFG application Password |
| User Identity Key | User Identity name in new SI |
| IP2 Address | New SI/SFG application IP Address |
| ID2 | New SI/ SFG application User ID |
| Password | New SI/ SFG application Password |
| Database Type | Select Database Type(DB2/ Oracle/ MS SQL |
| Database URL | URL of the selected Database (DB2/ Oracle/ MS SQL |
| Database Username | Username to connect to Database |
| Database Password | Password to connect to Database |
| Java Class name | Java Class Name of the Database selected |
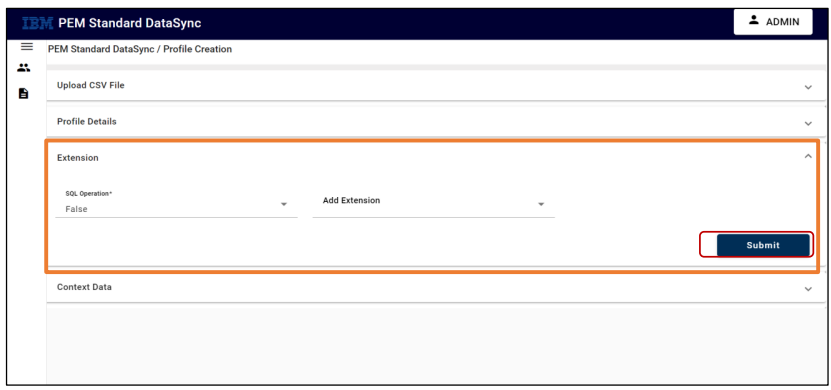
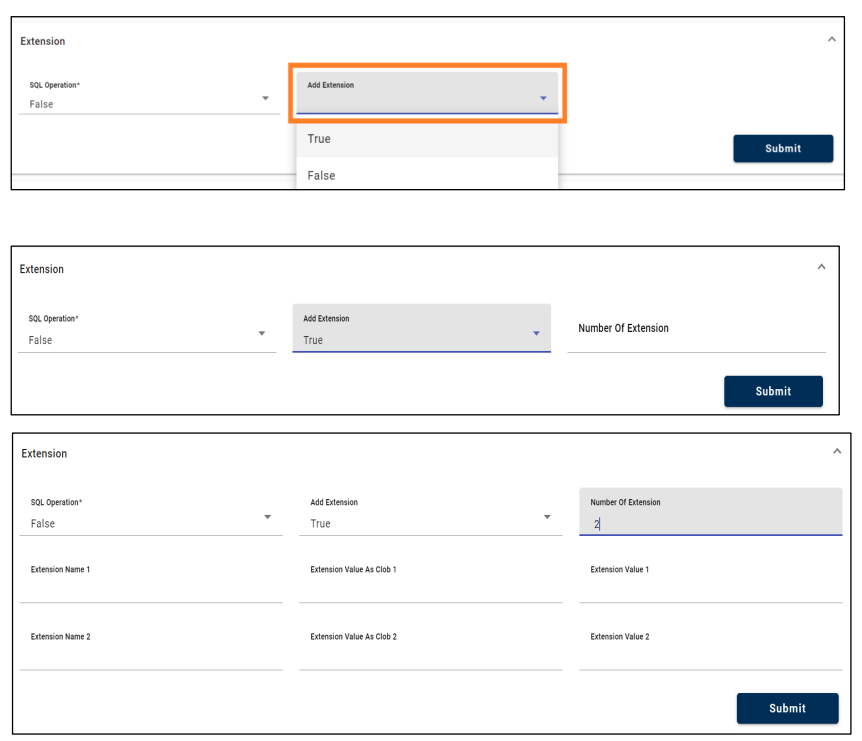
• Extensions:
If we need any dynamic extensions, then we can add them using the fields below.
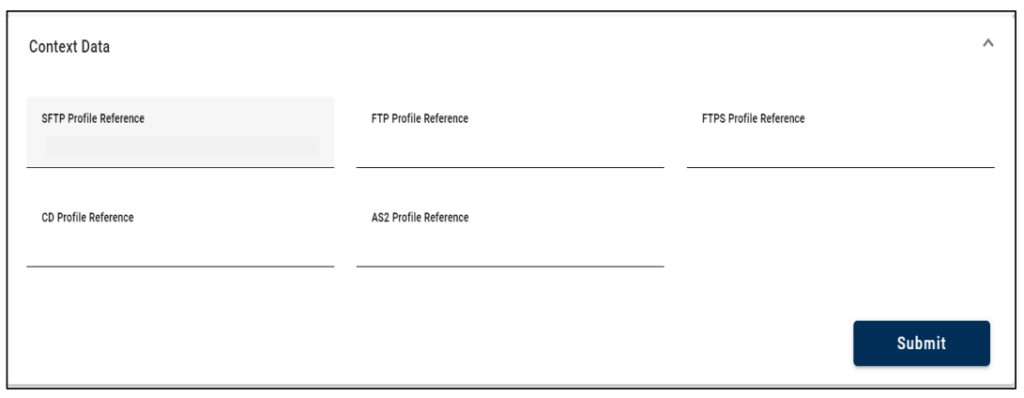
• Context Data:
Based on Protocol chosen while Profile Extract its respective Profile Reference will be directed to context data.
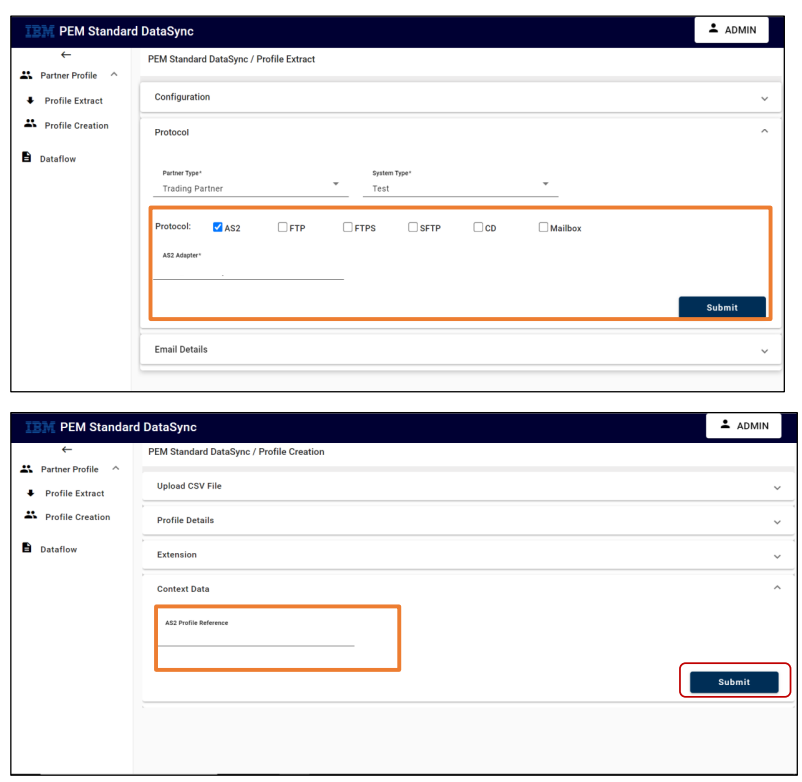
If protocol chosen are AS2, FTPS, SFTP we will provide its respective Profile Reference from PEM in Context Data field.
For all the protocols, it’s profile reference is specified below:
| Properties | Description |
|---|---|
| IP Address | OLD SI/ SFG application IP Address |
| ID1 | OLD SI/ SFG application User ID |
| Password | OLD SI/ SFG application Password |
| User Identity Key | User Identity name in new SI |
| IP2 Address | New SI/SFG application IP Address |
| ID2 | New SI/ SFG application User ID |
| Password | New SI/ SFG application Password |
| Database Type | Select Database Type(DB2/ Oracle/ MS SQL |
| Database URL | URL of the selected Database (DB2/ Oracle/ MS SQL |
| Database Username | Username to connect to Database |
| Database Password | Password to connect to Database |
| Java Class name | Java Class Name of the Database selected |
Submit – It submits the above filed details.
Create Profile – It ensures the creation of partner/application in PCM and PEM. Partner created using the above steps reflect in PCM and PEM.
Download Log – It downloads the file consisting of logs data.
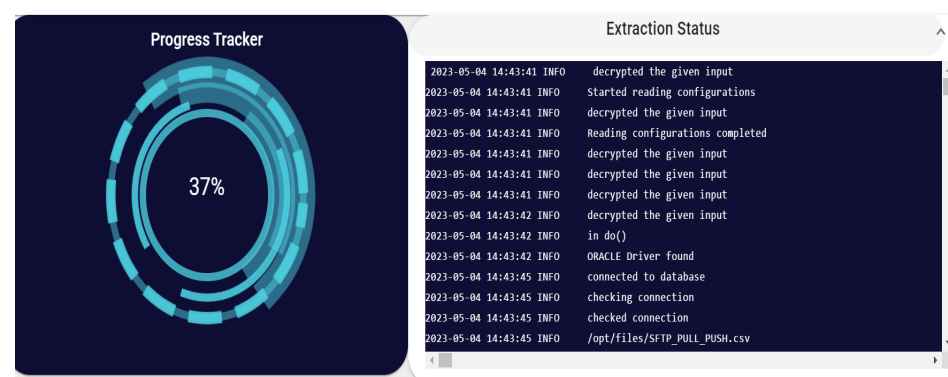
Extraction Status gives us the step-by-step details information about the profiles created.
Progress Tracker is user friendly representation of live logs which indicates the percentage of profiles created.
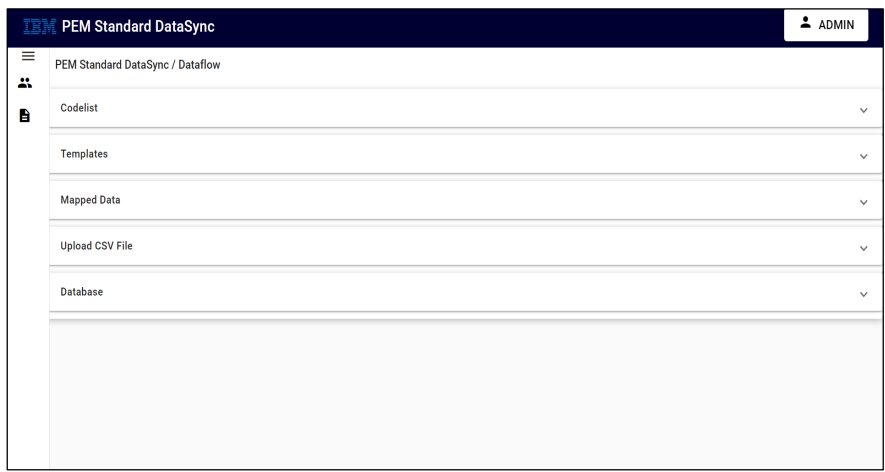
6. Dataflow
Path: Login-> Dashboard-> Dataflow
Dataflow is responsible for creating the workflow of the created profiles based on rules chosen by the user.
• Codelist
For creating the workflow, we need to get the information from codelist, for getting the data from codelist we need to connect to it.
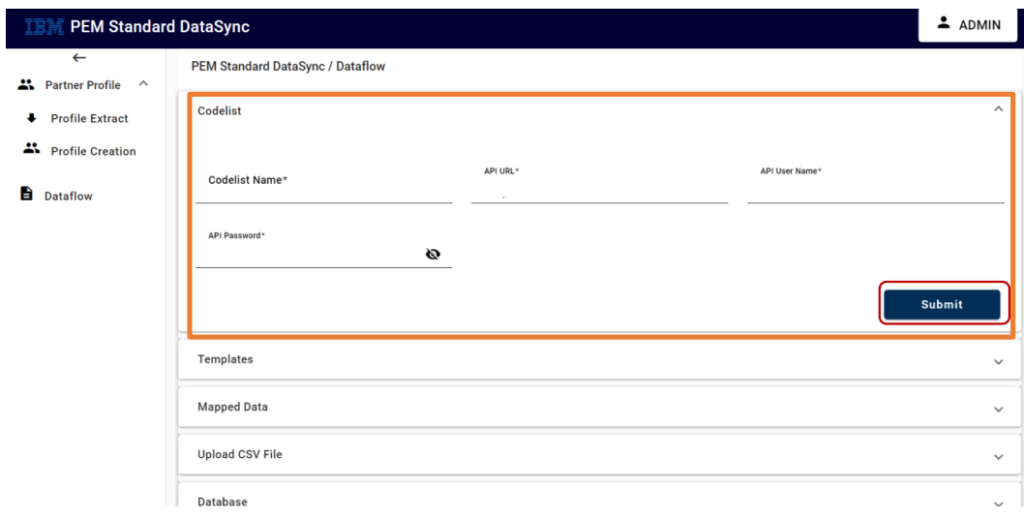
| Properties | Description |
|---|---|
| Codelist Name | Codelist name from SI |
| API URL | URL of API |
| API Username | Username of API |
| API Password | Password of API |
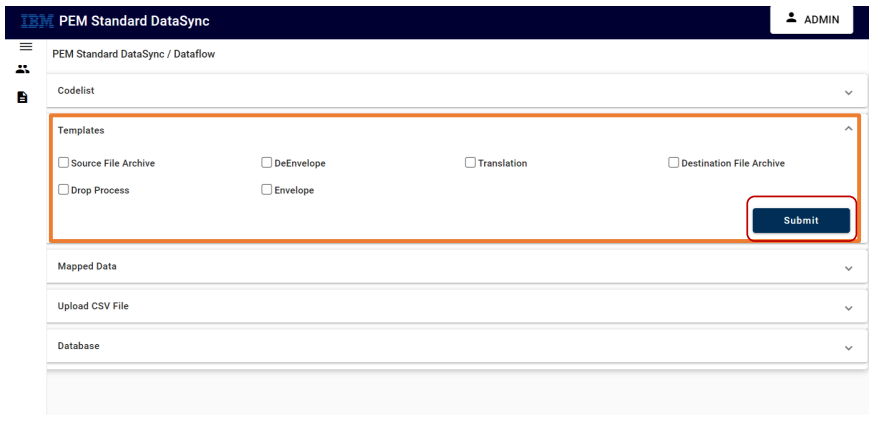
• Templates
Based on templates rule chosen by the user, it creates the workflow of the created profile
• Mapped Data
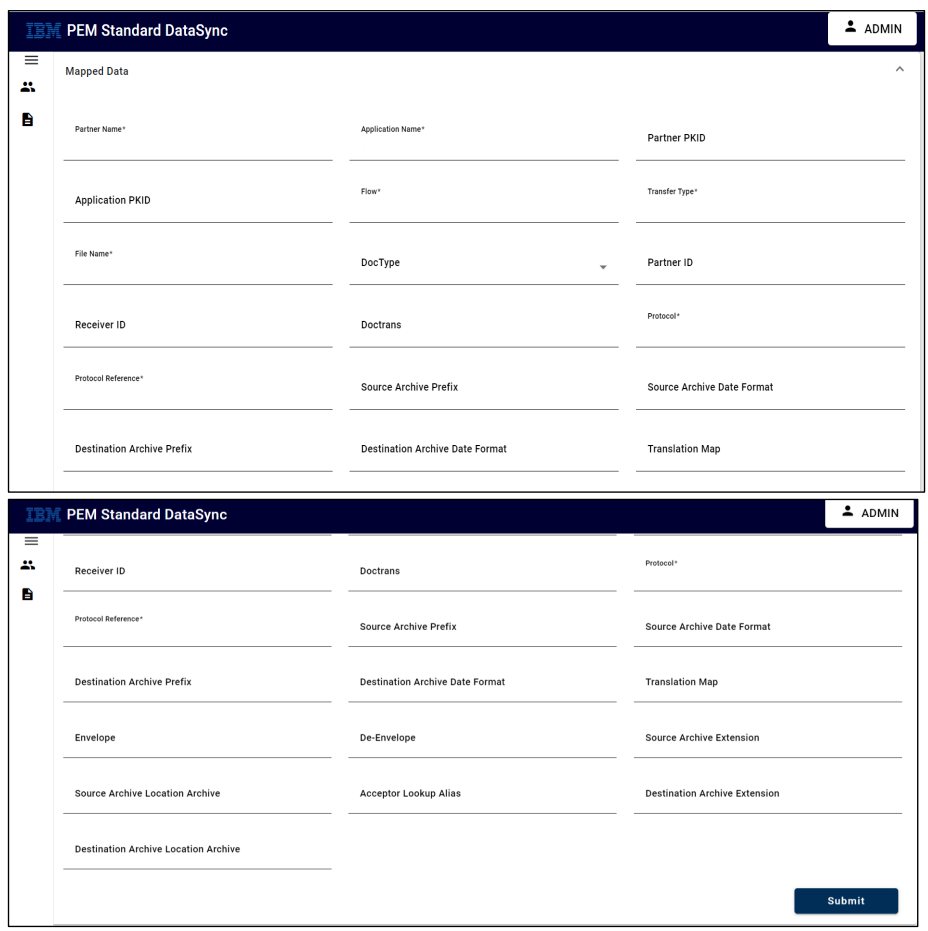
| Properties | Description |
|---|---|
| Partner Name | Field given in codelist for partner name (example: Sendercode) |
| Application Name | Field given in codelist for application name (example: Receivercode) |
| Partner PKID | Field given in code list for text2 |
| Application PKID | Field given in code list for text4 |
| Flow | Field given in code list for text1 |
| Transfer Type | Field given in code list for text9 |
| File Name | Field given in code list for text7 |
| Doc Type | Field given in code list for text3 |
| Partner ID | Field given in code list for text6 |
| Reference ID | Field given in code list for text5 |
| Doc trans | Field given in code list for text7 |
| Protocol | Field given in code list for text2 |
| Protocol Reference | Field given in code list for text3 |
| Source Archive Prefix | Field given in code list for text9 |
| Source Archive Date Format | Field given in code list for text1 |
| Destination Archive Prefix | Field given in code list for text4 |
| Destination Archive Date Format | Field given in code list for text6 |
| Translation Map | Field given in code list for text8 |
| Envelop | Field given in code list for text2 |
| De-Envelop | Field given in code list for text5 |
| Source Archive Extension | Field given in code list for text3 |
| Source Archive Extension | Field given in code list for text7 |
| Source Archive Location Archive | Field given in code list for text1 |
| Acceptor Lookup Alias | Field given in code list for text9 |
| Destination Archive Extension | Field given in code list for text2 |
| Destination Archive Location Archive | Field given in code list for text1 |
After submitting the above information, we will be able to create the profile and download the CSV File.
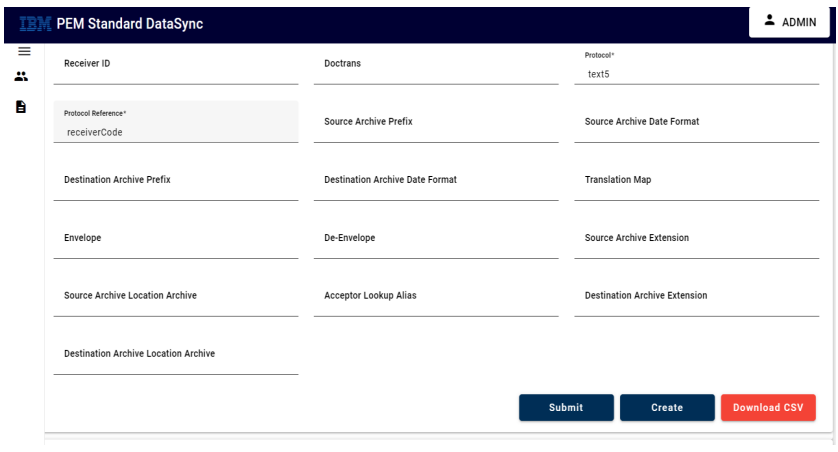
Create – Clicking “Create” will create profiles which will reflect in PCM/PEM.
Download CSV – It will help us in downloading the above provided inputs in the form of CSV File.
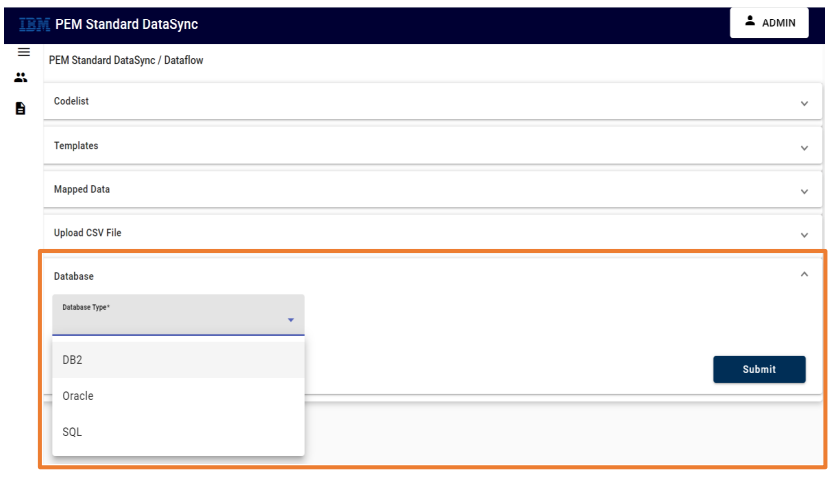
• Upload CSV File
This section involves either choosing preexisting CSV file, which is created based on inputs from codelist, templates and mapped data or gives option to upload modified file.

• Database
For creating the workflow in PCM we need to get following details from the Database (DB2/Oracle/SQL)
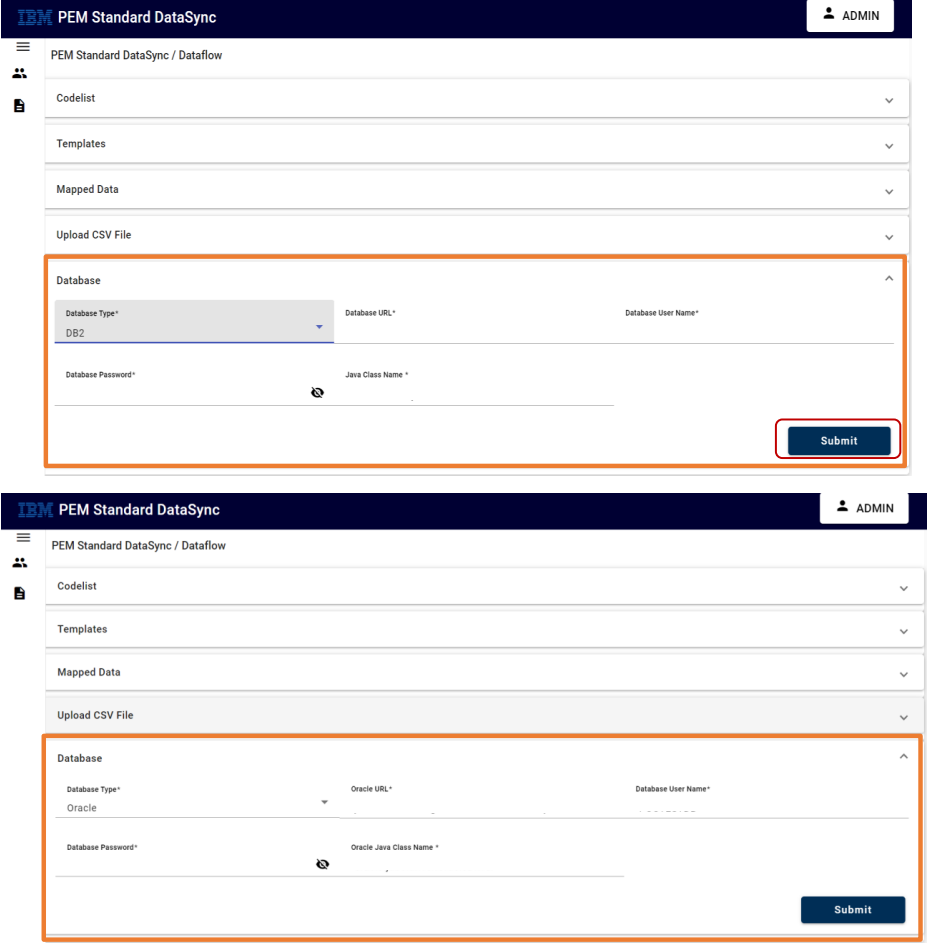
| Properties | Description |
|---|---|
| Database Type | Database can be DB2/ Oracle/ MY SQL |
| Database URL | URL of Database |
| Database Username | Username of Database |
| Database Password | Password of Database |
| Java Class Name | Java Class Name of Database Selected |
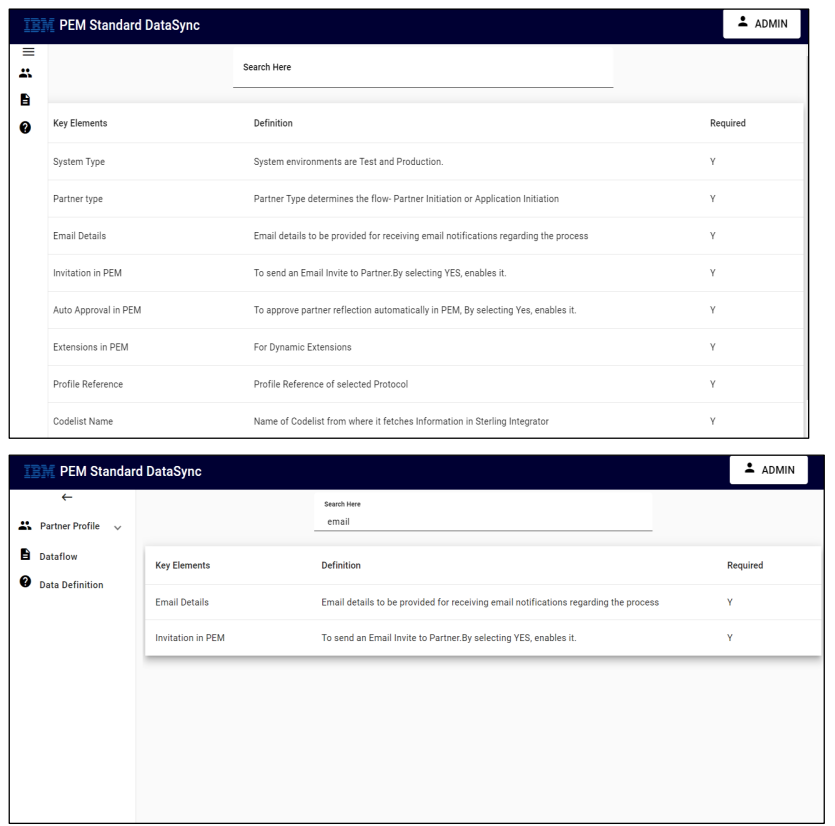
7. Data Definition
This is like a help menu which consists of Keywords and its details. If the user is facing trouble with any terminology, then the user can refer to the Data Definition which explains all the key words and their definition.