IANN FileGPS Server & Client Deployment Document
1. Introduction:
Pragma Edge FileGPS is a comprehensive, end-to-end file monitoring solution that empowers organizations to capture, collect, enrich, aggregate, and contextualize file events. It enables seamless tracking and tracing of files as they move across various IT systems and business applications.
Designed with a business focus, FileGPS provides critical insights into file activities, enhancing situational awareness and enabling proactive responses to potential issues or process degradation—ensuring smooth operations.
FileGPS offers a unified solution for SLA monitoring and management across disparate IT systems and business applications. Business users can manage and monitor file processes while assigning SLAs based on business-relevant contexts rather than technical terms. SLAs can be defined at multiple levels, including partner, enterprise, business unit/group, and file/transaction levels, ensuring precise control and compliance
2. FileGPS Pre-requisites
| Software/Certificate | Versions | Required |
|---|---|---|
| Java | 17 | Yes |
| Python | 3.11 | Yes |
| Postgres | V15 or above | Yes |
| Unzip | NA | Yes |
| .pfx | NA | Yes |
| DNS (for the FileGPS & FileGPS Reports Server) | NA | Yes |
| Pre-requisites | Description |
|---|---|
| Ports | 8787, 8086, 5432 ensure these ports should be open for FileGPS Server and 8088 for FileGPS Reports Server. |
| Postgres Database Permissions | Administration Access (Read and Write access). |
| Postgres Database Details | Database URL/Host, Type, Port, Username, Password, Schema. |
| SMTP Details | SMTP Hostname, Port, Username, Password, From Address. |
| MQ Details | IBM MQ details like host, queue name, port etc. |
| Logo | Client logo for FileGPS UI in PNG format. |
| Time Zone Details | Provide Zone ID. |
| Logs Path | Provide Logs Path in the configuration files. |
2.1 Hardware Requirements
The recommended hardware or server requirements for the deployment are as follows:
a. FileGPS Server
- 16 GB RAM
- 200 GB for Application
- 4 Core Processor
b. FileGPS Reports Server
- 4 GB RAM
- 200 GB for Application
- 2 Core Processor
c. Database Server
- 16 GB RAM
- 500 GB Storage
- 4 Core Processor
- Version 15 or higher
3. FileGPS Frontend Deployment
Before proceeding with the front-end deployment process, ensure the following prerequisites are met
3.1 Pre-requisites
Step 1: Application.yml Configuration
The UI JAR will read configurations from the application.yml file. The required tables will be automatically created when the UI JAR is deployed for the first time.
Note:
Provide the following details for configuration:
- Port: Ensure port 8787 is allowed on the FileGPS server.
- PFX File: Include the PFX file and its password.
Postgres Database Details:
- Database URL
- Schema
- Port
- Username
- Password
Additional Information:
- Zone ID
- SMTP Details:
- Hostname
- Port
- Username
- Password
- From Address
Note: A DNS is required for the FileGPS server, which should be linked with the .pfx file.
Step 2: Logo
- Provide the organization logo for the FileGPS UI.
3.2 Managing the Package
Download the Package
- Ensure that the FileGPS deployment package has been downloaded from the S3 bucket
3.3 Deployment Procedure
Step 1: Login to the Server
- Access the server where the deployment will take place.
- Upload the downloaded package FileGPS_APP_Release633.zip to the designated deployment server or platform.
Step 2: Ensure Necessary Permissions
- Verify that the user has permission to upload files.
Step 3: Ensure Unzip is Available
- Check if the unzip package is installed by running the relevant command.
- If installed, it will display the version of unzip. Example output: UnZip 6.00 of 20 April 2009, by Info-ZIP.
Step 4: Extract the FileGPS_APP_Release633.zip File
- Unzip the package into the FileGPS directory.
- Set permissions (755) for the extracted directory and its contents.
- Navigate to the FileGPS_APP_Release633 directory.
Step 5: Verify Files in the FileGPS_APP_Release633 Directory
- List all files to verify the contents.
- Expected files:
- UI
- Backend
- Rest_Consumer
- filegps_application_szipt.sh
- schedulers.txt
Note: If permission errors occur while uploading files, set the correct permissions manually.
Step 6: Navigate to the UI Directory
- Navigate to the UI directory.
- List files in the UI directory.
- Expected files:
- application.yml
- filegps-api-1.0.0.jar
- ssl
- logo
Step 7: Prepare Branding and SSL
- Upload the organization logo (.png file) to the logo folder.
- Upload the SSL certificates to the ssl folder.
Step 8: Configure application.yml
- Open the application.yml file for editing.
- Modify the file as follows:
- Update the server port in the server section.
- Update the SSL configuration:
- Set the certificate path.
- Update the password.
- Specify the certificate type.
Note: SSL certificates are used for configuring the FileGPS application on HTTPS. This will be an internal certificate as the application is accessed by the client.

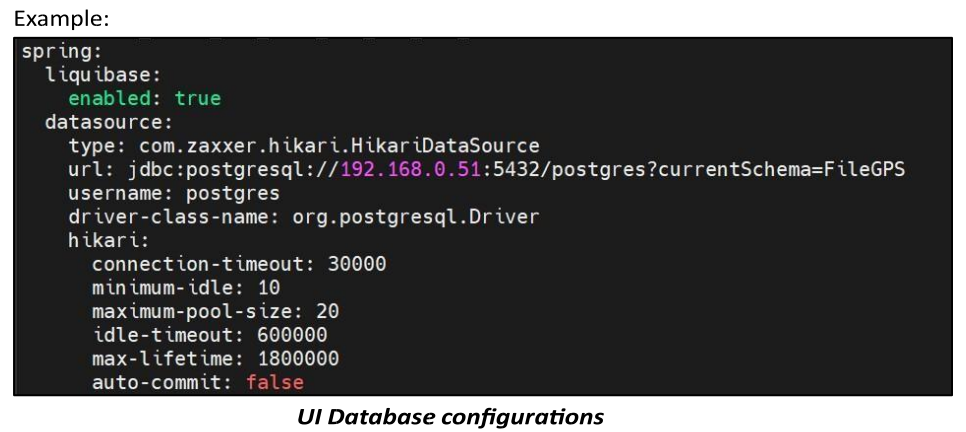
Enable Liquibase in the Spring configuration:
- Liquibase enabled: true
Update the database details in the data source section:
- Set the host, port, database, username, and schema name.
- Update SMTP Details:
- Set the following parameters:
- Host
- Port
- Username
- Password
- From Address
- Set the following parameters:
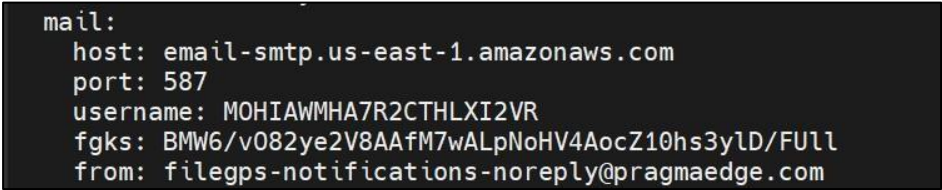
Note: SMTP details are required to send email notifications. Provide the SMTP password in the fgks field.
Update the Time Zone:
- Modify the zoneId setting.
- The default time zone is America/Chicago.
Save and Exit the File:
- Press ESC to exit insert mode.
- Type :wq! and press Enter to save and exit
4. FileGPS Backend deployment
Before proceeding to the back-end deployment process, follow the below detailedprerequisites.
4.1. Pre-requisites
Bin Directory
- The bin directory contains packages related to FileGPS Python jobs necessary for raising alerts from FileGPS.
- It includes the following jobs:
- agent_down_alert
- calculate_sla
- calculate_transaction_sla
- events_correlation
- fnr_alert_job
- fnr_alert_groups_job
- ka_si_queue_depth_alert
- mq_queue_depth_alert
- retention_policy
- sla_alert_job
- sla_client
- sla_client_group
- subscription_alert
- subscription_alert_group
- tnr_alert
- tnr_alert_group
- tra_alert
- tra_group
- transaction_duration
- update_context
- Note: Provide the required Python jobs for this directory.
Scripts
- The scripts directory contains individual shell script files used to trigger the Python jobs in the bin directory.
- It includes the following script files:
- agent_down_alert.sh
- calculate_sla.sh
- calculate_transaction_sla.sh
- events_correlation.sh
- fnr_alert_job.sh
- fnr_alert_group.sh
- ka_si_queue_depth_alert.sh
- mq_queue_depth_alert.sh
- retention_policy.sh
- sla_alert_job.sh
- sla_client.sh
- sla_client_group.sh
- subscription_alert.sh
- subscription_alert_group.sh
- tnr_alert.sh
- tra_alert.sh
- tnr_alert_group.sh
- tra_alert_group.sh
- transaction_duration.sh
- update_context.sh
- Note: Provide the necessary script files for this directory.
Config
- Python jobs will read configurations from the config.ini file.
- Note: Provide the following details in the config.ini file:
- Zone ID
- SMTP Details: Hostname, Port, Username, Password, and From Address
- PostgreSQL Database Details: Database name, Host, Username, Password, Schema, Port, and Driver name
Logs
- Log files will be stored in this directory.
4.2 Deployment steps for FileGPS Backend
Log in to the server and navigate to the specified directory using the command:
cd /home/filegps/FileGPS_APP_Release633/Backend/Inside the Backend folder, the structure should include the following directories:
- bin
- config
- logs
- scripts
To configure config.ini:
- Navigate to the config directory using the command: cd config
- Open the config.ini file for editing using the command: vi config.ini
Update the following settings in config.ini:
- Time Zone: Set the appropriate PCM time zone (default is America/Chicago).
- Logs Path: Provide the correct path to the logs directory.

• SMTP Details: Update the SMTP settings for email alerts.

SMTP Details:
- SMTP details are required to send email notifications when an alert is triggered in FileGPS.
- If SMTP authentication is required (username and password), set email_authentication to true.
- Provide the encrypted password in the password field.
PostgreSQL Database Details:
- Enter the necessary database information:
- Database Name
- Host
- Username
- Encrypted Password
- Port
- Schema Name
- The Database and SMTP details are provided by your Administrator.
- Enter the necessary database information:
Save and exit the file:
- Press ESC to exit insert mode.
- Type :wq! and press Enter.
Navigate to the scripts directory:
- Run the command:
cd ../scripts
- Run the command:
Open each script file for editing:
- Example:
vi fnr_alert_job.sh
- Example:
Update the script to include the correct paths:
pwd=$1nohup $pwd/<path to job in bin directory> $pwd/<path to config.ini in config directory> &
Example:
pwd=$1nohup $pwd/bin/fnr_alert_job $pwd/config/config.ini &

• Make similar updates to all other script files in the scripts directory.
• Save and exit each file using :wq!
5. FileGPS Rest Consumer Deployment
Before proceeding to the Rest Consumer deployment process, follow the below detailed pre-requisites
5.1 Pre-requisites:
- The Rest Consumer functions as an API that gathers data from the SFG client and transfers it to the Postgres database.
Step 1: configure config.ini
The Rest Consumer file reads configurations from the config.ini file.
Note: Provide the following details in the config.ini file:
- Host: Host/IP of the FileGPS Server
- Port:
8086(Ensure this port is allowed on the FileGPS server) - Zone ID
- SMTP Details:
- Hostname
- Port
- Username
- Password
- From Address
- Postgres Database Details:
- Database Name
- Host
- Username
- Password
- Schema
- Port
- Driver Name
5.2 Deployment steps for FileGPS Rest Consumer
Login to the server and move to the following directory using the command below.
Change the directory to the Rest_Consumer folder:
cd /home/filegps/FileGPS_APP_Release633/Rest_Consumer/
Verify File Structure: list the contents of the directory to verify the file structure.
lsorll
The directory structure should look like this:
- Rest_Consumer/
- logs/
- config.ini
- rest_consumer
- Rest_Consumer/
Update the config.ini file.
Open the config.ini file for editing:
vi config.ini
Enter insert mode to make changes:
- Press
Ito switch to insert mode.
- Press
Update the following details in the config.ini file:
- Time Zone: Change the time zone to the PCM preferred time zone (default is America/Chicago).
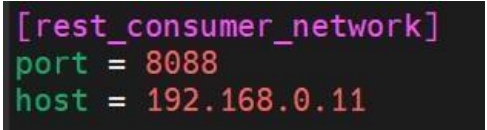
[rest_consumer_network] Section:
- Update the host and port as per your server.
Logs Path: Update the logs path to the desired location where logs should be stored.
Example: logs_path=/home/filegps/logs/

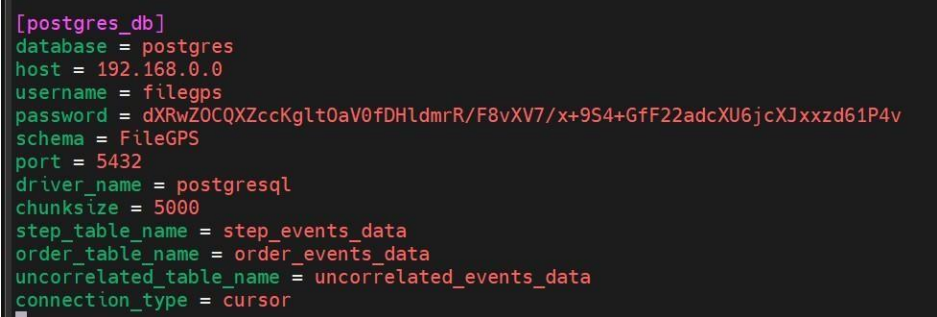
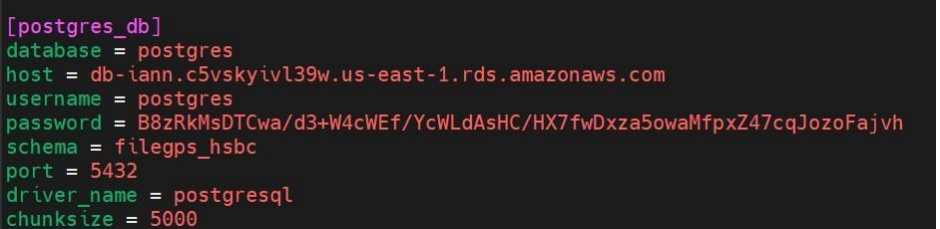
- [postgres_db] Section:
- Update the database, host, username, encrypted database password, schema, and port.
- Save and exit the file:
- Press ESC to exit insert mode.
- Type
:wq!and press Enter.
6. Running the shell script
Login to the server and navigate to
filegps_application_scipt.sh.Navigate to the
FileGPS_APP_Release633directory:cd /home/filegps/FileGPS_APP_Release633/
Run the shell script:
./filegps_application_scipt.sh /<path>/FileGPS_APP_Release633
Open the
schedulers.txtfile, take the queries one by one, and execute each query in any Postgres-supported DB tool, such as DBeaver or others, after connecting to the database.Verify Installation using logs:
- To verify FileGPS UI:
cd /home/filegps/FileGPS_APP_Release633/UI/tail -f file-gps-api.log
- To verify FileGPS UI:
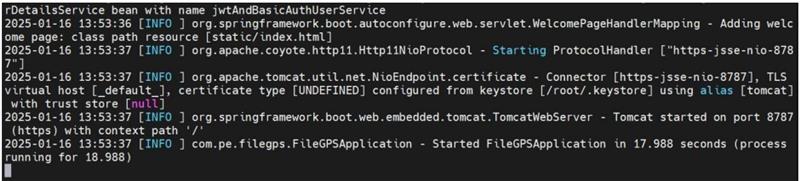
We can see the FileGPS application has successfully started.
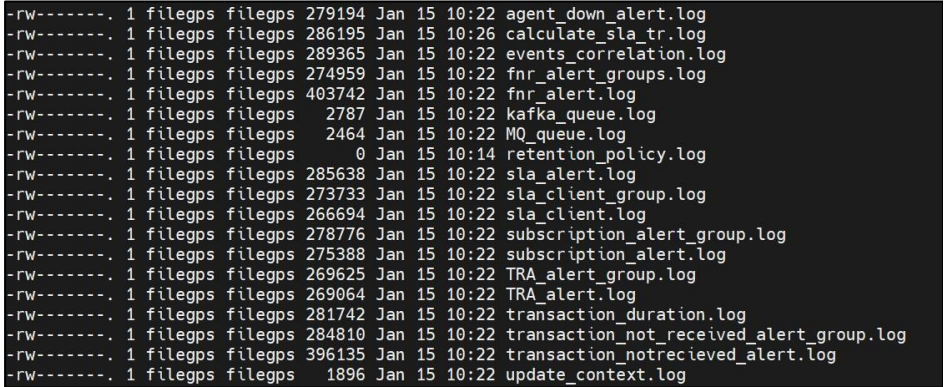
To verify FileGPS Backend:
Cmd: cd /home/filegps/FileGPS_APP_Release633/Backend/logs/ Cmd: l|
To verify FileGPS Rest Consumer:
Cmd: /home/filegps/FileGPS_APP_Release633/Rest_Consumer/logs/
Cmd: tail –f rest_consumer.log
